Action List
Scope of the Community Action List (CAL) Application
This application allows ETSI communities to create and maintain actions items and action lists using the portal.
Create a New Action Item (AI)
Actors: TB/WG/TG Chairman, Vice-Chairman and Secretary; TB support staff
In order to be able to create an AI you first need to be logged in to the portal. Click on the "create new" link in the portlet or in the CAL application itself.
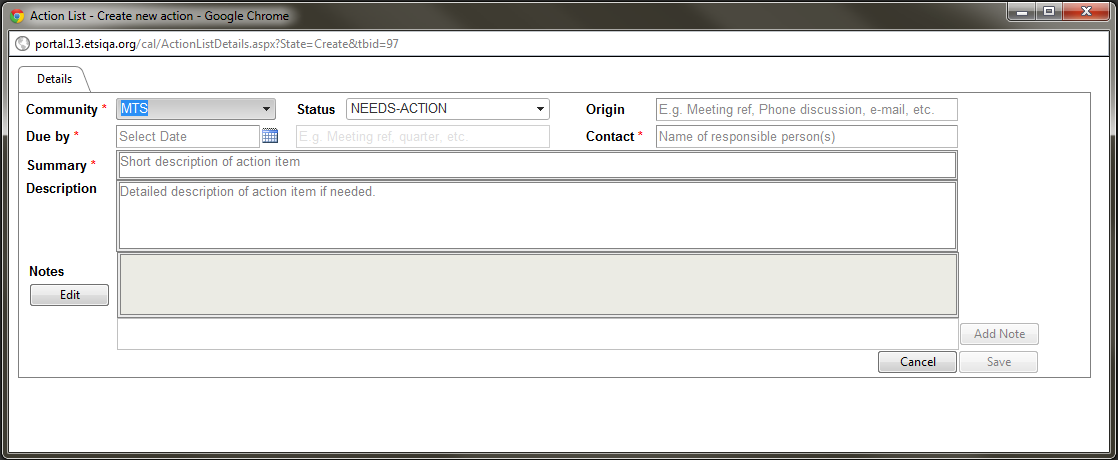
The following creation screen is displayed:
The system displays an empty form which you are asked to fill in. Some of the attributes are mandatory:
- Community: This field is mandatory and automatically shows your TB/WG and all the subgroups which belong to the parent TB. i.e. If you create an AI for TB ERM Then the system will give you the possibility to change the community to any sub-group which belong to ERM.
- Due By: This field is mandatory. This is the date when the AI is expected to be completed. Click on the calendar icon and navigate in the calendar to select the date. You have the possibility to add text in addition should you wish to add for instance the reference of the next meeting i.e. ERM#45
- Contact: This field is mandatory. Enter the name of the responsible person(s) for this AI
- Summary: This field is mandatory. Short description of the AI. You can add to this summary web links and/or email adresses
- Status: When creating an Action Item, the system put the status 'NEEDS ACTION' by default. But you can change this status to any of the other available statuses for an action:
- IN-PROCESS
- COMPLETED
- CANCELLED
- Origin: This text field can be a meeting reference (i.e. ERM#45), a phone discussion, email discussion, remote consensus...
- Description: Detailled description of the AI if needed. You can add to this description web links and/or email adresses
- Notes: This field is by default disabled, should you wish to add a note at the creation of the AI, click on the 'EDIT' button and fill in some text in the 'Notes' field.
When the action items fields are filled, click on the button ‘’SAVE’’. The system displays a creation confirmation pop-up summarising the Remote Consensus properties and the Remote Consensus portlet is refreshed with the newly created item.
