Meeting Calendar 2018
Meeting Calendar view
The Meeting Calendar service allows you to view the meetings of your chosen ETSI Body and/or its Sub-Groups, according to the selection you have previously made (see Body Selector).
Furthermore, this service allows you to register / de-register for some of the meetings, contribute to a given meeting and search for a subset of meetings.
In the list of meetings, the cell options are displayed and enabled only when you are authorised to execute the corresponding action. Therefore, you must first login if you want to proceed with some of the actions.
The page is divided into 3 main parts:
- The top part displays the list of meetings you have already registered to
- The middle part displays the list of your selected meetings
- The bottom part displays the full list of searched meetings
In the full list of searched meetings, frequently-used search, filter and sort options are available by default.
All meetings found are ordered by date. You can then sort the list by Date, Location or Working Groups.
Reset filter button resets all filtering criteria to their default value. This is convenient when you have changed several criteria in a row.
PIC1
Search/Filter in the Meeting Calendar on the ETSI Portal home page
On the ETSI home portal, the Meeting Calendar show all meetings of all TBs taking place over a given period. Meetings are sorted by ascending date order.

Searching within a date range
By default, meetings are displayed for a period of one month. It shows on-going meetings within the next month.
You can also choose a “6 months” or “1 year” period.
With the “More options” button , you can change this period to a precise date range, using From and To fields.
Note that this search takes into account the other filtering fields.
Searching with a meeting reference or identifier
When the “More options” pane is expanded, you can search for a meeting using its Meeting Reference or its Meeting Identifier
These Meeting Reference or its Meeting Identifier correspond to the values that you can find in the Meeting Information window.
An exact match is needed, so the search will show a maximum of one meeting.
Note that this search ignores the date range fields, but takes into account the filtering fields.
Searching for meetings ended within the last month
You can search for meeting that have ended within the last month by clicking the “Ended” choice.
Note that this search takes into account the other filtering fields.
Filtering with the working group
You can filter meetings linked to a working group.
First you select the period for which you want to make a search.
Then you select the working group in the “Working groups” drop-down list.
Filtering with the location
You can filter meetings taking place in a given location.
First you select the period for which you want to make a search.
Then you select the location in the “Location” drop-down list.
Filtering with a kind of meeting
When the “More options” pane is expanded, you can filter meetings matching a kind of meeting. Three filter values are available:
- All kinds of meetings are displayed (default search)
- Face to face meetings are displayed
- Online meetings are displayed First you select the period for which you want to make a search. Then you select the “Kind of meeting” option. Resetting the filters When you combine the filters, the filters will be evaluated in the order you set the filters, and you may be confused with the resulting list of meetings.
You can click the “Reset filters” button that will reset all fields to their default value.
Resetting the filters
When you combine the filters, the filters will be evaluated in the order you set the filters, and you may be confused with the resulting list of meetings.
You can click the “Reset filters” button that will reset all fields to their default value.
On the ETSI home portal, the Meeting Calendar show by default meetings for a period of two years.
Meetings are grouped by Working Groups or Task Groups (if any) in an alphabetical order, and then listed by meeting date.

Note: To view only meeting groups of a given Task Group /Working Group, select the TG/WG in the top banner of the ETSI portal.
Browsing with a Date
By default, meetings are displayed for a period of two years.
It is also possible to enter a Start date in the following format YYYY-MM-DD or click on the ![]() to select the starting date and ending date of your query.
to select the starting date and ending date of your query.
Click OK to validate the dates and refresh the portlet. The meeting calendar will display meetings starting on or after this date.
All meetings are listed in alphabetical order by TB and by dates.
Registration to ETSI Member Meetings
The registration column contains:
- You can register to a meeting using the
 button. This button is visible only if you are allowed to register, and if the registration is open.
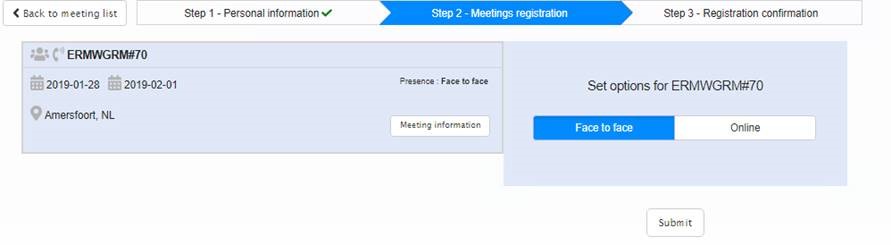
 - Clicking this button will open up a window that shows that the registration takes place in three steps:
- Step 1: it asks for your personal information. This step is skipped when you are connected.
- Step 2: it asks for your presence option: Face to face or Online. By default it is set to Face to face.
- Step 3: it confirms that you are registered.
- Once you are registered, the meeting calendar window is updated:
- The concerned meeting moves up to your list of registered meetings
- The registration icon is replaced with a deregistration icon on the meeting list. You can update your registration options by selecting the “Update my registration” menu item available from the ellipsis icon.

Registration to Public Meetings
You can register to a meeting using the ![]() button. This button is visible only if the registration is open.
button. This button is visible only if the registration is open.
Clicking this button will open up a window that shows that the registration takes place in three steps.
First it asks for your personal information. You need to enter your email address.
- It asks for your personal information. This step is described below.
- It asks for your presence option: Face to face or Online. By default, it is set to Face to face.
- It confirms that you are registered.
To fill your personal information, you must first enter your email address:
You will receive an email to confirm this is a valid address
Once confirmed, you get back to this first registration step.
Fill your personal information and tick the box.
Once you are registered, you receive a confirmation.
Keep this mail preciously, as it includes an “Update my Registration” link in case you want to update your registration details.
It will bring you back to the first registration step.
You can then proceed with the next registration step as described above.