Contributions old: Difference between revisions
m (Mangion moved page Contributions to Contributions old) |
|||
| (247 intermediate revisions by 4 users not shown) | |||
| Line 3: | Line 3: | ||
In order to access the Contribution application you first need to be logged in to the ETSI portal (http://portal.etsi.org). | In order to access the Contribution application you first need to be logged in to the ETSI portal (http://portal.etsi.org). | ||
You have two ways of accessing this application: | You have two ways of accessing this application: | ||
1st way | '''1st way:''' | ||
Select a Technical body/Working Group/Task Group. On this page you will see | :Select a Technical body/Working Group/Task Group. On this page you will see the [[Contributions_Portlet|Contributions portlet]] appearing. On the top of this portlet you see two links: | ||
- | :* New Contribution - to unfold the menu and choose the type of the contribution | ||
- | :* Full view - to access the contribution list in the application. | ||
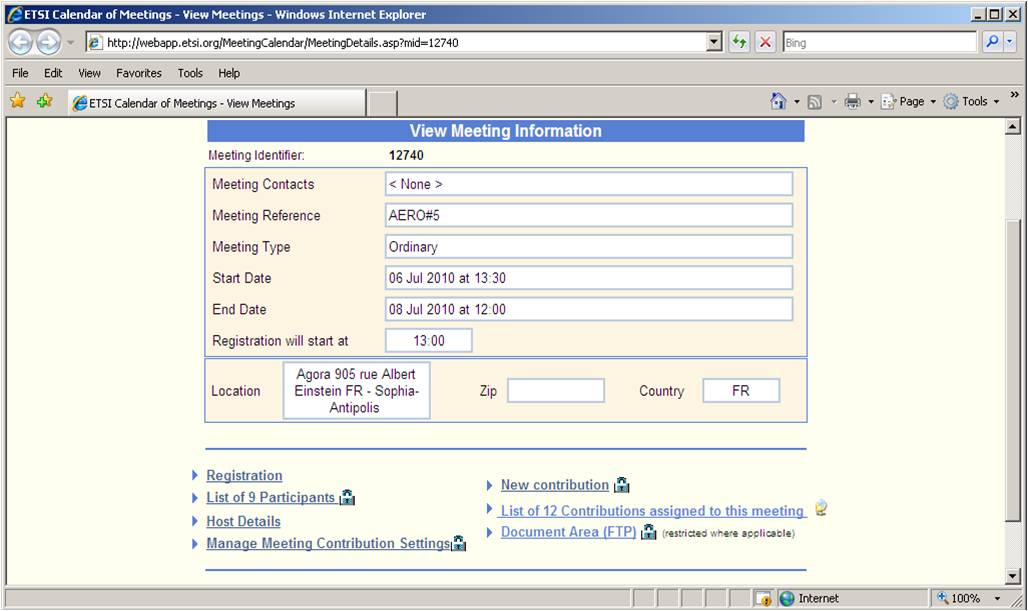
Go on the "Meeting Calendar" Portlet and select the meeting you wish to contribute to. The system displays the following meeting details page. | '''2nd way''' | ||
: Go on the "Meeting Calendar" Portlet and select the meeting you wish to contribute to. The system displays the following meeting details page. | |||
[[File:Meeting_details.jpg|450px]] | [[File:Meeting_details.jpg|450px]] | ||
| Line 24: | Line 25: | ||
On this above screen you can: | On this above screen you can: | ||
:* Create a New contribution | |||
:* View the contributions that have been attached to this meeting | |||
:* Access the docbox area of all contributions attached to this Technical Body | |||
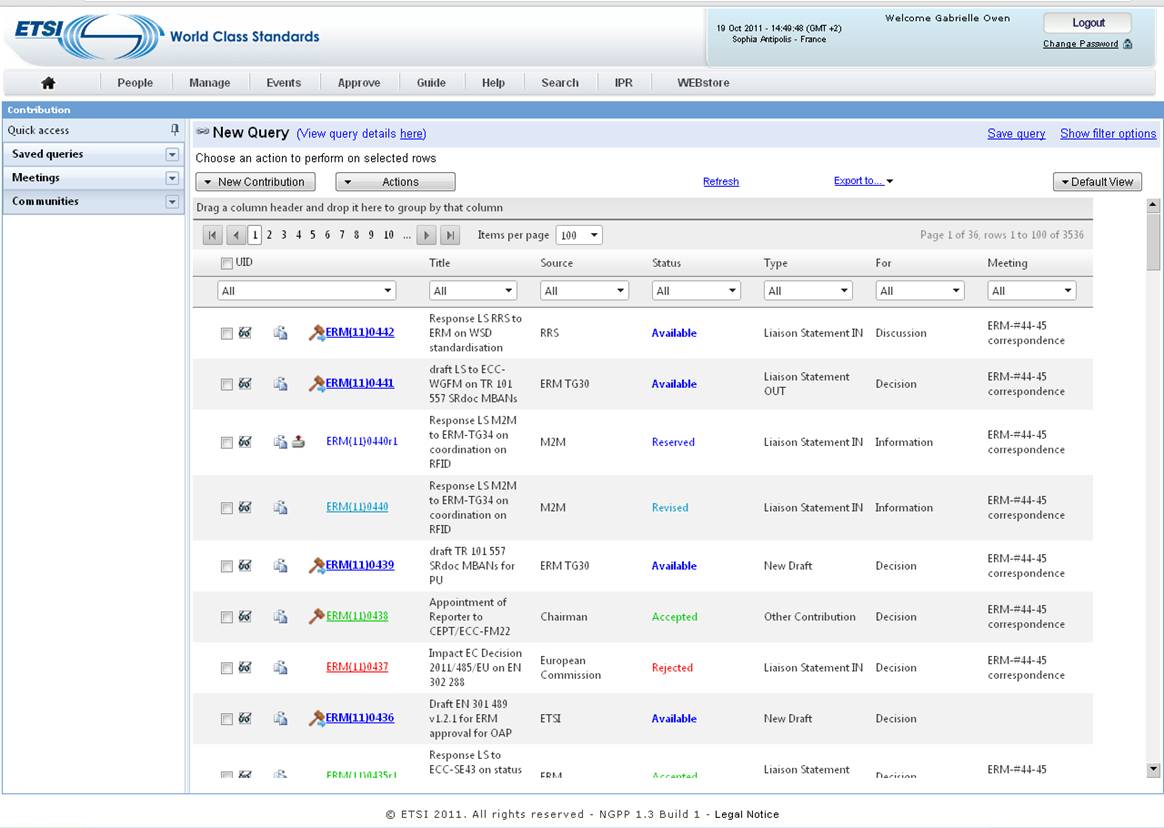
In the full list view of the contributions; statuses and UID are now displayed in different colours depending on their status: i.e. the reserved status is in blue, the accepted status in green and rejected status in red. | |||
[[File:Query_name.JPG|550px | [[File:Query_name.JPG|550px|Contributions full list view]] | ||
On the left side of the above screen, there is a new quick access panel divided in 3 parts: | |||
:* You can access your saved queries | |||
:* You can have direct access to contributions which have been linked to recent, on-going and future meetings | |||
:* You can also have direct access to contributions associated to any committees | |||
This quick access panel can be collapsed by clicking on [[File:Picture2.jpg|10px]] | |||
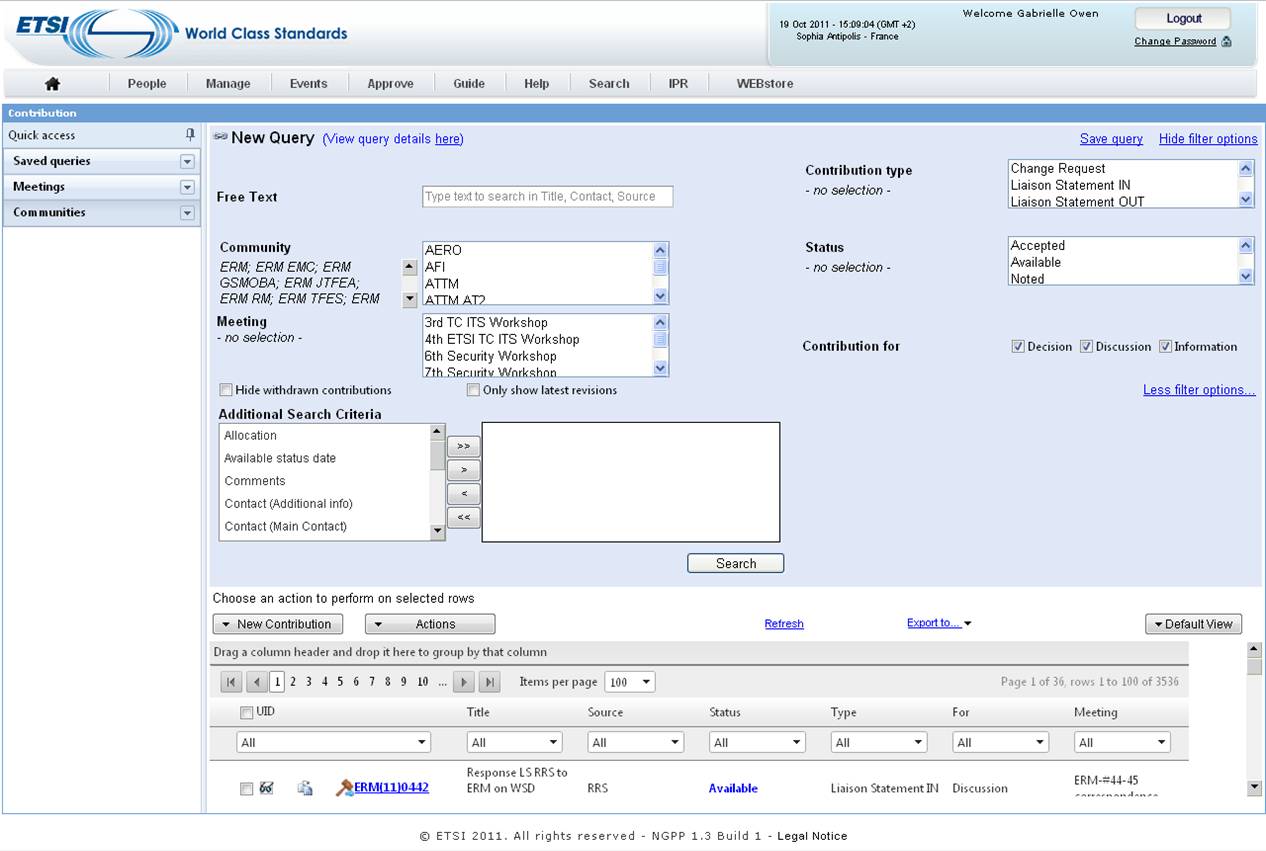
You may also use the new search panel to retrieve a set of contributions. To use this search options click on the link ''show filter options'' on the up right side of the screen. | |||
[[File:Picture4.jpg|550px]] | |||
You can customize your search by providing data to the most common used filter options. Such as free text, selected community, Meeting, contribution type, status, contribution for... | |||
You also have the possibility to perform your search using advanced filters options. To expand the search options click on the link ''More filter Options'' | |||
[[File:More_filter.jpg|550px]] | |||
Select one criterion and click on the [[File:Superior.JPG|30px]] button in order to move it from the "Available Criteria list" to the “Selected Criteria list”, repeat the action should you wish to add other criteria. To select all criteria at once click on [[File:Double_superior.JPG|30px]]. When your selection is finished click on Search. | |||
The system will now ask you to indicate the value for each criterion. | |||
Note: The criterion value and the operator selection depend on the selected search criteria. It can be value selection from a list, value selection from input date fields (using calendar), or free text input. | |||
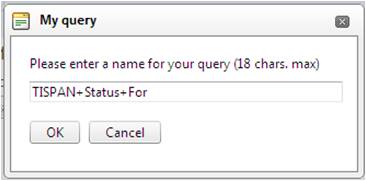
To save your query and being able to retrieve your favourite ones each time you log in the portal click on the link ''Save query'' at the top of the screen, a pop up window will open asking you the name of your query, fill in the name of your query and click OK: | |||
To save your query and being able to retrieve your favourite ones each time you log in the portal click on | |||
[[File:Save_Query.jpg|300px|center]] | [[File:Save_Query.jpg|300px|center]] | ||
| Line 78: | Line 79: | ||
The custom query is saved and appears on the left part of the screen under "My queries". | The custom query is saved and appears on the left part of the screen under "My queries". | ||
Update a saved query: | Update a saved query: | ||
To update a saved query, click on one of them under | To update a saved query, click on one of them under "Saved queries" and apply your changes, then click the link ''Save Query''. | ||
=== | ===Default view=== | ||
You may customize your own contribution list view format. To do so, click on the button [Default view] at the top right of the contribution list which displays the list predefined views. | |||
Note: A view format is a selection of columns of the result grid. It also contains data about the column order, sort, grouping, and width. | Note: A view format is a selection of columns of the result grid. It also contains data about the column order, sort, grouping, and width. | ||
[[File: | [[File:Default_view.jpg|250px|center]] | ||
When selecting the item "Edit view | When selecting the item "Edit view " from the menu as shown in print screen above, a pop-up opens which allows you to customize your preferred view by defining the columns you would like to see displayed in the result grid of contributions. You can also select the order in which the columns are displayed. | ||
See figure below: | See figure below: | ||
| Line 112: | Line 109: | ||
To order your selected columns use the up and down button on the right of the pop-up screen. | To order your selected columns use the up and down button on the right of the pop-up screen. | ||
== | ==Creating a Contribution== | ||
'''IMPORTANT: Only logged users can reserve/upload contributions.''' | |||
There are two places on the portal from which a user can reserve a contribution: | |||
* From the Portal [[Contributions_Portlet|Contributions tab]] by clicking on the "New contribution" link and selecting a contribution type in the drop-down menu. | |||
[[File:Contribution_Portlet.jpg|600px]] | |||
* From the Contribution application itself by clicking on "New contribution" button. | |||
[[File: | [[File:New_contribution.jpg|500px]] | ||
=== Contributing a Meeting Agenda, a Meeting Report, a Change Request, a Liaison Statement, or an "Other contribution" type === | |||
<html> | |||
<iframe width="420" height="345" src="http://www.youtube.com/embed/UoMe7aXqXPg" frameborder="0" allowfullscreen></iframe> | |||
</html> | |||
The | The '''Contribution Creation''' screen opens on the '''General''' tab. | ||
==== The General tab ==== | |||
[[File:Contribution_Creation.jpg|450px]] | [[File:Contribution_Creation.jpg|450px]] | ||
Several attributes need to filled, these attributes will allow categorization and retrieval of contribution documents. | |||
:* '''Title''': free text | |||
:* '''Source''': When clicking on the "Change" button near the field "Source", a pop-up "'''Manage Source'''" opens (see figure below). 4 different types of Source are available: | |||
:** Organisations: a company allowed to contribute to the technical work of a committee | |||
:** ETSI committees: an active ETSI (sub-)Technical Body | |||
:** Roles: Chairman, Vice-Chairman, Secretary, Rapporteur, WG/TG Chairman, ETSI support | |||
:** Other: free text describing a role not matching one of the above categories | |||
: Note: there can be more than one source for a contribution (example: company A, company B, and company C) yet all sources of a contribution have to be of the same type. | |||
[[File:Manage_Source.jpg|450px|center]] | |||
:* '''Main Contact''': Is set automatically to the submitter's name of the contribution this field can be enriched by an additional contact in the text field. | |||
:* '''Input for Committee''': group to which the contribution will be submitted | |||
:* '''Contribution for''': to inform the committee whether your contribution is '''for Decision''', '''for Discussion''', or '''Information''' | |||
:: In case your contribution is for decision you then have to describe the expected decision by filling in the "'''Decision/Action requested'''" box | |||
:* '''Meeting - Allocation''': | |||
You can assign a contribution to ONE meeting (and one allocation) by clicking on the "Change" button next to Meeting - Allocation. | |||
Contributions assigned to a meeting are then listed in the Meeting's Document list. | |||
[[File:Attach_meeting.jpg|450px|center]] | |||
The system retrieves all recent, ongoing and future meetings for the related committee (including joint meetings). | |||
There | There is also the possibility to attach your contribution to an allocation (if some exists). Those allocations could be for instance agenda items. | ||
Selecting a meeting (and an allocation) in the list(s) will display further information in the grey box below. Once the correct selection is made, you can ssign the contribution to your selected meeting with the [Assign] button. The assignment will be effective after saving your contribution. | |||
You can | :* '''Related WIs or deliverables''': You can also attach your contribution to an existing Work Items or deliverable. click on the ''Change'' button | ||
[[File:Related_WI.jpg|450px]] | |||
The system displays all the work items attached to the committee you contribute to, the text field allow you to filter the content of the box or to search for other ETSI work items. It is possible to select more than one work item. Select one Work item in the displayed list and click on the "Add" button, the selected work item appears on the left part of the pop-up with a red cross which allow you to remove it. then click on the "Done" button. | |||
:* '''Abstract''': Free text summarizing the content of the contribution | |||
You then have the possibility to link your contribution to a meeting. | |||
==== The Related Contributions tab ==== | |||
You can also refer to one or several other contributions and link them to the contribution you are submitting. | |||
: This feature can be used (for example) to place your contribution in the context of other ones, and help its understanding. | |||
: This feature could also be used to point the attention of the reader to a contribution of another committee which you consider as for interest as well... | |||
To do so, the selection mechanism is similar as for "Add related Work Item", except that instead of linking WIs you are linking other contributions. | |||
==== Saving your contribution ==== | |||
Your contribution can now been saved. | |||
Note: As soon as all the mandatory fields from the General Tab have been filled in, the contribution can be Saved(except for ''New WI proposals'' and ''New Drafts''). | |||
[[File: | Once you click on the Save button, it will receive a Unique contribution Identifier (UID) and a new record will be added to the contribution database. | ||
Your contribution appears now with status '''RESERVED'''. | |||
[[File:Contribution_reserved.jpg|550px]] | |||
'''The next steps are:''' | |||
* Download the Cover Page for your contribution with the "'''Get cover page'''" button: the system will PUSH a contribution template pre-filled with the information you have entered in the General Tab. | |||
<html> | |||
<iframe width="420" height="345" src="http://www.youtube.com/embed/g9G45s0W-uM" frameborder="0" allowfullscreen></iframe> | |||
</html> | |||
* Edit the contribution details and update | |||
<html> | |||
<iframe width="420" height="345" src="http://www.youtube.com/embed/UehJphAUJyk" frameborder="0" allowfullscreen></iframe> | |||
</html> | |||
* Upload the final contribution with the "'''make available'''" button | |||
<html> | |||
<iframe width="420" height="345" src="http://www.youtube.com/embed/nTQ420t1w9A" frameborder="0" allowfullscreen></iframe> | |||
</html> | |||
You can Make available a contribution from the detailled view of the contribution (accessible from the portlet and from the full list view) by clicking on the "Upload/Make Available" button. | |||
Or you can Upload a contribution from the full list view by clicking on the [upload] Icon on the line of the RESERVED contribution: | |||
[[File:Make_ava_from_list.jpg|550px]] | |||
==== Revising a contribution ==== | |||
<html> | |||
<iframe width="420" height="345" src="http://www.youtube.com/embed/Gs7Hwl-AttM" frameborder="0" allowfullscreen></iframe> | |||
</html> | |||
You can Revise a contribution from the detailled view of the contribution (accessible from the portlet and from the full list view) by clicking on the "Revise" button. | |||
Or you can Revise a contribution from the full list view by clicking on the [Revise] Icon on the line of the AVAILABLE or NOTED contribution: | |||
[[File:Revise.jpg|550px]] | |||
===Contribute/Create a New Work Item Proposal=== | |||
To create a New Work Item (NWI) proposal, log in the ETSI portal with your EOL account and click on the Technical Body you intend to contribute to. | |||
[[File: | [[File: Login_banner.png|700px|center]] | ||
In the Contributions portlet, click on "New contribution" and select the type "New WI Proposal / Description" from the drop down list. | |||
[[File: Newcontrib_droplist.png|550px|center]] | |||
To create a NWI proposal, you first need to fill in the attributes from the general tab: | To create a NWI proposal, you first need to fill in the attributes from the general tab: | ||
[[File: | [[File: NWIgeneral_tab.png|500px|center]] | ||
After having filled in the attributes from this tab, then click on "WI Details" tab. | |||
This tab reflects the content of the New Work Item sheet you are used to utilize. | |||
[[File: WIdetails_complete_NWI.PNG|600px|center]] | |||
Fill in the following mandatory attributes in order to present the proposal to the community: | |||
:* ‘‘‘WI committee’’’ | |||
:* ‘‘‘Deliverable’’’ | |||
: Select either a New Work Item or Revision of an Existing Work Item. | |||
:* ‘‘‘Formal Title 1 and 2’’’ | |||
: If it is a Revision, the system will retrieve most information from the ETSI Work Programme. | |||
:* ‘‘‘Scope of the work’’’ | |||
You can present your contribution to the chosen Committee with only those 4 fields filled in. Nevertheless you will need to inform the system about the other fields in order to be able to "accept" this Work Item. | |||
In addition to the above listed fields, the following fields are mandatory to pass the Work Item proposal from the status "available" to "accepted": | |||
:* ‘‘‘Standard type’’’ | |||
: Choose in the drop down list from the six ETSI deliverable types: EN, TR, TS, EG, ES, GS | |||
:* ‘‘‘To be published as version’’’ | |||
: If it is a New Work Item, then by default, the version will be 1.1.1 | |||
:* ‘‘‘Requested WI reference’’’ | |||
: The system will automatically attribute the next available number. | |||
:* ‘‘‘Rapporteur’’’ | |||
: Enter the name of the rapporteur, the system will propose matching results and complete the entry automatically. | |||
:* ‘‘‘Supporting Companies’’’ | |||
: A minimum of 4 supporting companies is requested. Click on the button “Add/Remove” and enter the name in the new window. Double click to select and add the company. The company’s details appear at the bottom. When done, click “Done” to save the selection and close the window. | |||
[[File: Add_supp_orga.PNG|450px|center]] | |||
:* ‘‘‘Schedule’’’ | |||
: A NWI proposal needs at least the TB adoption, WG and TB approval dates in the schedule in order to be accepted. | |||
: ‘‘‘Note: For deliverable type EN’’’, an extra line will appear. Select the Procedure, whether or not it is a Harmonized Standard and Mandate if applicable. | |||
:* ‘‘‘Keywords’’’ | |||
: To select the Keywords, click on “Add/Remove”. Search the keywords and add them with a double click. Click “Done” to save the selection and close the window. | |||
‘‘‘IMPORANT NOTE: If this a Revision of an existing Work Item’’’, then you can enter the ETSI number (e.g. EN 383 001) or the reference of the Work Item to be revised (e.g. DEN/TISPAN-03008) and the system will retrieve all the information available from the Work Programme. | |||
Example of a NWI revision: | |||
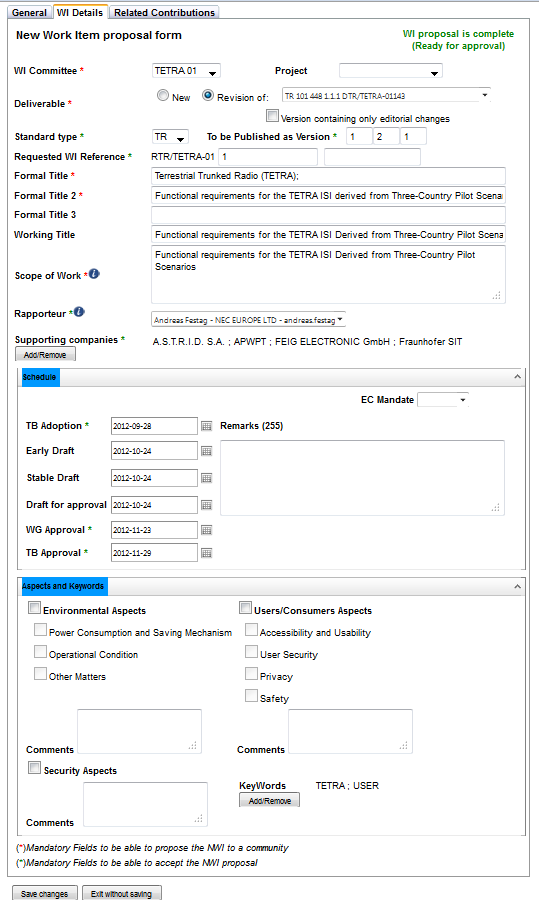
[[File:WIdetails_complete_revision.PNG|450px|center]] | |||
==== Check your Work Item Proposal ==== | |||
During the creation of the Work Item Proposal, the system displays a warning on the top right corner of the WI details tab. | |||
It will display “WI proposal is NOT READY” until all the mandatory fields necessary to accept the proposal are filled in. You may mouse over this warning to see what information is missing. | |||
[[File:Warning_with_info.png|400px|center]] | |||
The warning is refreshed automatically. | |||
Once the Work Item is complete and ready for approval, the system will display the following warning: | |||
[[File:Warning_green.PNG|550px|center]] | |||
To save your proposal, click on the "Save changes" button, at the bottom of the window. The system retrieves your contribution details. | |||
: '''If the proposal is incomplete:''' | |||
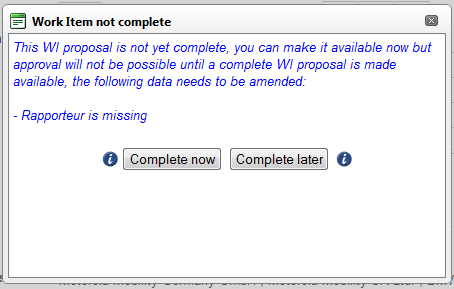
: You may leave your contribution in the "reserved" status and complete it later on. Click then on “Complete later”. | |||
[[File:WI_not_complete.PNG|350px|center]] | |||
: '''If the proposal is complete:''' | |||
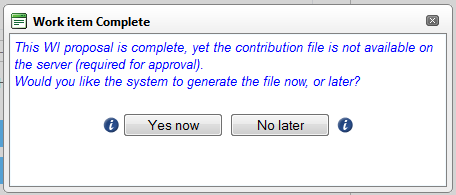
: You may leave your contribution in the "reserved" status and make it available later on. Click then on “No later”. | |||
[[File:Pop_up_save_complete.PNG|350px|center]] | |||
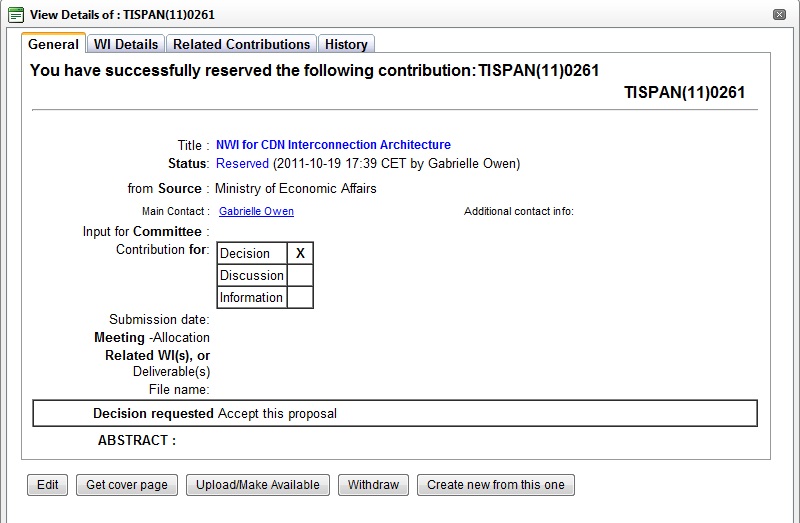
In either case, you will see a confirmation that you contribution has been reserved, with the contribution number allocated. | |||
[[File:Confirmation_reserve.jpg|550px|center]] | |||
====Make available a Work Item Proposal==== | |||
You can make available a Work Item proposal which is in "Reserved" Status. | |||
To make it available you need to proceed to the upload of the contribution which is done automatically for this type of contribution. | |||
NOTE: For the Work Item Proposal Contribution, there is no need to get cover page as the system will take all data and generate it automatically. | |||
There are two ways of making available a New Work Item Proposal. | |||
: '''From the “Save changes” button''' | |||
: If you wish to make your proposal right away, click “Yes now”. | |||
[[File:Pop_up_save_complete.PNG|350px|center]] | |||
You will be redirected to the following screen. | |||
[[File:Automatic_generation.jpg|450px|center]] | |||
: '''From the reservation confirmation screen''' | |||
[[File:Confirmation_reserve.jpg|450px|center]] | |||
Click on "Upload/Make available", a pop-up is displayed | |||
[[File:Automatic_generation.jpg|450px|center]] | |||
Select if you wish to upload a cover page from your computer or if you want it to be generated by the system itself and then click on "Make Available" and the system will generate a zip file with the cover page and the Work Item sheet. | |||
Your New Work Item proposal is now in status "Available". | |||
[[File:NWIavailable.png|550px|center]] | |||
''At this stage, updating the proposal is still possible, however it requires to'' [Revise] ''the contribution.'' | |||
===== The Preliminary Work Item number (PWI) ===== | |||
Once a NWI contribution is reserved and or made available to the community, a Preliminary Work Item number (PWI) is attributed. It is the identification number of the Work Item until it is approved at the Technical Body level. | |||
The PWI number consists of the following: | |||
:::::: '''“PWI_TBname_Year+sequence number_version”''' | |||
(For example, PWI_TETRA01_1204_1 is a proposed Work Item to TETRA WG1, the 4th proposal in 2012 and it is currently version 1 of the proposal). | |||
That PWI number is visible on top of the WI Details tab in the NWI proposal: | |||
[[File:PWI_WI_details_tab.PNG|350px|center]] | |||
It can also be found in the contribution file, in the New Work Item sheet: | |||
[[File:PWI_WI_sheet.png|500px|center]] | |||
====Change the status of a contribution of type NWI proposal==== | |||
To change the status of the contribution, go the Contribution portlet. | |||
Click on the [[File:Glasses_icon.PNG]] on the line of your contribution. This will open the details of the contribution. | |||
[[File:Status_buttons.png|550px|center]] | |||
There are four changes possible changes to the status: | |||
: '''Accept''' | |||
: '''Reject''' | |||
: '''Note ''' | |||
: '''Withdraw''' | |||
Click on the appropriate status button. A pop-up will open allowing you to enter some comments | |||
[[File:Status_confirm_popup.png|350px|center]] | |||
Click “OK”. The status is updated in the General tab of your contribution: | |||
[[File:Gen_tab_Accepted_status.png|550px|center]] | |||
From this same screen, you may progress the Work Item to the parent Technical Body for adoption. | |||
See description under section [[Contributions#Progress_the_New_Work_Item_to_the_Technical_Body|Progress the New Work Item to Technical Body]] of the Contribution application helpfiles. | |||
==== Progress the New Work Item to the Technical Body ==== | |||
Should you have created a New Work Item at Working Group/Task Group level and got it approved by this WG/TG; you will need to get it approved by the Parent Technical Body. | |||
To do that click on the [[File:Glasses_icon.PNG]] in the contribution application for the concerned NWI proposal. | |||
In the contribution General tab, click on [[File:Submit_tbappr_button.PNG|170px]] | |||
A drop down list appears with all the upcoming meeting of the parent Technical Body. Select the meeting the contribution should be attached to, or “No meeting” if applicable. | |||
[[File: | [[File:Submit_tb_approval.png|550px|center]] | ||
'''Warning:''' beware there is no confirmation requested. Once the meeting selected (or “No meeting”), the contribution will be submitted right away. | |||
===Contributing a draft=== | |||
Contributing a draft means '''embedding an available draft in a contribution''' and contributing that contribution to the community for decision, for discussion, or for information. The first step consists in uploading a draft via the Latest Draft application, the second step then consists in embedding the drat in a contribution. This second step is necessary, especially when the rapporteur wants a specific version of his draft to be discussed and/or approved by the community. | |||
<small>Note that after publication of a Work Item as an ETSI deliverable, drafts are no longer accessible (usually deleted), whereas contributions are never deleted.</small> | |||
There are '''two ways''' of embedding a draft in a contribution and contributing it: | |||
[[ | *The easiest way is to start '''from the Latest Drafts application''', either by uploading a new draft (with the [[Image:update.gif|15px||alt=Upload icon|Upload icon]] icon) and contributing it on-the-fly, or by contributing and already-available draft (with the [[Image:Contribute.gif|15px||alt=Contribute draft|Contribute draft]] icon). | ||
*The second way starts '''from the Contribution application'''. This approach is <span style=color:red>'''recommended when contributing a Working Group draft to its parent group''' </span> (Example: WG draft contributed to plenary for approval). | |||
====From the Latest Draft application==== | |||
The Latest Draft application is available on every Technical Body's portal page, from there, you will upload and/or contribute a draft in a few clicks. Follow the instructions in the [[Latest_Drafts#Latest_Draft_Screen_Content| Latest Draft wiki]]. | |||
* If you just uploaded a new draft, the successful upload confirmation message will prompt you to [[File:Contribute_draft_now_button.PNG]]. | |||
[[File:Draft_upload_confirmation.png|right|500px]] | |||
You can | * You can also contribute an available draft at any time by clicking on the [[Image:Contribute.gif|15px||alt=Contribute draft|Contribute draft]] icon next to the relevant version on the [[Latest_Drafts#Latest_Draft_Screen_Content|Latest Draft screen]]. | ||
After clicking on the [CONTRIBUTE this draft version now] button or on a [[Image:Contribute.gif|15px||alt=Contribute draft|Contribute draft]] icon, the portal will open a "NEW CONTRIBUTION" window. On that window you will notice that the contribution type is set to ''New Draft'' and that a specific '''Draft''' tab has been inserted after the '''General''' tab. | |||
The ''New Draft''tab has already been filled with the draft's meta-data (Committee, reference, version), and in the '''General''' tab most fields have already been pre-filled as well. | |||
You still have to: | |||
*Decide if you contribute the draft for '''Decision''', for '''Discussion''', or for '''Information'''. | |||
You may also: | |||
*Link the contribution to a meeting | |||
*Add an abstract to your contribution | |||
Once this done, click on the '''[Save Changes]''' button to reserve the contribution, and then on the '''[Upload/Make Available]''' one. | |||
An intermediate pop-up will appear: just follow the instructions and acknowledge, at this this stage the portal has enough information to create the contribution file and upload it without any further action from you. | |||
====From the Contribution application==== | |||
This approach is recommended when contributing a Working Group draft to its parent group (Example: a Working Group draft contributed to plenary for approval). | |||
[[File:Contribution_Portlet.jpg|600px|center]] | |||
* From the Portal [[Contributions_Portlet|Contributions application]] click on the "New contribution" link and select "New Draft" | |||
An empty contribution-creation-window will appear, this window has a specific '''[Draft]''' tab (which does not appear when reserving other types of contributions). | |||
[ | ⇒ '''Before anything else''', select the appropriate "Input for committee" in the '''[General]''' tab of the contribution-creation-window. This is the committee in which the contribution will be created . | ||
'''Important:''' when a Working Group draft will be contributed to the parent group (i.e. to the plenary) select the parent group here, not the Working Group. | |||
[[File:Draft_tab_from_contrib_app.png|right|500px]] | |||
'''Then''', switch to the '''[Draft]''' tab and select: | |||
:* The '''WI committee''' (or Working Group) from which the draft is issued | |||
:* The '''WI reference''': drop-down list of all active WIs belonging to the selected committee. | |||
:* The appropriate '''Version''': drop-down list displaying all available draft versions for the selected WI. | |||
[ | Go back to the '''[General]''' Tab → the title field should have been automatically filled with meta-data retrieved from the draft you selected. | ||
Fill-in the remaining fields: choose whether your draft is for information, discussion or decision, type free text in the abstract box and allocate your contribution to a meeting. | |||
[[File: | When done, click on the [Save Changes] button to reserve a contribution number and then on the [[File:Upload_make_avail_button.PNG]] one to upload the contribution. | ||
An intermediate pop-up may appear: just follow the instructions and acknowledge, at this this stage the portal has enough information to create the contribution file and upload it without any further action from you. | |||
Latest revision as of 14:26, 21 December 2018
CONTRIBUTION SEARCH
In order to access the Contribution application you first need to be logged in to the ETSI portal (http://portal.etsi.org).
You have two ways of accessing this application:
1st way:
- Select a Technical body/Working Group/Task Group. On this page you will see the Contributions portlet appearing. On the top of this portlet you see two links:
- New Contribution - to unfold the menu and choose the type of the contribution
- Full view - to access the contribution list in the application.
2nd way
- Go on the "Meeting Calendar" Portlet and select the meeting you wish to contribute to. The system displays the following meeting details page.
On this above screen you can:
- Create a New contribution
- View the contributions that have been attached to this meeting
- Access the docbox area of all contributions attached to this Technical Body
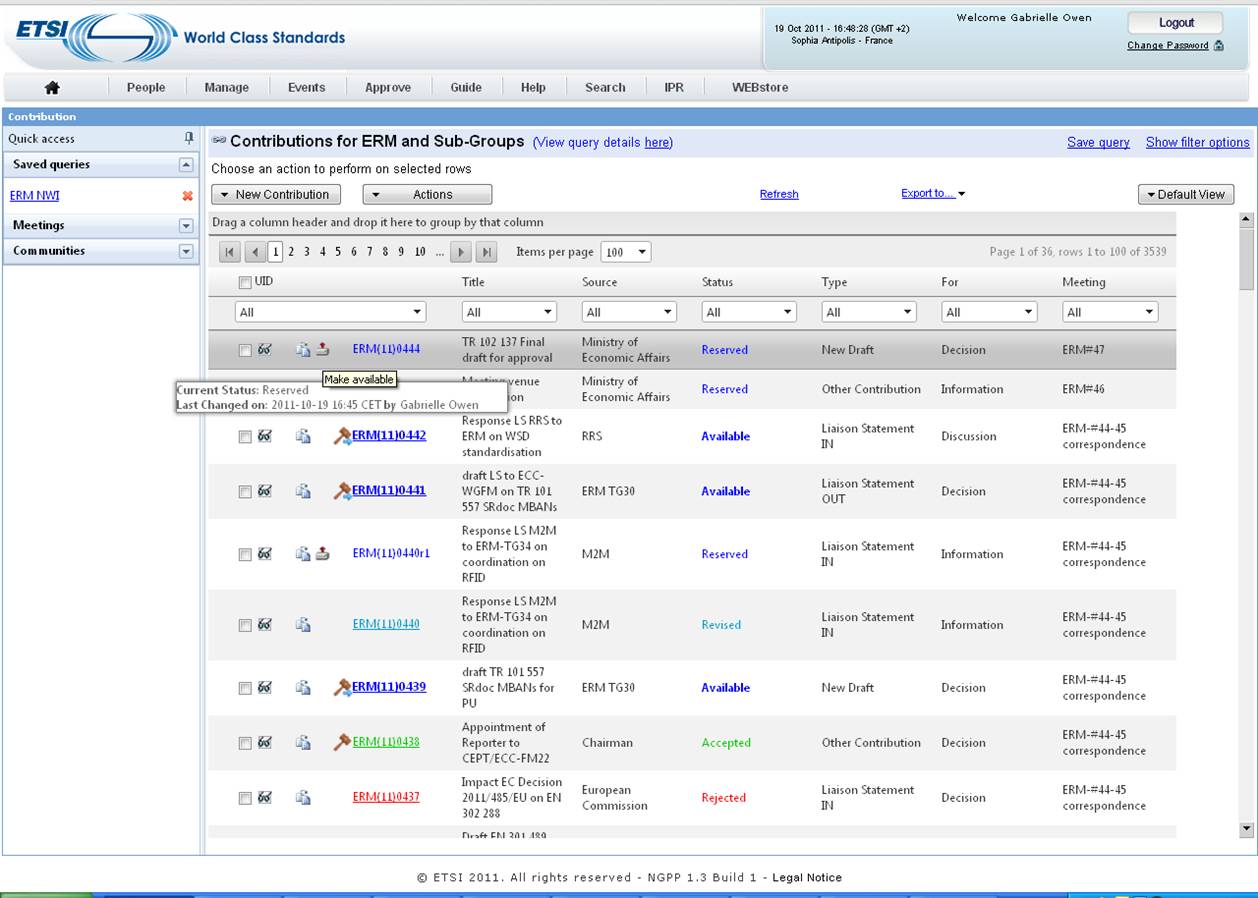
In the full list view of the contributions; statuses and UID are now displayed in different colours depending on their status: i.e. the reserved status is in blue, the accepted status in green and rejected status in red.
On the left side of the above screen, there is a new quick access panel divided in 3 parts:
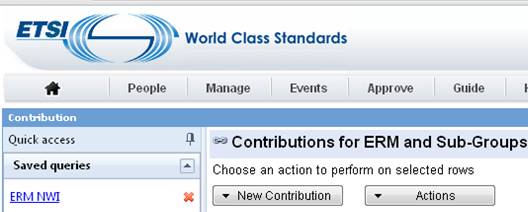
- You can access your saved queries
- You can have direct access to contributions which have been linked to recent, on-going and future meetings
- You can also have direct access to contributions associated to any committees
This quick access panel can be collapsed by clicking on ![]()
You may also use the new search panel to retrieve a set of contributions. To use this search options click on the link show filter options on the up right side of the screen.
You can customize your search by providing data to the most common used filter options. Such as free text, selected community, Meeting, contribution type, status, contribution for...
You also have the possibility to perform your search using advanced filters options. To expand the search options click on the link More filter Options
Select one criterion and click on the button in order to move it from the "Available Criteria list" to the “Selected Criteria list”, repeat the action should you wish to add other criteria. To select all criteria at once click on
. When your selection is finished click on Search.
The system will now ask you to indicate the value for each criterion.
Note: The criterion value and the operator selection depend on the selected search criteria. It can be value selection from a list, value selection from input date fields (using calendar), or free text input.
To save your query and being able to retrieve your favourite ones each time you log in the portal click on the link Save query at the top of the screen, a pop up window will open asking you the name of your query, fill in the name of your query and click OK:
The custom query is saved and appears on the left part of the screen under "My queries".
Update a saved query:
To update a saved query, click on one of them under "Saved queries" and apply your changes, then click the link Save Query.
Default view
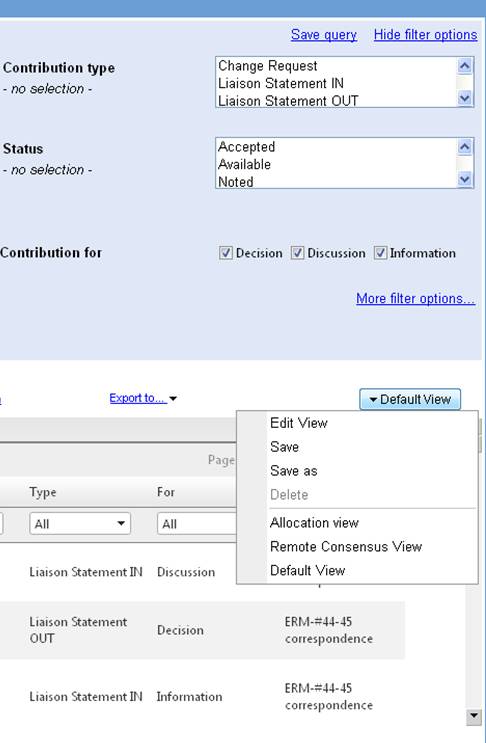
You may customize your own contribution list view format. To do so, click on the button [Default view] at the top right of the contribution list which displays the list predefined views.
Note: A view format is a selection of columns of the result grid. It also contains data about the column order, sort, grouping, and width.
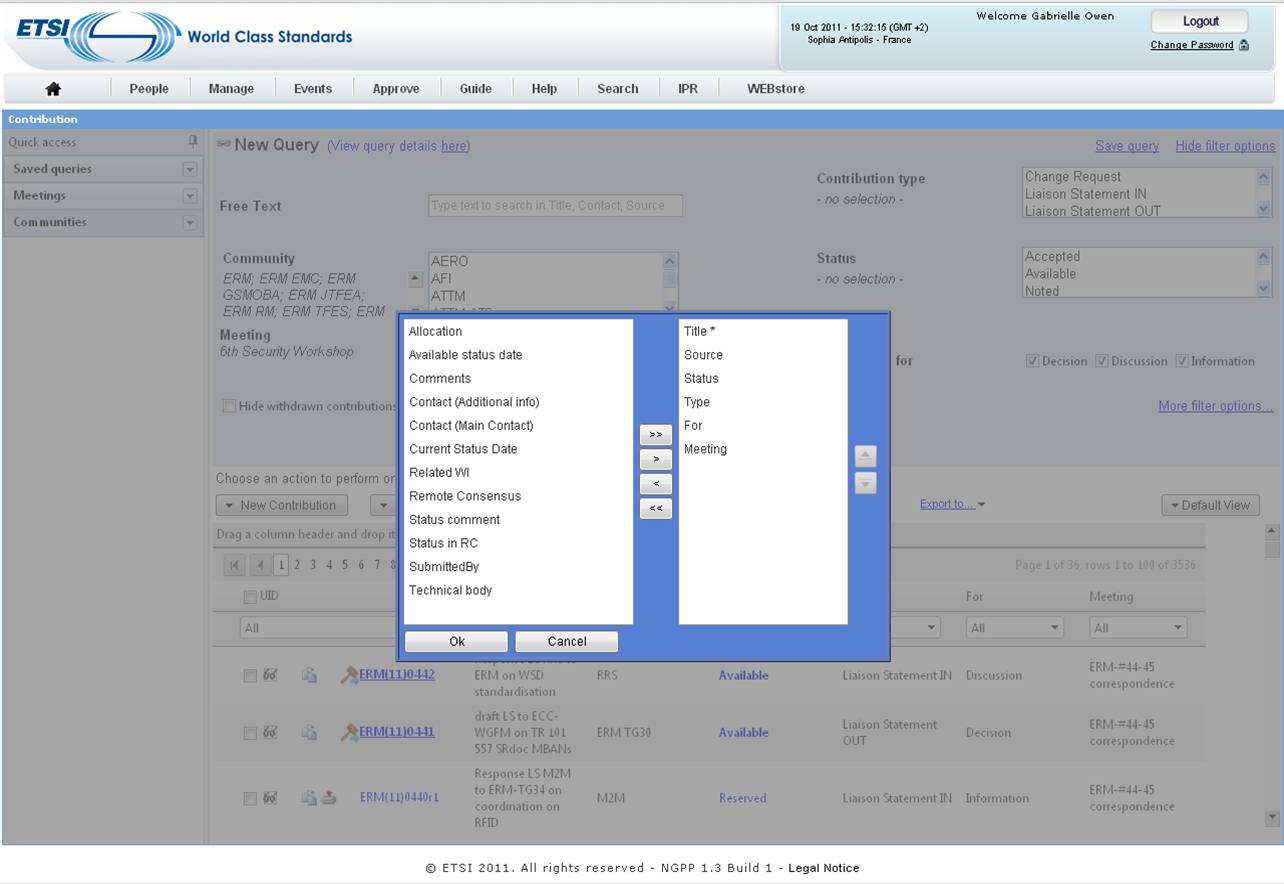
When selecting the item "Edit view " from the menu as shown in print screen above, a pop-up opens which allows you to customize your preferred view by defining the columns you would like to see displayed in the result grid of contributions. You can also select the order in which the columns are displayed.
See figure below:
Should you wish to display all available columns then use the that will move all the items from the left to the right column. Should you wish to remove the selected items except "Contrib ID", "Title" and "Actions which are mandatory, then click on
![]()
Should you wish to select items one by one then select the wished item in the left part of the pop-up and use to move it to the right part. Should you wish to remove one item from the selected list then select this item and click on
![]()
To order your selected columns use the up and down button on the right of the pop-up screen.
Creating a Contribution
IMPORTANT: Only logged users can reserve/upload contributions.
There are two places on the portal from which a user can reserve a contribution:
- From the Portal Contributions tab by clicking on the "New contribution" link and selecting a contribution type in the drop-down menu.
- From the Contribution application itself by clicking on "New contribution" button.
Contributing a Meeting Agenda, a Meeting Report, a Change Request, a Liaison Statement, or an "Other contribution" type
The Contribution Creation screen opens on the General tab.
The General tab
Several attributes need to filled, these attributes will allow categorization and retrieval of contribution documents.
- Title: free text
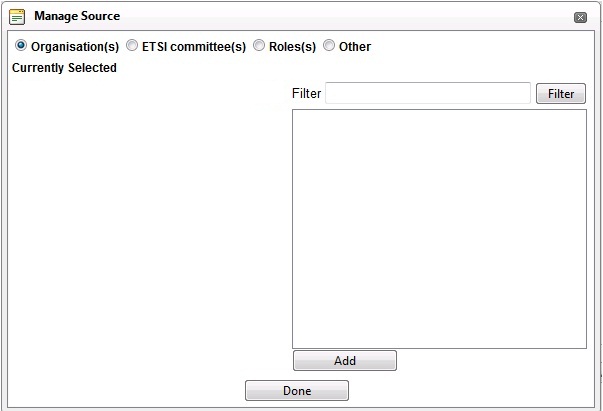
- Source: When clicking on the "Change" button near the field "Source", a pop-up "Manage Source" opens (see figure below). 4 different types of Source are available:
- Organisations: a company allowed to contribute to the technical work of a committee
- ETSI committees: an active ETSI (sub-)Technical Body
- Roles: Chairman, Vice-Chairman, Secretary, Rapporteur, WG/TG Chairman, ETSI support
- Other: free text describing a role not matching one of the above categories
- Source: When clicking on the "Change" button near the field "Source", a pop-up "Manage Source" opens (see figure below). 4 different types of Source are available:
- Note: there can be more than one source for a contribution (example: company A, company B, and company C) yet all sources of a contribution have to be of the same type.
- Main Contact: Is set automatically to the submitter's name of the contribution this field can be enriched by an additional contact in the text field.
- Input for Committee: group to which the contribution will be submitted
- Contribution for: to inform the committee whether your contribution is for Decision, for Discussion, or Information
- In case your contribution is for decision you then have to describe the expected decision by filling in the "Decision/Action requested" box
- Meeting - Allocation:
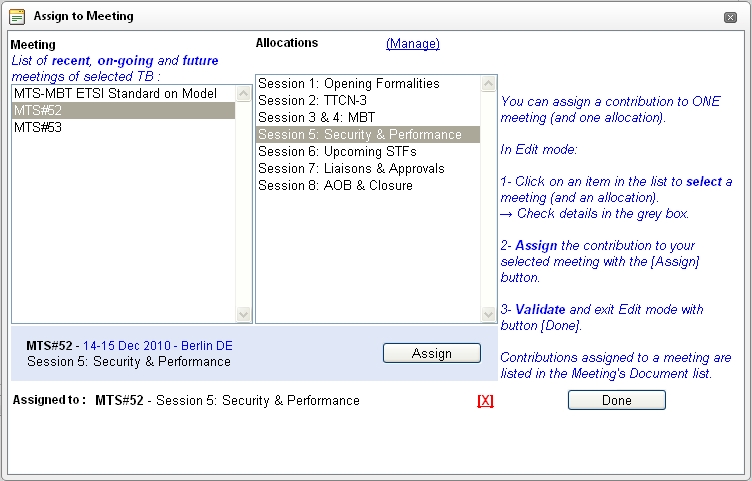
You can assign a contribution to ONE meeting (and one allocation) by clicking on the "Change" button next to Meeting - Allocation. Contributions assigned to a meeting are then listed in the Meeting's Document list.
The system retrieves all recent, ongoing and future meetings for the related committee (including joint meetings).
There is also the possibility to attach your contribution to an allocation (if some exists). Those allocations could be for instance agenda items.
Selecting a meeting (and an allocation) in the list(s) will display further information in the grey box below. Once the correct selection is made, you can ssign the contribution to your selected meeting with the [Assign] button. The assignment will be effective after saving your contribution.
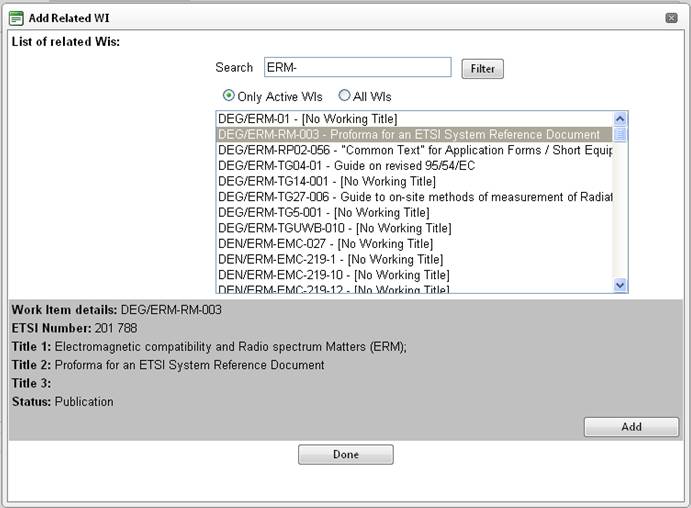
- Related WIs or deliverables: You can also attach your contribution to an existing Work Items or deliverable. click on the Change button
The system displays all the work items attached to the committee you contribute to, the text field allow you to filter the content of the box or to search for other ETSI work items. It is possible to select more than one work item. Select one Work item in the displayed list and click on the "Add" button, the selected work item appears on the left part of the pop-up with a red cross which allow you to remove it. then click on the "Done" button.
- Abstract: Free text summarizing the content of the contribution
You then have the possibility to link your contribution to a meeting.
The Related Contributions tab
You can also refer to one or several other contributions and link them to the contribution you are submitting.
- This feature can be used (for example) to place your contribution in the context of other ones, and help its understanding.
- This feature could also be used to point the attention of the reader to a contribution of another committee which you consider as for interest as well...
To do so, the selection mechanism is similar as for "Add related Work Item", except that instead of linking WIs you are linking other contributions.
Saving your contribution
Your contribution can now been saved.
Note: As soon as all the mandatory fields from the General Tab have been filled in, the contribution can be Saved(except for New WI proposals and New Drafts).
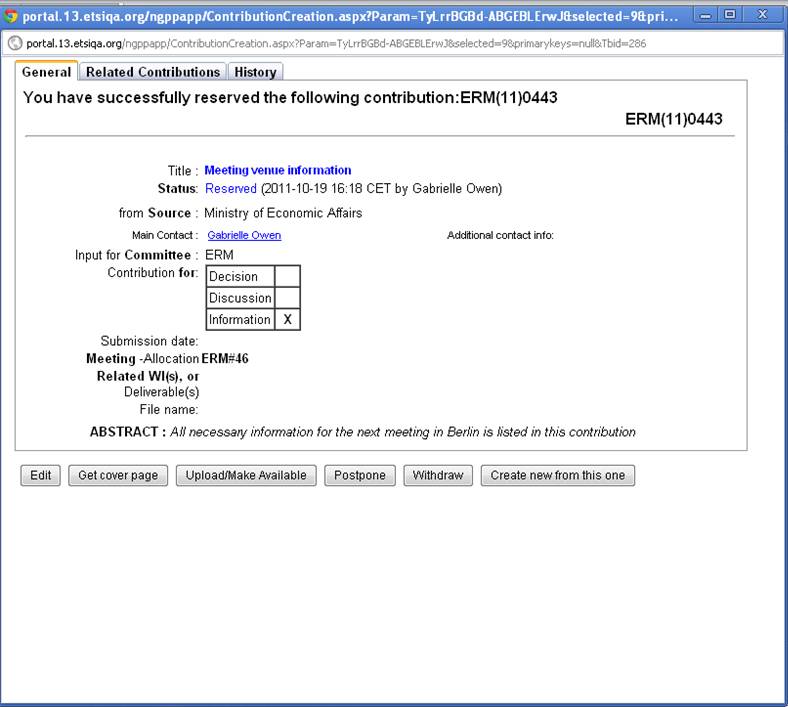
Once you click on the Save button, it will receive a Unique contribution Identifier (UID) and a new record will be added to the contribution database. Your contribution appears now with status RESERVED.
The next steps are:
- Download the Cover Page for your contribution with the "Get cover page" button: the system will PUSH a contribution template pre-filled with the information you have entered in the General Tab.
- Edit the contribution details and update
- Upload the final contribution with the "make available" button
You can Make available a contribution from the detailled view of the contribution (accessible from the portlet and from the full list view) by clicking on the "Upload/Make Available" button.
Or you can Upload a contribution from the full list view by clicking on the [upload] Icon on the line of the RESERVED contribution:
Revising a contribution
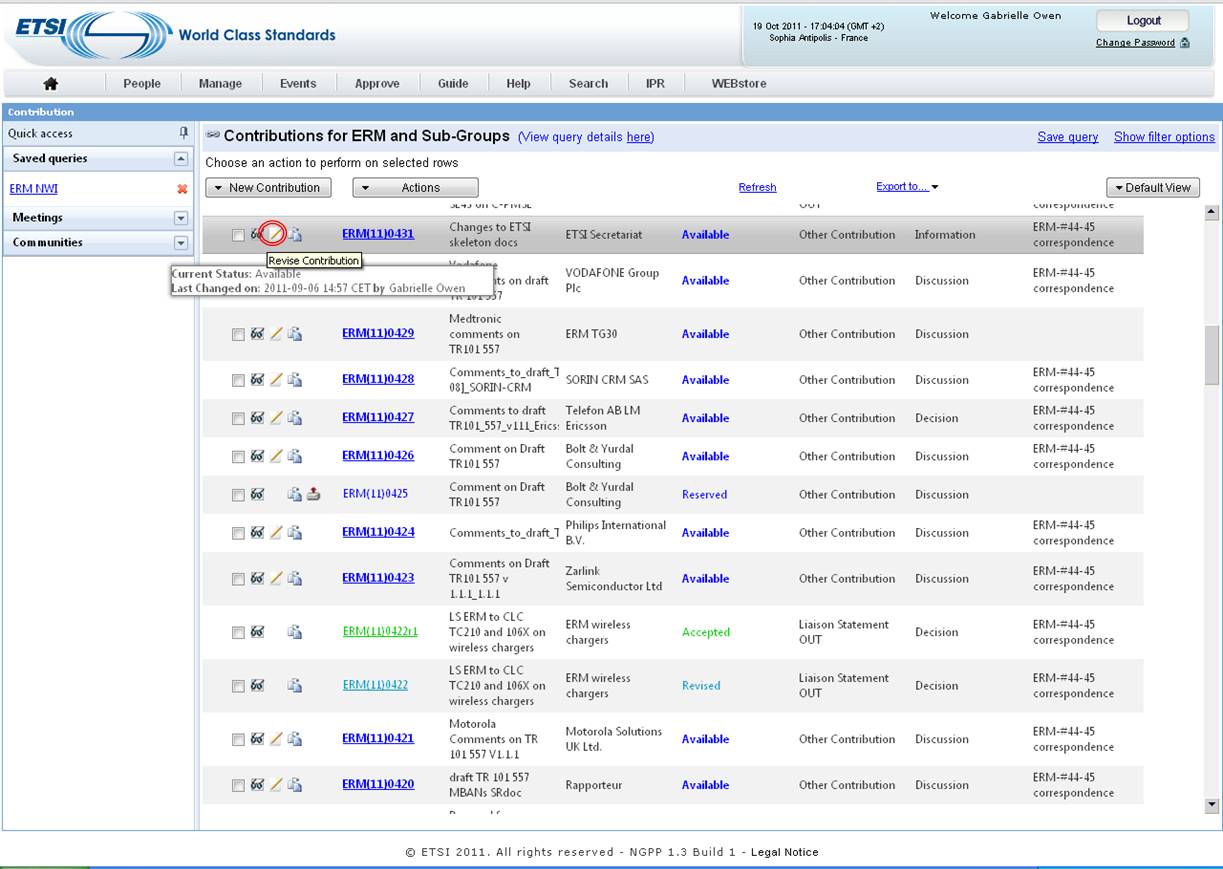
You can Revise a contribution from the detailled view of the contribution (accessible from the portlet and from the full list view) by clicking on the "Revise" button.
Or you can Revise a contribution from the full list view by clicking on the [Revise] Icon on the line of the AVAILABLE or NOTED contribution:
Contribute/Create a New Work Item Proposal
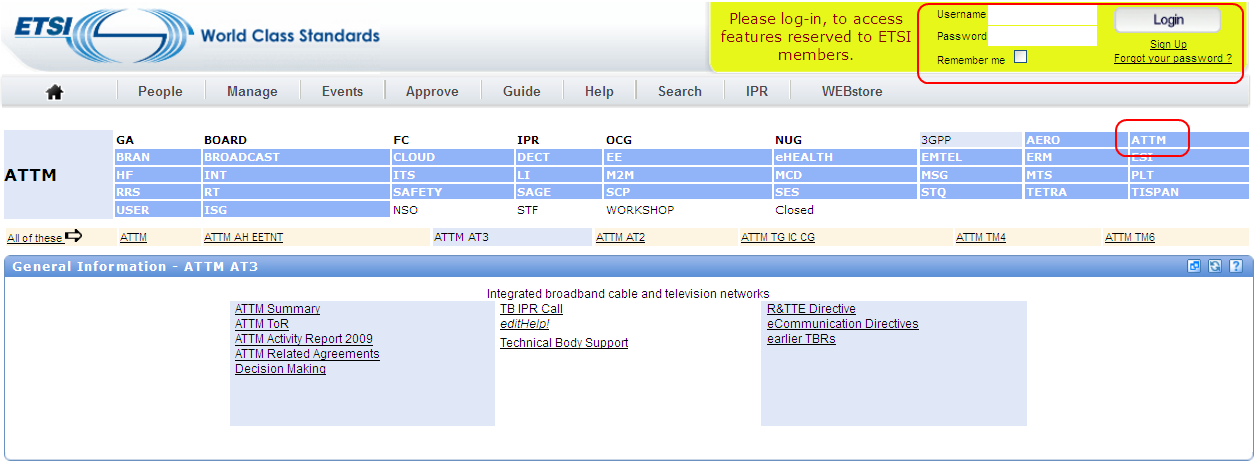
To create a New Work Item (NWI) proposal, log in the ETSI portal with your EOL account and click on the Technical Body you intend to contribute to.
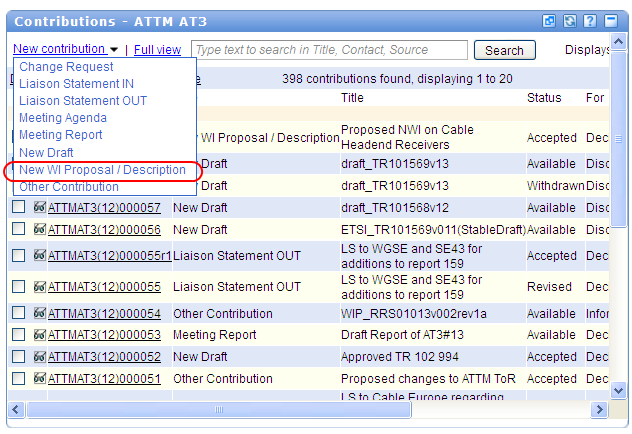
In the Contributions portlet, click on "New contribution" and select the type "New WI Proposal / Description" from the drop down list.
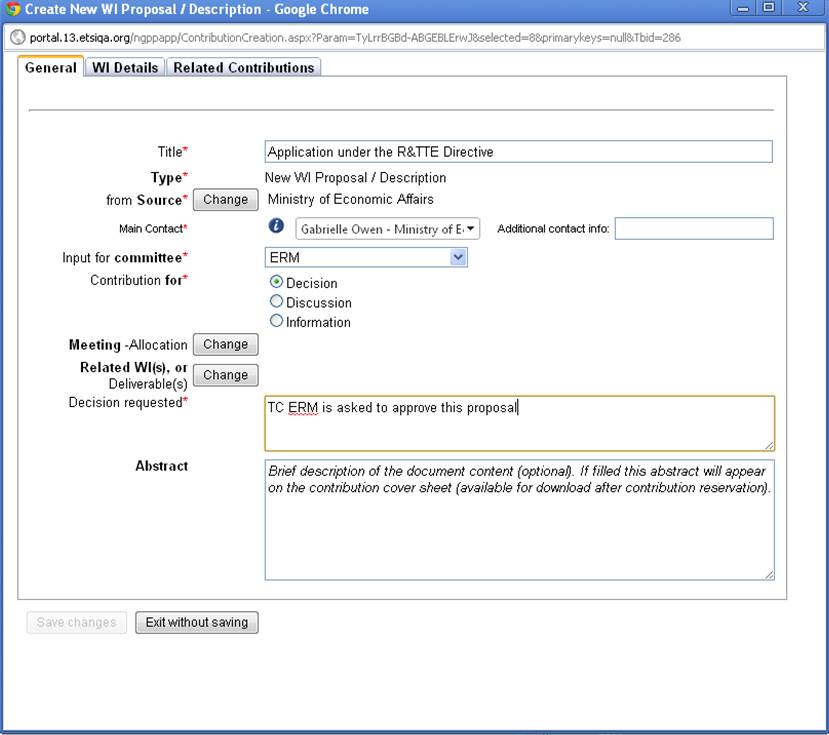
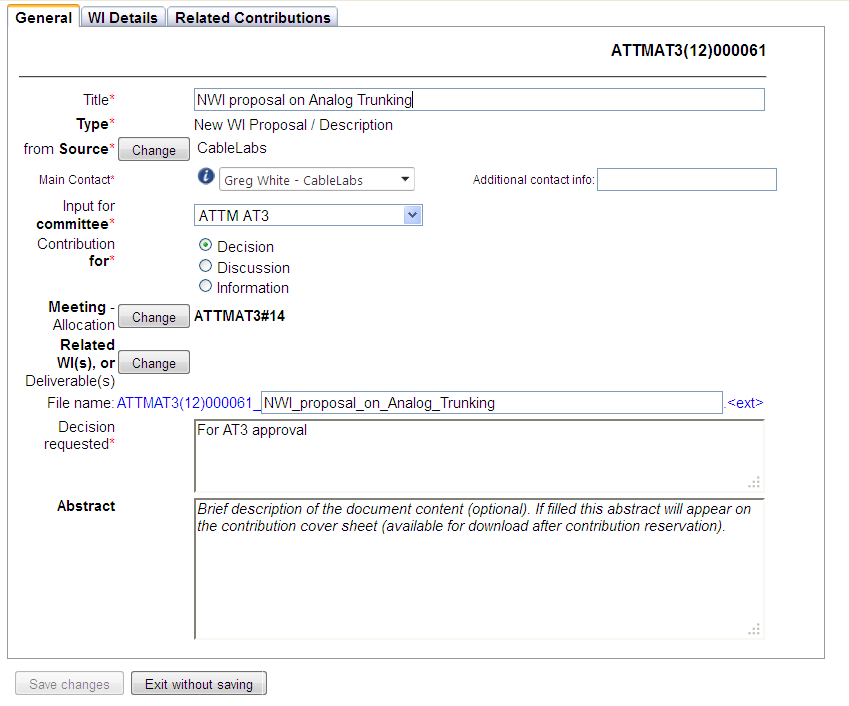
To create a NWI proposal, you first need to fill in the attributes from the general tab:
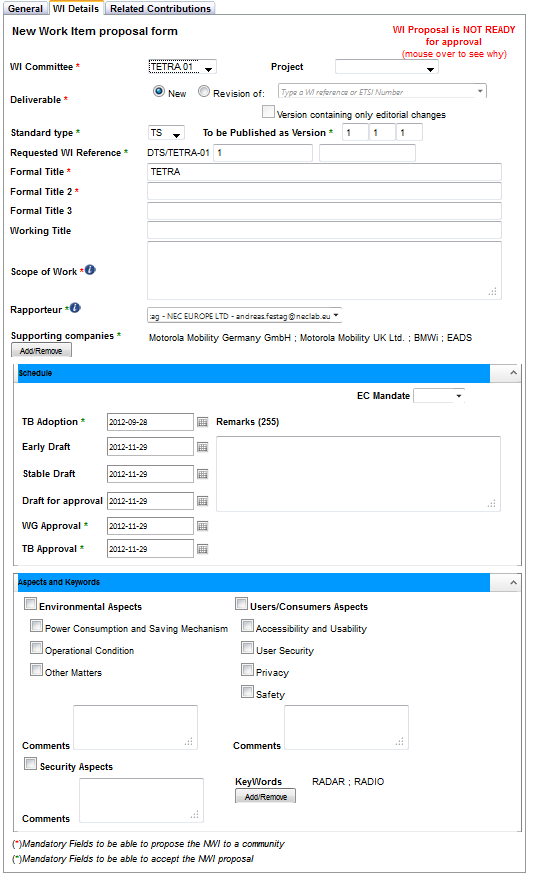
After having filled in the attributes from this tab, then click on "WI Details" tab.
This tab reflects the content of the New Work Item sheet you are used to utilize.
Fill in the following mandatory attributes in order to present the proposal to the community:
- ‘‘‘WI committee’’’
- ‘‘‘Deliverable’’’
- Select either a New Work Item or Revision of an Existing Work Item.
- ‘‘‘Formal Title 1 and 2’’’
- If it is a Revision, the system will retrieve most information from the ETSI Work Programme.
- ‘‘‘Scope of the work’’’
You can present your contribution to the chosen Committee with only those 4 fields filled in. Nevertheless you will need to inform the system about the other fields in order to be able to "accept" this Work Item.
In addition to the above listed fields, the following fields are mandatory to pass the Work Item proposal from the status "available" to "accepted":
- ‘‘‘Standard type’’’
- Choose in the drop down list from the six ETSI deliverable types: EN, TR, TS, EG, ES, GS
- ‘‘‘To be published as version’’’
- If it is a New Work Item, then by default, the version will be 1.1.1
- ‘‘‘Requested WI reference’’’
- The system will automatically attribute the next available number.
- ‘‘‘Rapporteur’’’
- Enter the name of the rapporteur, the system will propose matching results and complete the entry automatically.
- ‘‘‘Supporting Companies’’’
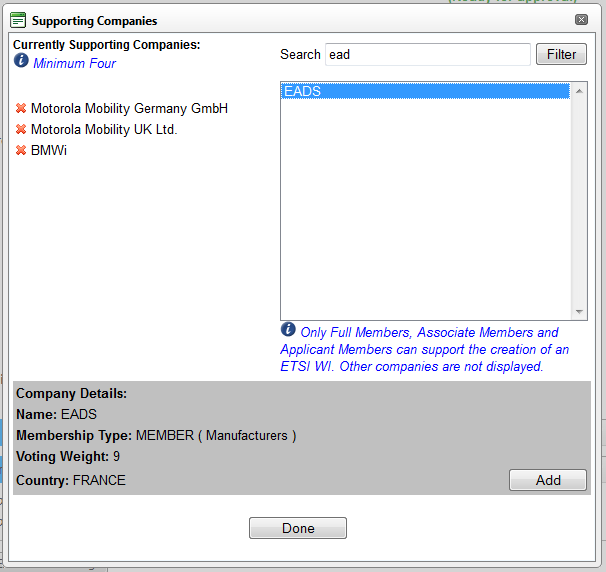
- A minimum of 4 supporting companies is requested. Click on the button “Add/Remove” and enter the name in the new window. Double click to select and add the company. The company’s details appear at the bottom. When done, click “Done” to save the selection and close the window.
- ‘‘‘Schedule’’’
- A NWI proposal needs at least the TB adoption, WG and TB approval dates in the schedule in order to be accepted.
- ‘‘‘Note: For deliverable type EN’’’, an extra line will appear. Select the Procedure, whether or not it is a Harmonized Standard and Mandate if applicable.
- ‘‘‘Keywords’’’
- To select the Keywords, click on “Add/Remove”. Search the keywords and add them with a double click. Click “Done” to save the selection and close the window.
‘‘‘IMPORANT NOTE: If this a Revision of an existing Work Item’’’, then you can enter the ETSI number (e.g. EN 383 001) or the reference of the Work Item to be revised (e.g. DEN/TISPAN-03008) and the system will retrieve all the information available from the Work Programme.
Example of a NWI revision:
Check your Work Item Proposal
During the creation of the Work Item Proposal, the system displays a warning on the top right corner of the WI details tab.
It will display “WI proposal is NOT READY” until all the mandatory fields necessary to accept the proposal are filled in. You may mouse over this warning to see what information is missing.
The warning is refreshed automatically.
Once the Work Item is complete and ready for approval, the system will display the following warning:
To save your proposal, click on the "Save changes" button, at the bottom of the window. The system retrieves your contribution details.
- If the proposal is incomplete:
- You may leave your contribution in the "reserved" status and complete it later on. Click then on “Complete later”.
- If the proposal is complete:
- You may leave your contribution in the "reserved" status and make it available later on. Click then on “No later”.
In either case, you will see a confirmation that you contribution has been reserved, with the contribution number allocated.
Make available a Work Item Proposal
You can make available a Work Item proposal which is in "Reserved" Status.
To make it available you need to proceed to the upload of the contribution which is done automatically for this type of contribution.
NOTE: For the Work Item Proposal Contribution, there is no need to get cover page as the system will take all data and generate it automatically.
There are two ways of making available a New Work Item Proposal.
- From the “Save changes” button
- If you wish to make your proposal right away, click “Yes now”.
You will be redirected to the following screen.
- From the reservation confirmation screen
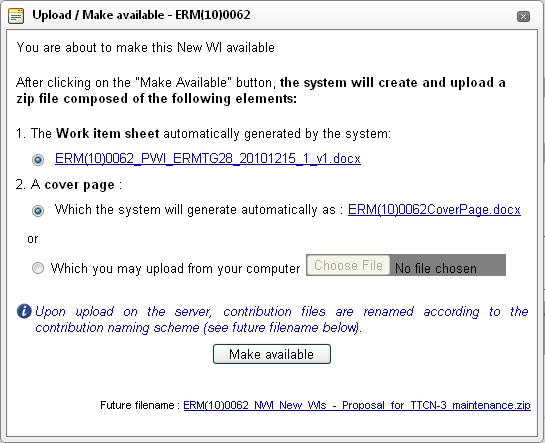
Click on "Upload/Make available", a pop-up is displayed
Select if you wish to upload a cover page from your computer or if you want it to be generated by the system itself and then click on "Make Available" and the system will generate a zip file with the cover page and the Work Item sheet.
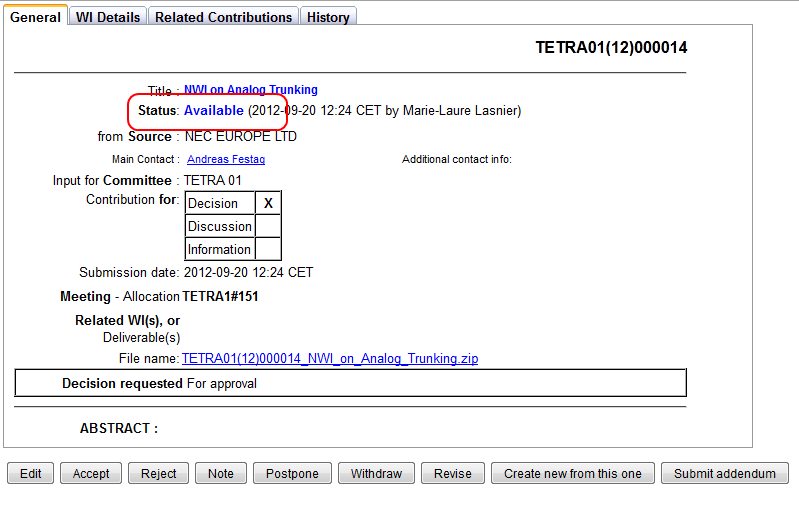
Your New Work Item proposal is now in status "Available".
At this stage, updating the proposal is still possible, however it requires to [Revise] the contribution.
The Preliminary Work Item number (PWI)
Once a NWI contribution is reserved and or made available to the community, a Preliminary Work Item number (PWI) is attributed. It is the identification number of the Work Item until it is approved at the Technical Body level.
The PWI number consists of the following:
- “PWI_TBname_Year+sequence number_version”
(For example, PWI_TETRA01_1204_1 is a proposed Work Item to TETRA WG1, the 4th proposal in 2012 and it is currently version 1 of the proposal).
That PWI number is visible on top of the WI Details tab in the NWI proposal:
It can also be found in the contribution file, in the New Work Item sheet:
Change the status of a contribution of type NWI proposal
To change the status of the contribution, go the Contribution portlet.
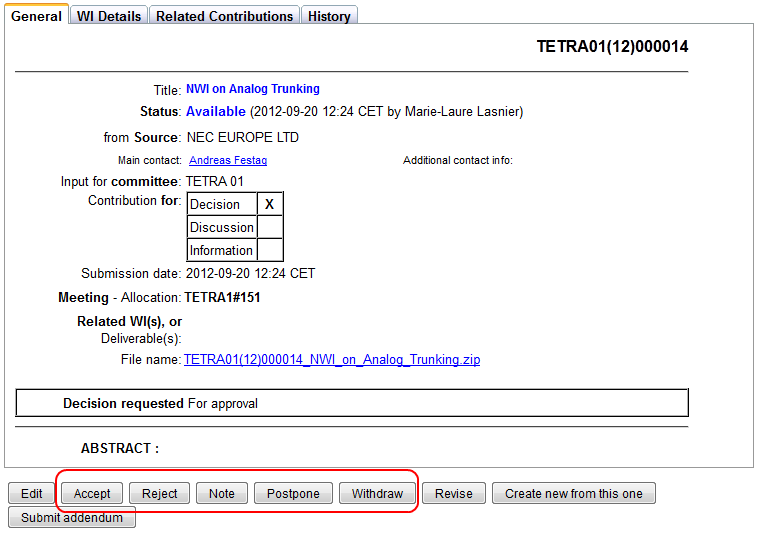
Click on the on the line of your contribution. This will open the details of the contribution.
There are four changes possible changes to the status:
- Accept
- Reject
- Note
- Withdraw
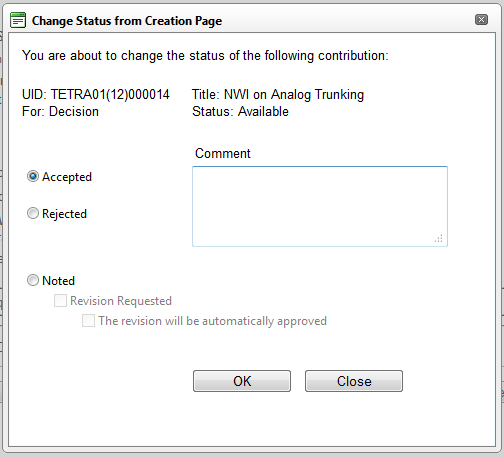
Click on the appropriate status button. A pop-up will open allowing you to enter some comments
Click “OK”. The status is updated in the General tab of your contribution:
From this same screen, you may progress the Work Item to the parent Technical Body for adoption.
See description under section Progress the New Work Item to Technical Body of the Contribution application helpfiles.
Progress the New Work Item to the Technical Body
Should you have created a New Work Item at Working Group/Task Group level and got it approved by this WG/TG; you will need to get it approved by the Parent Technical Body.
To do that click on the in the contribution application for the concerned NWI proposal.
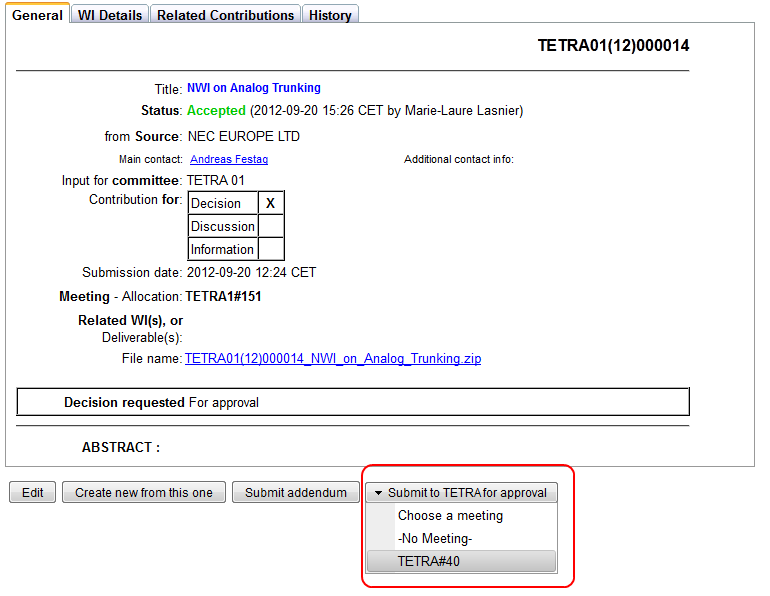
In the contribution General tab, click on
A drop down list appears with all the upcoming meeting of the parent Technical Body. Select the meeting the contribution should be attached to, or “No meeting” if applicable.
Warning: beware there is no confirmation requested. Once the meeting selected (or “No meeting”), the contribution will be submitted right away.
Contributing a draft
Contributing a draft means embedding an available draft in a contribution and contributing that contribution to the community for decision, for discussion, or for information. The first step consists in uploading a draft via the Latest Draft application, the second step then consists in embedding the drat in a contribution. This second step is necessary, especially when the rapporteur wants a specific version of his draft to be discussed and/or approved by the community.
Note that after publication of a Work Item as an ETSI deliverable, drafts are no longer accessible (usually deleted), whereas contributions are never deleted.
There are two ways of embedding a draft in a contribution and contributing it:
- The easiest way is to start from the Latest Drafts application, either by uploading a new draft (with the
 icon) and contributing it on-the-fly, or by contributing and already-available draft (with the
  icon).
- The second way starts from the Contribution application. This approach is recommended when contributing a Working Group draft to its parent group (Example: WG draft contributed to plenary for approval).
From the Latest Draft application
The Latest Draft application is available on every Technical Body's portal page, from there, you will upload and/or contribute a draft in a few clicks. Follow the instructions in the Latest Draft wiki.
- You can also contribute an available draft at any time by clicking on the
 icon next to the relevant version on the Latest Draft screen.
After clicking on the [CONTRIBUTE this draft version now] button or on a ![]() icon, the portal will open a "NEW CONTRIBUTION" window. On that window you will notice that the contribution type is set to New Draft and that a specific Draft tab has been inserted after the General tab.
icon, the portal will open a "NEW CONTRIBUTION" window. On that window you will notice that the contribution type is set to New Draft and that a specific Draft tab has been inserted after the General tab.
The New Drafttab has already been filled with the draft's meta-data (Committee, reference, version), and in the General tab most fields have already been pre-filled as well.
You still have to:
- Decide if you contribute the draft for Decision, for Discussion, or for Information.
You may also:
- Link the contribution to a meeting
- Add an abstract to your contribution
Once this done, click on the [Save Changes] button to reserve the contribution, and then on the [Upload/Make Available] one. An intermediate pop-up will appear: just follow the instructions and acknowledge, at this this stage the portal has enough information to create the contribution file and upload it without any further action from you.
From the Contribution application
This approach is recommended when contributing a Working Group draft to its parent group (Example: a Working Group draft contributed to plenary for approval).
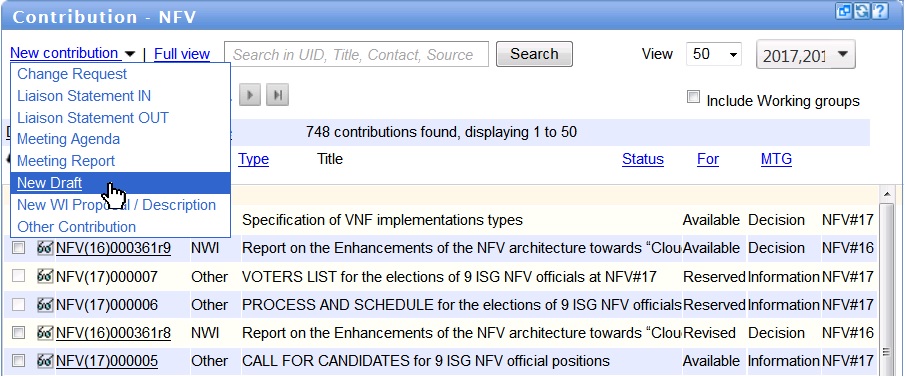
- From the Portal Contributions application click on the "New contribution" link and select "New Draft"
An empty contribution-creation-window will appear, this window has a specific [Draft] tab (which does not appear when reserving other types of contributions).
⇒ Before anything else, select the appropriate "Input for committee" in the [General] tab of the contribution-creation-window. This is the committee in which the contribution will be created .
Important: when a Working Group draft will be contributed to the parent group (i.e. to the plenary) select the parent group here, not the Working Group.
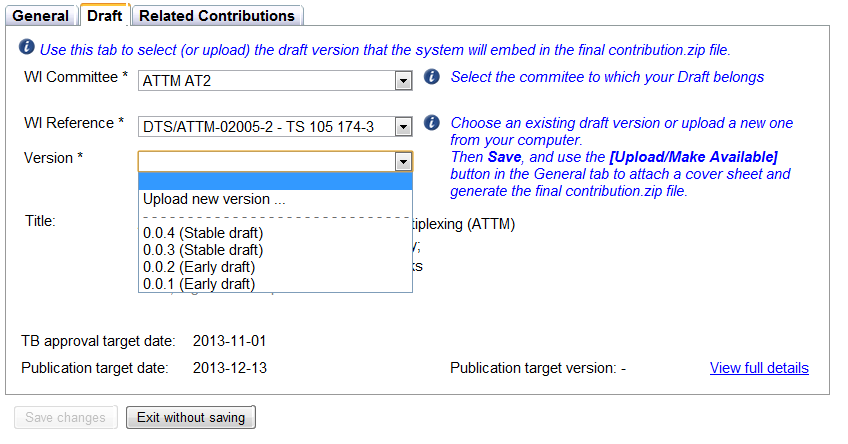
Then, switch to the [Draft] tab and select:
- The WI committee (or Working Group) from which the draft is issued
- The WI reference: drop-down list of all active WIs belonging to the selected committee.
- The appropriate Version: drop-down list displaying all available draft versions for the selected WI.
Go back to the [General] Tab → the title field should have been automatically filled with meta-data retrieved from the draft you selected.
Fill-in the remaining fields: choose whether your draft is for information, discussion or decision, type free text in the abstract box and allocate your contribution to a meeting.
When done, click on the [Save Changes] button to reserve a contribution number and then on the one to upload the contribution.
An intermediate pop-up may appear: just follow the instructions and acknowledge, at this this stage the portal has enough information to create the contribution file and upload it without any further action from you.
