Meetings Management 2.0: Difference between revisions
mNo edit summary |
|||
| (52 intermediate revisions by the same user not shown) | |||
| Line 1: | Line 1: | ||
The <span style="color: blue">'''Meeting Management v2 (MMP 2.0)'''</span> focuses on developing an updated web application for managing meetings. The key improvements include: | |||
= | |||
* Implementing a revamped meeting management web application; | * Implementing a revamped meeting management web application; | ||
| Line 8: | Line 5: | ||
* Replacing the meeting calendar functions currently offered by the DS legacy web application. | * Replacing the meeting calendar functions currently offered by the DS legacy web application. | ||
[[File:MMPv2in_a_nutshell_FNL.mp4|center|thumb|640x360px]] | |||
On the [[Meetings Management 2.0 FaQs|FAQ page]] you can the find most frequent and relevant questions that we received so far from different users. | |||
Following the [[ChangeLog|ChangeLog page]] will give you the opportunity to be informed about the evolutions of the application, including bug fixing, small enhancements or new functionalities. | |||
A detailed list of main features is presented in the table below: | |||
{| class="wikitable" style="margin:auto" | {| class="wikitable" style="margin:auto" | ||
|style="width: 33%" <td style="vertical-align:middle;text-align:center"|'''Feature''' | |style="width: 33%" <td style="vertical-align:middle;text-align:center"|'''Feature''' | ||
| Line 22: | Line 27: | ||
| colspan="1" rowspan="1" |A step-by-step guide (4 steps maximum) allows meeting creators to easily schedule meetings and ensure all required information is compiled in the same place. | | colspan="1" rowspan="1" |A step-by-step guide (4 steps maximum) allows meeting creators to easily schedule meetings and ensure all required information is compiled in the same place. | ||
| colspan="1" rowspan="1" | | | colspan="1" rowspan="1" | | ||
*<span style="color: green">Ease of use</span> | *<span style="color: green">Ease of use</span> | ||
*<span style="color: SteelBlue">Error reduction</span> | *<span style="color: SteelBlue">Error reduction</span> | ||
|- | |- | ||
| colspan="1" rowspan="1" |'''Summary page''' | | colspan="1" rowspan="1" |'''[[Meetings_Management_2.0#Summary|Summary page]]''' | ||
| colspan="1" rowspan="1" |The summary page, i.e. the last step of the meeting creation process, provides a comprehensive view of all meeting details before publishing and allows to update/adjust any parameter easily. | | colspan="1" rowspan="1" |The summary page, i.e. the last step of the meeting creation process, provides a comprehensive view of all meeting details before publishing and allows to update/adjust any parameter easily. | ||
| colspan="1" rowspan="1" | | | colspan="1" rowspan="1" | | ||
| Line 31: | Line 36: | ||
*<span style="color: goldenrod">Empowered meeting creator</span> | *<span style="color: goldenrod">Empowered meeting creator</span> | ||
|- | |- | ||
| colspan="1" rowspan="1" |<span style="color: green">'''Cloning meetings'''</span> | | colspan="1" rowspan="1" |<span style="color: green">'''[[Meetings_Management_2.0#Clone_meeting|Cloning meetings]]'''</span> | ||
| colspan="1" rowspan="1" |The clone feature allows to duplicate an existing/previous meeting in one click directly from the meeting list. Only new information (such as date/time) will need to be updated. | | colspan="1" rowspan="1" |The clone feature allows to duplicate an existing/previous meeting in one click directly from the meeting list. Only new information (such as date/time) will need to be updated. | ||
| colspan="1" rowspan="1" | | | colspan="1" rowspan="1" | | ||
| Line 38: | Line 43: | ||
*<span style="color: goldenrod">Empowered meeting creator</span> | *<span style="color: goldenrod">Empowered meeting creator</span> | ||
|- | |- | ||
| colspan="1" rowspan="1" |<span style="color: green">''' | | colspan="1" rowspan="1" |<span style="color: green">'''[[Meetings_Management_2.0#Contribution_settings|Enhanced management of contributions]]'''</span> | ||
| colspan="1" rowspan="1" |Single location to manage ETSI and 3GPP contributions settings: contributions can be defined directly from the meeting creation interface and at meeting creation time with direct links to allocation management and reservation of block of contributions. | | colspan="1" rowspan="1" |Single location to manage ETSI and 3GPP contributions settings: contributions can be defined directly from the meeting creation interface and at meeting creation time with direct links to allocation management and reservation of block of contributions. | ||
| colspan="1" rowspan="1" | | | colspan="1" rowspan="1" | | ||
| Line 45: | Line 50: | ||
*<span style="color: goldenrod">Empowered meeting creator</span> | *<span style="color: goldenrod">Empowered meeting creator</span> | ||
|- | |- | ||
| colspan="1" rowspan="1" |'''Synchronization meeting types & bodies''' | | colspan="1" rowspan="1" |'''[[Meetings_Management_2.0#Meeting_category_-_type_matrix|Synchronization meeting types & bodies]]''' | ||
| colspan="1" rowspan="1" |Only the relevant meeting types to the concerned bodies are displayed. | | colspan="1" rowspan="1" |Only the relevant meeting types to the concerned bodies are displayed. | ||
| colspan="1" rowspan="1" | | | colspan="1" rowspan="1" | | ||
| Line 70: | Line 75: | ||
* Save meeting(s) as a draft, including meeting room booking, without publishing it/them | * Save meeting(s) as a draft, including meeting room booking, without publishing it/them | ||
* | * Display meetings as cancelled, even after scheduled dates, without asking Meeting Support for help. | ||
| colspan="1" rowspan="1" | | | colspan="1" rowspan="1" | | ||
*<span style="color: blue">Time saving</span> | *<span style="color: blue">Time saving</span> | ||
| Line 82: | Line 87: | ||
*<span style="color: indigo">Enhanced delegate experience</span> | *<span style="color: indigo">Enhanced delegate experience</span> | ||
|- | |- | ||
| colspan="1" rowspan="1" |'''Enhanced room allocation calendar | | colspan="1" rowspan="1" |'''[[Meetings_Management_2.0#View_Room_allocation_(for_all_users)|Enhanced room allocation calendar view]]''' | ||
| colspan="1" rowspan="1" |Day/Week/Month view of ETSI Premises room allocation provides a clear and comprehensive overview of room usage and availability, including current pre-booked and booked rooms. | | colspan="1" rowspan="1" |Day/Week/Month view of ETSI Premises room allocation provides a clear and comprehensive overview of room usage and availability, including current pre-booked and booked rooms. | ||
| Line 89: | Line 94: | ||
*<span style="color: goldenrod">Empowered meeting creator</span> | *<span style="color: goldenrod">Empowered meeting creator</span> | ||
|- | |- | ||
| colspan="1" rowspan="1" |'''Enhanced meeting list with advanced search / filter options''' | | colspan="1" rowspan="1" |'''[[Meetings_Management_2.0#View_meeting_list|Enhanced meeting list with advanced search / filter options]]''' | ||
| colspan="1" rowspan="1" |It is easier to search, sort and filter meetings using the meeting list. | | colspan="1" rowspan="1" |It is easier to search, sort and filter meetings using the meeting list. | ||
| colspan="1" rowspan="1" | | | colspan="1" rowspan="1" | | ||
| Line 117: | Line 122: | ||
*<span style="color: navy">Inclusiveness</span> | *<span style="color: navy">Inclusiveness</span> | ||
|} | |} | ||
| |||
* As the application evolves, please note that the content/videos/screenshots might differ from the current version. We are doing our best to keep this | <span style="color: red">'''Disclaimer'''</span> | ||
* As the application evolves, please note that the content/videos/screenshots presented on this help page might differ from the current version of the application. We are doing our best to keep this page up to date. | |||
* All details displayed on the screenshots/videos are from a testing environment, so please consider them as dummy data. | * All details displayed on the screenshots/videos are from a testing environment, so please consider them as dummy data. | ||
* The menu and options shown could differ depending on user rights. | * The menu and options shown could differ depending on user rights. | ||
== Access rights == | == <span style="color: darkblue">'''Access rights'''</span> == | ||
Meeting management application is accessible using an EOL account. | Meeting management application is accessible using an EOL account. | ||
| Line 130: | Line 136: | ||
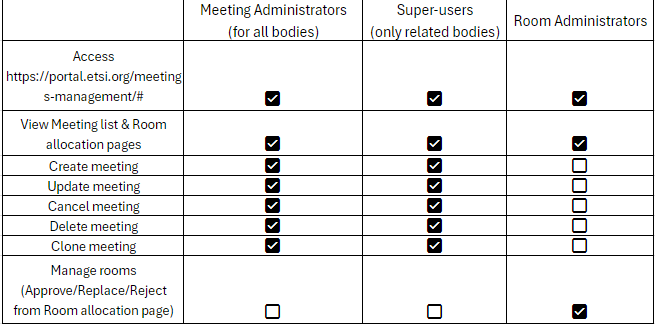
There are 3 different profiles: | There are 3 different profiles: | ||
'''Meeting administrators''' => ETSI Staff, access is not limited depending on Bodies (with few exceptions); | |||
* Super-users | * '''Super-users''' | ||
** Body Officials (Chair, Vice Chair, Secretary, Acting Chair, Convenor). In case of Joint meeting, only the Body Officials of the "master"/parent Bodies (i.e., the Body to which the meeting was primarily attached at Meeting creation) are part of the Meeting Super-users group. | ** Body Officials (Chair, Vice Chair, Secretary, Acting Chair, Convenor). In case of Joint meeting, only the Body Officials of the "master"/parent Bodies (i.e., the Body to which the meeting was primarily attached at Meeting creation) are part of the Meeting Super-users group. | ||
** Rapporteurs (active work items' rapporteurs are allowed to create and manage specific type of meetings for their specific groups) | ** Rapporteurs (active work items' rapporteurs are allowed to create and manage specific type of meetings for their specific groups) | ||
* Room Administrators => ETSI Staff members who are part of the Events (EVE) meeting support team + ITC team. | * '''Room Administrators''' => ETSI Staff members who are part of the Events (EVE) meeting support team + ITC team. | ||
[[File:MMPv2_Access_Rights.png|center|frame|Fig 1 - Access rights table]] | |||
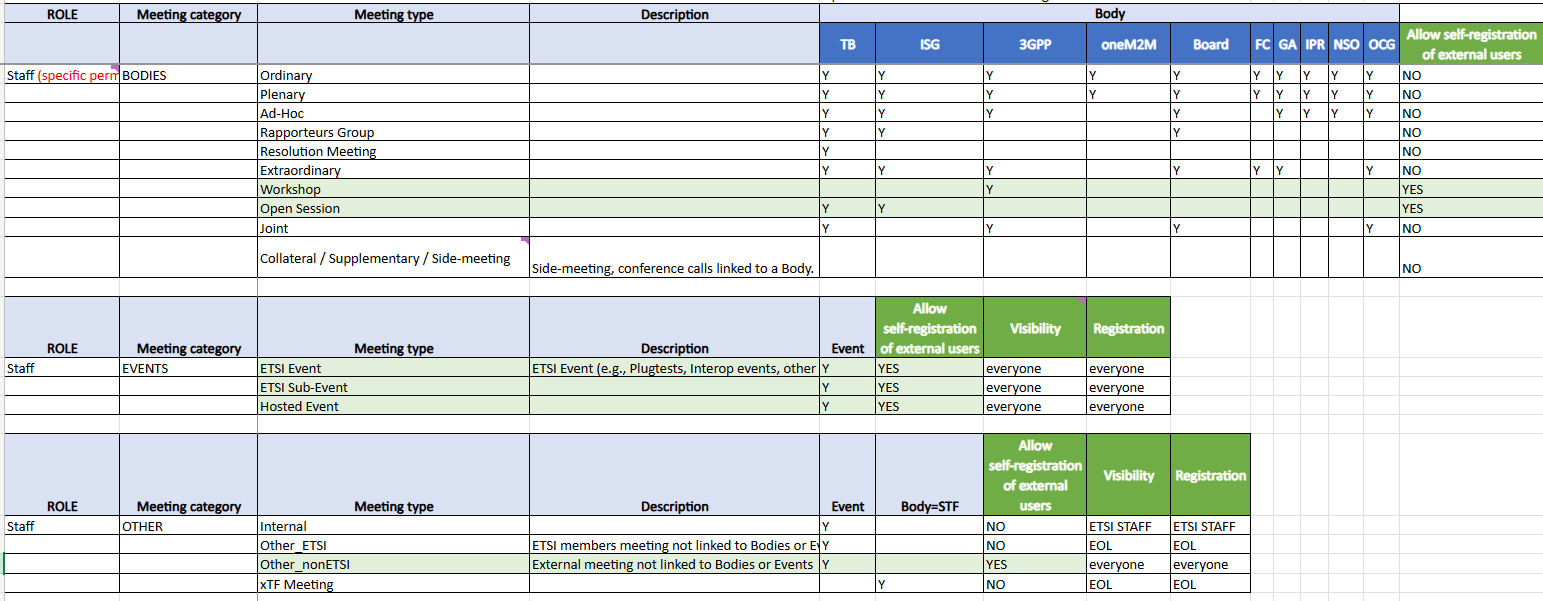
== <span style="color: darkblue">'''Meeting category - type matrix'''</span> == | |||
Depending on Meeting category and Body (if it is the case) the user has the possibility to decide what type of meeting to create. | Depending on Meeting category and Body (if it is the case) the user has the possibility to decide what type of meeting to create. | ||
[[File:MMPv2 Meeting category - type matrix.png|center|thumb|655x655px]] | [[File:MMPv2 Meeting category - type matrix.png|center|thumb|655x655px|Fig 2 - Meeting category - Meeting type matrix]] | ||
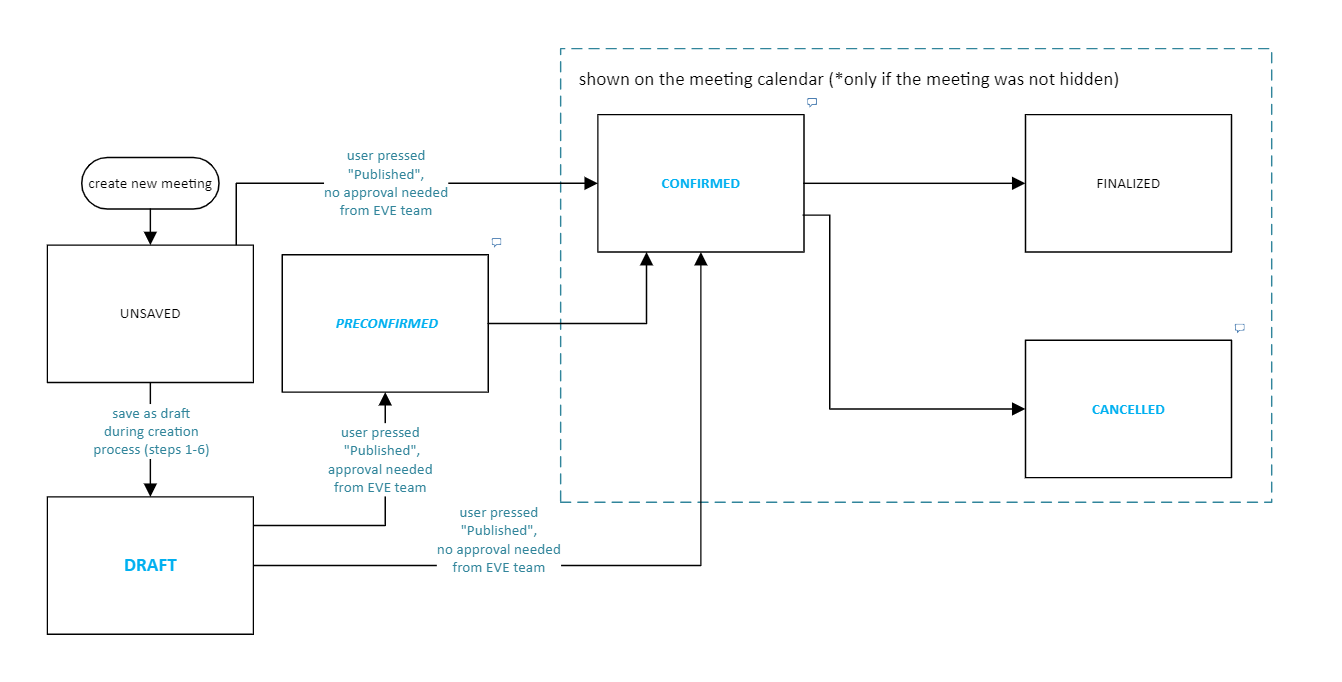
== <span style="color: darkblue">'''Meeting statuses'''</span> == | |||
[[File:MMPv2 Meeting Statuses .png|center|thumb|655x655px|Fig 3 - Meeting statuses diagram]] | |||
[[File:MMPv2 Meeting Statuses .png|center|thumb|655x655px]] | |||
| Line 159: | Line 166: | ||
<span style="color: green">'''CANCELLED'''</span> = the meeting has been cancelled after being Confirmed. | <span style="color: green">'''CANCELLED'''</span> = the meeting has been cancelled after being Confirmed. | ||
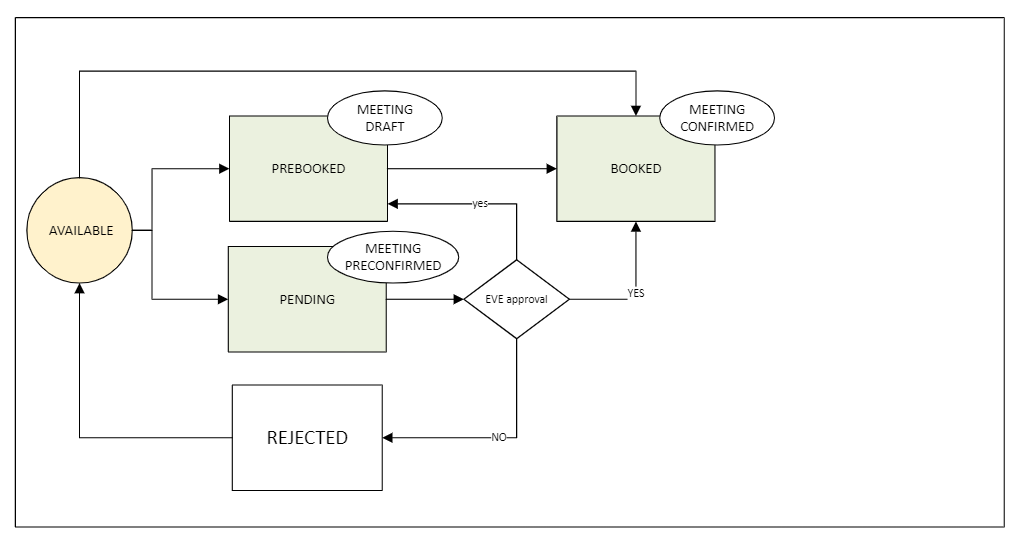
== Room statuses == | == <span style="color: darkblue">'''Room statuses'''</span> == | ||
[[File:MMPv2 Room Statuses 1.png|center|thumb|655x655px]] | [[File:MMPv2 Room Statuses 1.png|center|thumb|655x655px|Fig 4 - Room statuses diagram]] | ||
| Line 171: | Line 178: | ||
'''PENDING =''' when the user is choosing an available, but not recommended room, and it press the Publish button. The meeting will not be published until the EVE team will review the room request. If the EVE team approve the room request, the status of the room becomes Booked. In case EVE team denies the room request, the room status becomes Available. | '''PENDING =''' when the user is choosing an available, but not recommended room, and it press the Publish button. The meeting will not be published until the EVE team will review the room request. If the EVE team approve the room request, the status of the room becomes Booked. In case EVE team denies the room request, the room status becomes Available. | ||
[[File:MMPv2 Room Statuses 2.png|center|frame]] | [[File:MMPv2 Room Statuses 2.png|center|frame|Fig 5 - Meeting support Room request process]] | ||
| | ||
== Room recommendations matrix == | == <span style="color: darkblue">'''Room recommendations matrix'''</span> == | ||
When the meeting is organized on ETSI Premises, the system is recommending a list of meeting rooms, depending on availability and room capacity. Below is the matrix that indicates which meeting room could be displayed as "Available & Recommended" depending on its capacity (marked in this table with "x" and light blue background) and which meeting rooms will be displayed as "Available" (marked in this table with dark blue background).[[File:MMPv2 Room recommendations matrix 1.png|center|thumb|655x655px]]For more details, please see the legend below:[[File:MMPv2 Room recommendations matrix 2.png|center|frame]] | When the meeting is organized on ETSI Premises, the system is recommending a list of meeting rooms, depending on availability and room capacity. Below is the matrix that indicates which meeting room could be displayed as "Available & Recommended" depending on its capacity (marked in this table with "x" and light blue background) and which meeting rooms will be displayed as "Available" (marked in this table with dark blue background).[[File:MMPv2 Room recommendations matrix 1.png|center|thumb|655x655px|Fig 6 - Room recommendations matrix]]For more details, please see the legend below:[[File:MMPv2 Room recommendations matrix 2.png|center|frame|Fig 7 - legend for Room recommendations matrix]] | ||
== Create a meeting == | == <span style="color: darkblue">'''Create a meeting'''</span> == | ||
For starting the creation of a new meeting, there are multiple options: | For starting the creation of a new meeting, there are multiple options: | ||
| Line 183: | Line 190: | ||
- go to https://portal.etsi.org/meetings-management/#/ | - go to https://portal.etsi.org/meetings-management/#/ | ||
- if you the user is already on the meetings management administration page (https://portal.etsi.org/meetings-management/#/ | - if you the user is already on the meetings management administration page ([https://portal.etsi.org/meetings-management/#/list https://portal.etsi.org/meetings-management/#/list]), by clicking on "Create meeting" button: | ||
[[File:MMPv2 Main Menu.png|center|frame]] | [[File:MMPv2 Main Menu.png|center|frame|Fig 8 - Meetings management application main menu]] | ||
- from the ETSI Portal -> Meeting calendar, by clicking on "New meeting" | - from the ETSI Portal -> Meeting calendar, by clicking on "New meeting" | ||
[[File:MMPv2_Meeting_details_4.png|center|frame]] | [[File:MMPv2_Meeting_details_4.png|center|frame]] | ||
| Line 192: | Line 199: | ||
[[File:MMPv2 Meeting details 1.png|center|thumb|655x655px]] | [[File:MMPv2 Meeting details 1.png|center|thumb|655x655px]] | ||
==Meeting details== | == <span style="color: darkblue">'''Meeting details'''</span> == | ||
On Meeting Details page, the user must fill in the mandatory fields (marked with *): | On Meeting Details page, the user must fill in the mandatory fields (marked with *): | ||
| Line 224: | Line 231: | ||
[[File:MMPv2_New_Meeting_Details.webm|center|thumb|640x360px]] | [[File:MMPv2_New_Meeting_Details.webm|center|thumb|640x360px]] | ||
==Room allocation== | == <span style="color: darkblue">'''Room allocation'''</span> == | ||
"Room allocation" is the 2nd step of the meeting creation process. The user can proceed to the room allocation after completing the ‘Meeting Details’ step and only if the meeting location is "ETSI Premises". | |||
Once landed on step 2, the user will see the following screen:[[File:MMPv2 Room allocation 1.png|center|thumb|655x655px]] | |||
The user needs to fill in all the necessary fields marked * about the desired meeting room: | The user needs to fill in all the necessary fields marked * about the desired meeting room: | ||
| Line 243: | Line 248: | ||
To preview the room, the user must click on the blue text ‘Preview room’ under the room name in the room selector, that will lead them to the pictures of the room: | To preview the room, the user must click on the blue text ‘Preview room’ under the room name in the room selector, that will lead them to the pictures of the room: | ||
<gallery | <gallery class="center" widths="200" heights="200"> | ||
File:MMPv2 Room allocation | File:MMPv2 Room allocation 5.png | ||
File:MMPv2_Room_allocation_6.png | |||
File:MMPv2_Room_allocation_7.png | |||
</gallery> | </gallery> | ||
| Line 266: | Line 271: | ||
[[File:MMPv2_New_Room_Allocation.webm|center|thumb|640x360px]] | [[File:MMPv2_New_Room_Allocation.webm|center|thumb|640x360px]] | ||
==Payment settings== | == <span style="color: darkblue">'''Payment settings'''</span> == | ||
<span style="color: red">(!!!Payment feature is deactivated for now)</span> | |||
The meeting creator can activate the payment settings and select if the fees will be applied only to non-members or to all participants. | |||
Also, depending on the Presence type allowed (Face to Face and/or Online), it is possible to choose / enter the applicable fees. | |||
[[File:MMPv2 Payment settings 1.png|center|thumb|655x655px]] | [[File:MMPv2 Payment settings 1.png|center|thumb|655x655px]] | ||
[[File:MMPv2 Payment settings 2.png|center|thumb|655x655px]] | [[File:MMPv2 Payment settings 2.png|center|thumb|655x655px]] | ||
== <span style="color: darkblue">'''Contribution settings'''</span> == | |||
Contributions is the 4th step of meeting creation process and it will be activated only if Meeting category=Bodies. | |||
Once on the Contributions screen, the user may opt for allowing contributions to a meeting simply by switching ‘Switch on if you allow contributions’ on: | Once on the Contributions screen, the user may opt for allowing contributions to a meeting simply by switching ‘Switch on if you allow contributions’ on:[[File:MMPv2 Contributions settings 1.png|center|thumb|655x655px]] | ||
[[File:MMPv2 Contributions settings 1.png|center|thumb|655x655px]] | |||
Once the switch is on, the user must fill/check/edit the mandatory (marked with *) Contribution allocation fields: | |||
* Contribution reservation start; | |||
* Contribution reservation end; | |||
* Contribution upload end; | |||
* Meeting prefix. | |||
[[File:MMPv2 Contributions settings 2.png|center|thumb|655x655px]] | [[File:MMPv2 Contributions settings 2.png|center|thumb|655x655px]] | ||
Once all mandatory Contribution settings are defined, the user can continue to the next step, go back to the previous step or save the meeting as a draft. | |||
[[File:MMPv2_New_Contributions.webm|center|thumb|640x360px]] | [[File:MMPv2_New_Contributions.webm|center|thumb|640x360px]] | ||
==Summary== | == <span style="color: darkblue">'''Summary'''</span> == | ||
The last step of meeting creation process is the Display of the meeting's summary: | |||
* All the meeting details (all the field labels and values chosen) are summarized inside a collapsible/expandable section, divided into groups (which correspond to the previous steps: | |||
* All the meeting details (all the field labels and values chosen) are summarized inside a collapsible/expandable section, divided into groups (which correspond to the previous steps: | |||
[[File:MMPv2 Summary page 3.png|center|thumb|655x655px]] | |||
[[File:MMPv2 Summary page 4.png|center|thumb|655x655px]] | |||
* A complementary print-to-PDF option “Print to PDF” appears below the meeting details section: | * A complementary print-to-PDF option “Print to PDF” appears below the meeting details section: | ||
[[File:MMPv2 Summary page 1.png|center|thumb|655x655px]] | [[File:MMPv2 Summary page 1.png|center|thumb|655x655px]] | ||
* At the bottom of the Summary screen, there are several action buttons. The user can go back to the previous step, save the meeting as a draft (allowing the user to save the changes in the database, but without making the meeting public, the meeting is saved in status "DRAFT"), publish or delete the meeting: | |||
* At the bottom of the Summary screen, there are several action buttons. The user can go back to the previous step, save the meeting as a draft, | |||
[[File:MMPv2 Summary page 2.png|center|thumb|655x655px]] | [[File:MMPv2 Summary page 2.png|center|thumb|655x655px]] | ||
| Line 306: | Line 317: | ||
[[File:MMPv2_New_Summary.webm|center|thumb|640x360px]] | [[File:MMPv2_New_Summary.webm|center|thumb|640x360px]] | ||
== | == <span style="color: darkblue">'''View meeting list'''</span> == | ||
The user can view he meeting list by clicking the action button "Meeting list" on the top-left corner of the page. | |||
[[File:MMPv2_New_Clone_a_meeting.webm|center|thumb|640x360px]] | Once this action is done, the list of meetings is displayed. | ||
Several filters are available for a more precise search results, as well as the search window if the user knows details like meeting reference, title, body etc. Also, the user can use the sorting options for each of the columns or it can filter the meetings he/she created. | |||
[[File:MMPv2_New_View_Meetings_List.webm|center|thumb|640x360px]] | |||
== <span style="color: darkblue">'''Update/Edit meeting'''</span> == | |||
If the user has the permissions to update meetings, he/she can do so in several ways: | |||
- by accessing the meeting update page via “...”>”Update Meeting” buttons from the Portal’s meeting calendar; | |||
- from the meeting’s details page via the Portal and select the option “Update Meeting”; | |||
- using the [https://portal.etsi.org/meetings-management/#/list Meetings list] and press the Edit button. | |||
Then the user is redirected to a Meeting Detail’s screen where they can start editing the desired information. Once the modifications are done, at the bottom of the page at each step of modification, there is save modifications button. | |||
Upon clicking on it, the meeting is updated, and a confirmation pop-up message is displayed in the top right corner of the screen. | |||
The video below is presenting the Update/Edit process:[[File:MMPv2_New_Edit_a_meeting.webm|center|thumb|640x360px]] | |||
== <span style="color: darkblue">'''Clone meeting'''</span> == | |||
To clone a meeting, the user needs to identify a source meeting from a meeting list and click on the button ‘clone’. | |||
A confirmation pop-up will be prompted on the screen, asking to confirm or cancel the action. | |||
If the user clicks on ‘Yes,’ he/she is redirected to the Meeting Details screen, where the information from the source meeting was cloned, except the Start and End Date/Time. | |||
To avoid duplications, it is mandatory to select new Start and end dates. Then, the user might modify other input fields, depending on their needs. | |||
The user can continue modifying/verifying Meeting information by following the steps in Meeting Creation. At any step, the user can save the meeting as a draft or publish it (if all mandatory details are filled in). | |||
An explanatory video is presented below:[[File:MMPv2_New_Clone_a_meeting.webm|center|thumb|640x360px]] | |||
== <span style="color: darkblue">'''Cancel meeting'''</span> == | |||
To cancel a meeting, the user needs to identify the meeting from a meeting list and click on the ‘cancel’ button [[File:MMPv2_Cancel_meeting_1.png]]: | |||
A confirmation pop-up will be prompted on the screen, asking to confirm or cancel the action: | |||
[[File:MMPv2_Cancel_meeting_2.png|600x300px|center]] | |||
If the user clicks on ‘Yes’, the meeting is cancelled: | |||
[[File:MMPv2_Cancel_meeting_3.png|600x300px|center]] | |||
A cancelled meeting will still be displayed on the Meeting calendar via the ETSI Portal (and/or 3GPP Portal if the meeting body is 3GPP) with a red label. | |||
[[File:MMPv2_Cancel_meeting_4.png|600x300px|center]] | |||
If the meeting location is on ETSI Premises and a room booking has been made, the cancellation action will automatically release any reservation or cancel any request. | |||
[[File:MMPv2_New_Cancel_a_meeting.webm|center|thumb|640x360px]] | [[File:MMPv2_New_Cancel_a_meeting.webm|center|thumb|640x360px]] | ||
==Delete meeting== | == <span style="color: darkblue">'''Delete meeting'''</span> == | ||
To delete a meeting, the authorized user needs to identify the meeting from a meeting list and click on the ‘delete’ button [[File:MMPv2_Delete_meeting_1.png]]: | |||
A confirmation pop-up will be prompted on the screen, asking to confirm or cancel the action: | |||
[[File:MMPv2_Delete_meeting_4.png|600x300px|center]] | |||
If the user clicks on ‘Yes’, the meeting is deleted, and a confirmation pop-up message is displayed on the top right corner of the screen. | |||
[[File: | [[File:MMPv2_Delete_meeting_2.png|center]] | ||
A deleted meeting will no longer be displayed on the Meeting calendar via the ETSI Portal (and/or 3GPP Portal if the meeting body is 3GPP). | |||
If the meeting location is on ETSI Premises and a room booking has been made, the deletion action will automatically release any reservation or cancel any request. | |||
== <span style="color: darkblue">'''View Room allocation (for all users)'''</span> == | |||
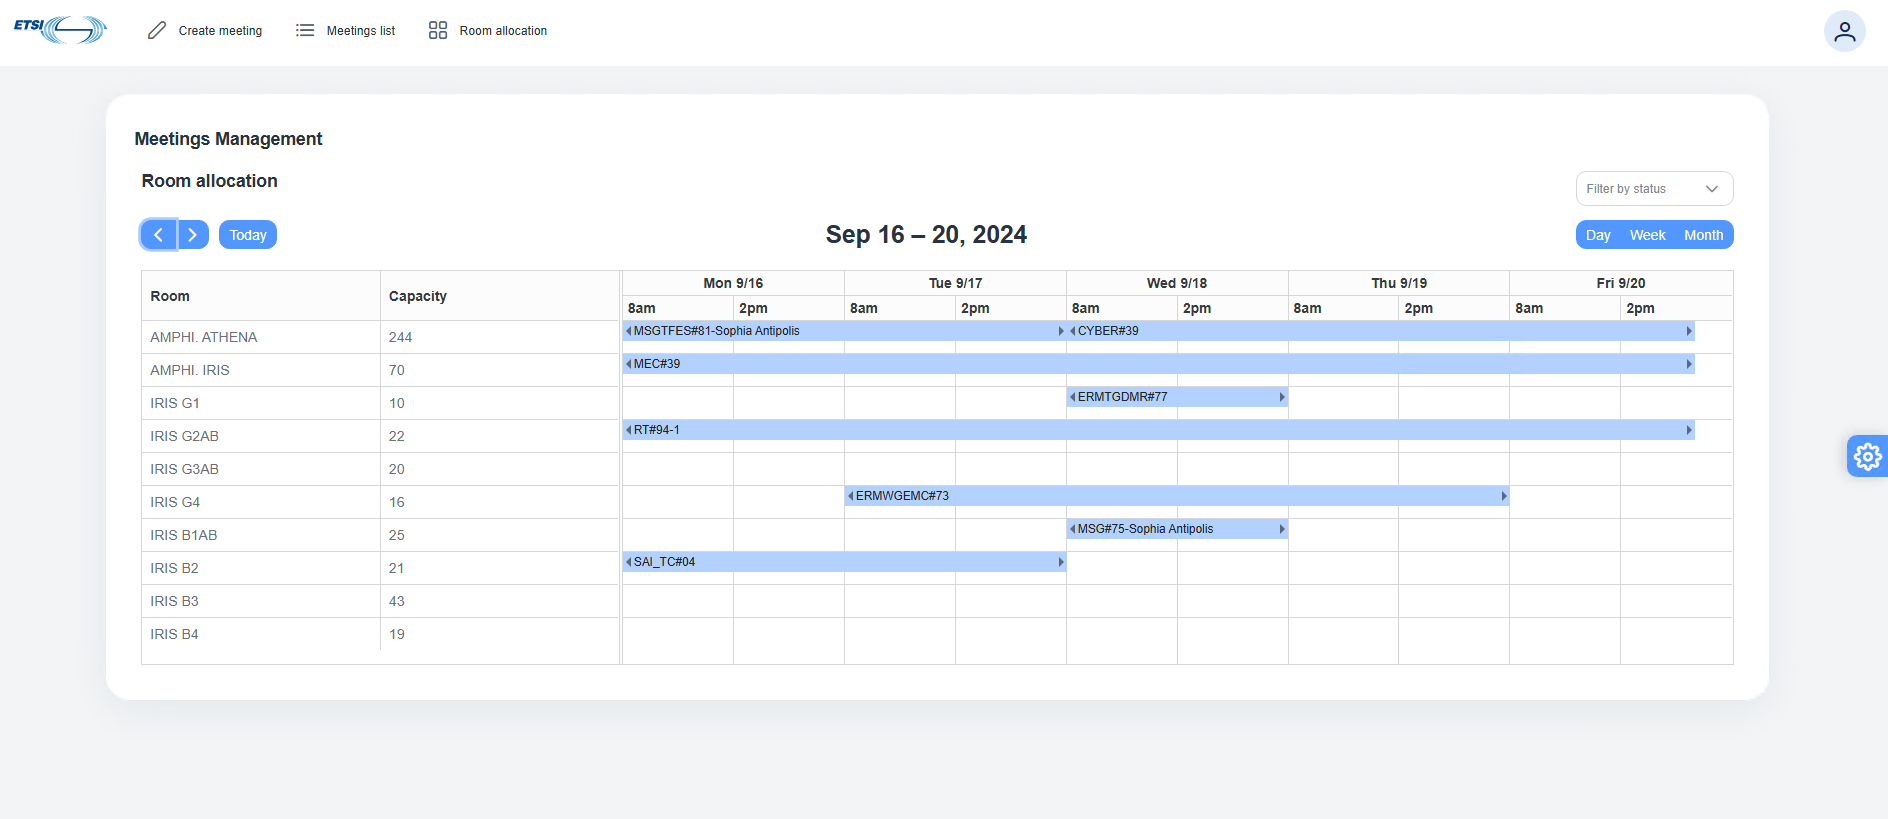
Any meeting creator has the possibility to access the Room allocation screen and see the full list of meeting rooms (+ capacities) and the reservations that are already done. | |||
By default, the weekly view on the current date is displayed. The user can: | |||
- change the weekly view by choosing the day view or the monthly view; | |||
- navigate in the past or the future using the left/right arrows and press the "Today" button to see the current date; | |||
- filter by meeting room status (see [[Meetings Management 2.0#Room statuses|Room statuses]] for more details). | |||
[[File:MMPv2_Room_management_4.png|center|thumb|640x360px]] | |||
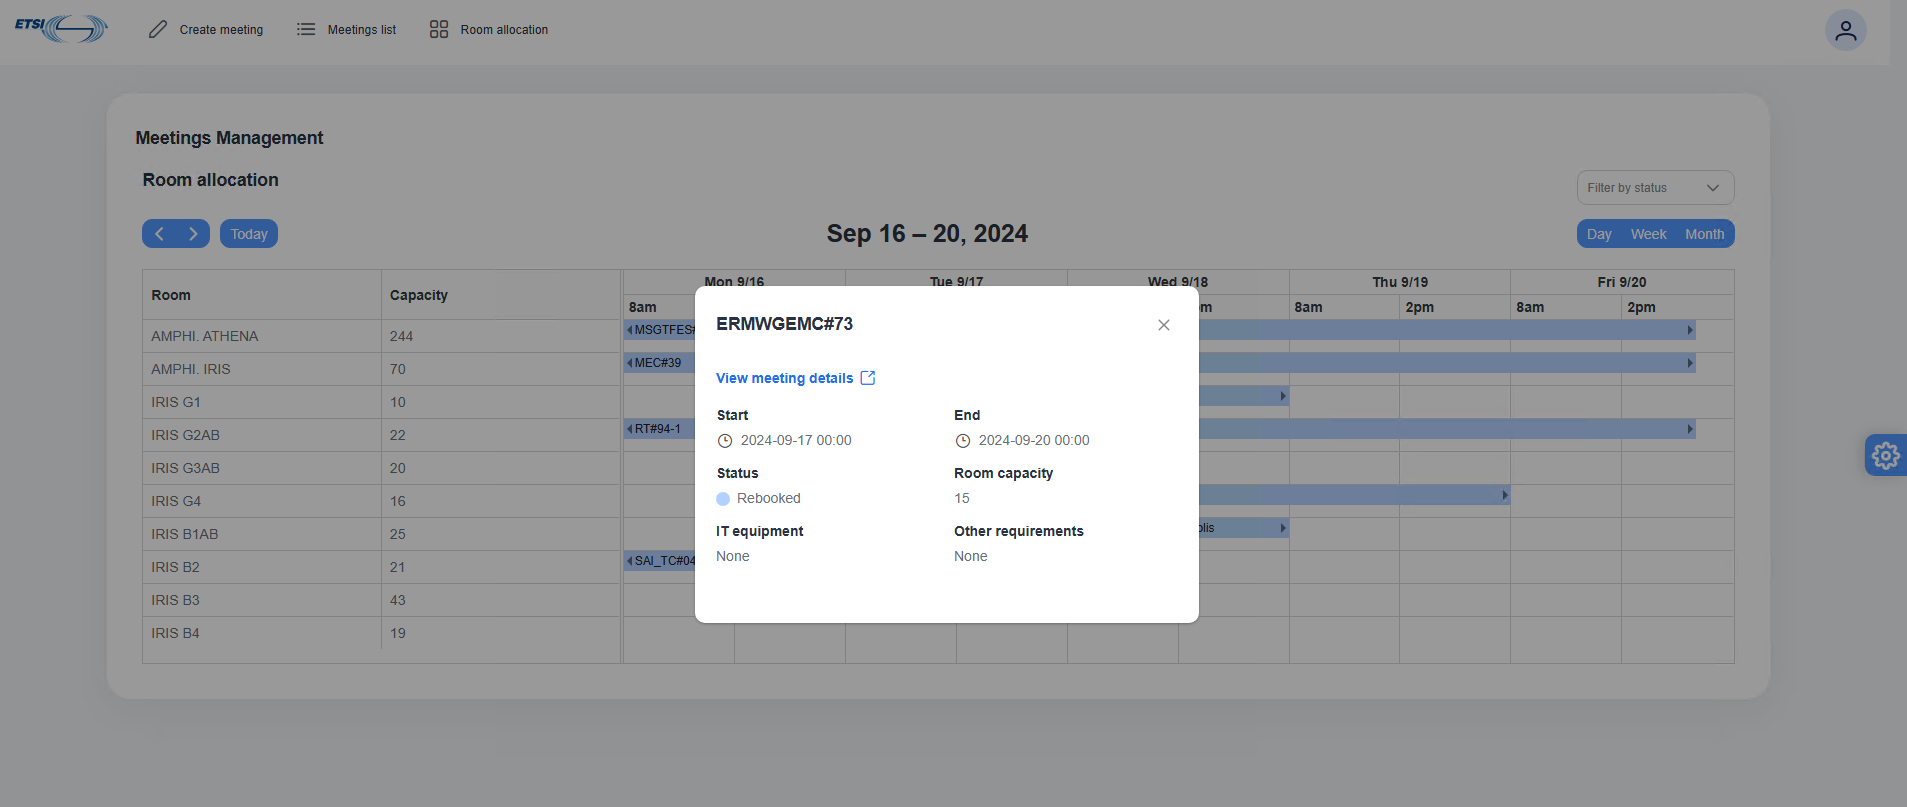
The user can click on one of the meeting room reservations to view more details about the reservation. The "View meeting link" will also land on the meeting page. | |||
[[File:MMPv2_Room_management_5.png|center|thumb|640x360px]] | |||
For more details about the process flow, please watch this video: | |||
[[File:MMPv2_New_View_Room_Allocation_all_users.webm|center|thumb|640x360px]] | [[File:MMPv2_New_View_Room_Allocation_all_users.webm|center|thumb|640x360px]] | ||
==Room allocation validation (Meeting Support team)== | == <span style="color: darkblue">'''Email notifications'''</span> == | ||
{| class="wikitable" style="margin:auto" | |||
| style="vertical-align:middle;text-align:center" <td |'''Notification topic''' | |||
| style="vertical-align:middle;text-align:center" <td |'''Send''' | |||
| style="vertical-align:middle;text-align:center" <td |'''Details''' | |||
|- | |||
|Meeting created (saved as draft) | |||
|TO: meeting creator | |||
|One-time notification about successful meeting saved as draft. It will be send only for the first "Save as draft" action. | |||
|- | |||
|Meeting published | |||
|TO: meeting creator | |||
CC: meetings@etsi.org (if ETSI Premises) | |||
|One-time notification about successful meeting publication | |||
|- | |||
|Answer to your room requested for meeting | |||
|TO: meeting creator | |||
CC: meetings@etsi.org | |||
|When meeting room booking has been approved. | |||
|- | |||
|Change to your room requested for meeting | |||
|TO: meeting creator | |||
CC: meetings@etsi.org | |||
|When meeting room booking has been updated. | |||
|- | |||
|ETSI rooms pre-booking reminder | |||
|TO: meeting creator | |||
CC: meetings@etsi.org | |||
|Several reminders when meeting status = “Draft” and has at least one ETSI room request in status “prebooked”. | |||
|- | |||
|Maximum room capacity reached | |||
| TO: meeting creator | |||
CC: meetings@etsi.org | |||
|When the meeting room allocated to the meeting has almost reached the maximum capacity. | |||
|- | |||
| Meeting updates | |||
|TO: meeting creator | |||
CC: meetings@etsi.org (if ETSI Premises) | |||
|Updates taken into account: start & end dates, time, location, presence type, allocated meeting room. | |||
|- | |||
|Meeting canceled | |||
|TO: meeting creator | |||
CC: meetings@etsi.org (if ETSI Premises) | |||
|When a meeting is canceled. If ETSI Premises any room that was prebooked or booked will be now automatically released. | |||
|} | |||
{| class="wikitable" style="margin:auto" | |||
| style="vertical-align:middle;text-align:center" <td |'''Notification topic''' | |||
| style="vertical-align:middle;text-align:center" <td |'''Send''' | |||
| style="vertical-align:middle;text-align:center" <td |'''Details''' | |||
|- | |||
|Non-recommended room requested for meeting | |||
|TO: meetings@etsi.org | |||
CC: meeting creator | |||
|When the selected room is not marked as “Recommended” and the user clicks "Save as draft" or “Publish meeting”. | |||
|- | |||
|List of local meetings without room request | |||
|TO: meetings@etsi.org | |||
|List of local meetings without room request, with start date less than 1 month. Notification to be sent each Monday. | |||
|- | |||
|Notification to Meeting support for Other requirements | |||
| TO: meetings@etsi.org | |||
CC: meeting creator | |||
|Once the field "Other requirements" from the "Room allocation" screen is filled in and the meeting is published, a notification will be sent to the Meeting support team and cc'd to the meeting creator. | |||
|- | |||
|Meeting update @registered participant | |||
|TO: registered participant | |||
|Updates taken into account: start & end dates, time, location, presence type. | |||
|- | |||
|Meeting canceled @registered participant | |||
|TO: registered participant | |||
|When a meeting is canceled. | |||
|- | |||
|Notification to IT for IT equipment | |||
|TO: helpdesk@etsi.org | |||
CC: meeting creator | |||
|Once the field "IT equipment" from the "Room allocation" screen is filled in and the meeting is published, a notification will be sent to the Helpdesk team and cc'd to the meeting creator. | |||
|} | |||
== <span style="color: darkblue">'''Room allocation validation (Meeting Support team)'''</span> == | |||
[[File:MMPv2_New_Room_allocation_validation_Meeting_Support_team.webm|center|thumb|640x360px]] | [[File:MMPv2_New_Room_allocation_validation_Meeting_Support_team.webm|center|thumb|640x360px]] | ||
Latest revision as of 13:54, 24 February 2025
The Meeting Management v2 (MMP 2.0) focuses on developing an updated web application for managing meetings. The key improvements include:
- Implementing a revamped meeting management web application;
- Upgrading the room booking and pre-booking features;
- Replacing the meeting calendar functions currently offered by the DS legacy web application.
On the FAQ page you can the find most frequent and relevant questions that we received so far from different users.
Following the ChangeLog page will give you the opportunity to be informed about the evolutions of the application, including bug fixing, small enhancements or new functionalities.
A detailed list of main features is presented in the table below:
| Feature | Description | Main Benefits |
| Next gen, intuitive UI | The new intuitive, user-centred interface for the meeting management module provides a seamless user experience to schedule meetings and navigate the meeting list and room allocation. |
|
| Wizard including progression tracker | A step-by-step guide (4 steps maximum) allows meeting creators to easily schedule meetings and ensure all required information is compiled in the same place. |
|
| Summary page | The summary page, i.e. the last step of the meeting creation process, provides a comprehensive view of all meeting details before publishing and allows to update/adjust any parameter easily. |
|
| Cloning meetings | The clone feature allows to duplicate an existing/previous meeting in one click directly from the meeting list. Only new information (such as date/time) will need to be updated. |
|
| Enhanced management of contributions | Single location to manage ETSI and 3GPP contributions settings: contributions can be defined directly from the meeting creation interface and at meeting creation time with direct links to allocation management and reservation of block of contributions. |
|
| Synchronization meeting types & bodies | Only the relevant meeting types to the concerned bodies are displayed. |
|
| Events and sub-events | Sub-events can be configured under one global event, allowing individual registration for each sub-event. |
|
| Possibility for external / non-EoL users to register for certain meeting types | TB/ISG Open Sessions can be open for self-registration of external / non EoL users. The Open Sessions will be displayed in the same section of the ETSI portal as other concerned TB/ISG meetings. There is no need to use “type = workshop” anymore. |
|
| Advanced features for meeting administrators | With the new version, the meeting creators can now:
|
|
| Independent management of online and F2F registration | For hybrid meetings, different dates can be defined for online and F2F registration. F2F registration can be closed without impacting online registration. |
|
| Enhanced room allocation calendar view | Day/Week/Month view of ETSI Premises room allocation provides a clear and comprehensive overview of room usage and availability, including current pre-booked and booked rooms. |
|
| Enhanced meeting list with advanced search / filter options | It is easier to search, sort and filter meetings using the meeting list. |
|
| Advanced room reservation module for ETSI premises | This embedded module streamlines and enhances the process of booking meeting rooms in ETSI:
|
|
| Enhanced room allocation management | The room administrators do not need the DS desktop application anymore to handle room allocation, all actions can be done seamlessly directly from the Meeting Management module. |
|
| Usability enhancements | The theme used is WCAG 2.1 AA compliant. |
|
Disclaimer
- As the application evolves, please note that the content/videos/screenshots presented on this help page might differ from the current version of the application. We are doing our best to keep this page up to date.
- All details displayed on the screenshots/videos are from a testing environment, so please consider them as dummy data.
- The menu and options shown could differ depending on user rights.
Access rights
Meeting management application is accessible using an EOL account.
There are 3 different profiles:
Meeting administrators => ETSI Staff, access is not limited depending on Bodies (with few exceptions);
- Super-users
- Body Officials (Chair, Vice Chair, Secretary, Acting Chair, Convenor). In case of Joint meeting, only the Body Officials of the "master"/parent Bodies (i.e., the Body to which the meeting was primarily attached at Meeting creation) are part of the Meeting Super-users group.
- Rapporteurs (active work items' rapporteurs are allowed to create and manage specific type of meetings for their specific groups)
- Room Administrators => ETSI Staff members who are part of the Events (EVE) meeting support team + ITC team.
Meeting category - type matrix
Depending on Meeting category and Body (if it is the case) the user has the possibility to decide what type of meeting to create.
Meeting statuses
UNSAVED = this value is displayed in the meeting creation screen, when the user is starting the creation process, but it has not yet saved any information (it has not yet pressed the “save as draft” button). The value indicates to the user that no information is saved yet in the data base, therefore once the user is quitting the page/closing the browser, the information will be lost. The meeting is not yet displayed in the meeting calendar.
DRAFT = this meeting status is indicating that the “save as draft” button has been saved at least once during the creation process. To be sure that the most recent information added has been saved, the user should press the “save as draft” button. The meeting is not yet displayed in the meeting calendar.
PRECONFIRMED = the user has finished the creation and has pressed the “Publish” button, but the meeting cannot be published until the EVE team is approving the room request. The meeting is not yet displayed in the meeting calendar.
CONFIRMED = the user has finished the creation and has pressed the “Publish” button. All conditions are met for the system to automatically confirm the meeting creation (and room allocation if it is the case). The meeting is displayed in the meeting calendar (unless it has been marked as hidden).
FINALIZED = the end date/time of the meeting is in the past. The meeting is displayed in the meeting calendar (unless it has been marked as hidden).
CANCELLED = the meeting has been cancelled after being Confirmed.
Room statuses
AVAILABLE = a room for which there are no reservations or requests between a specific start/end date/time.
PREBOOKED = when the user is choosing an available and recommended room and saves the meeting as draft.
BOOKED = when the user is publishing a meeting for which it selected an available and recommended room.
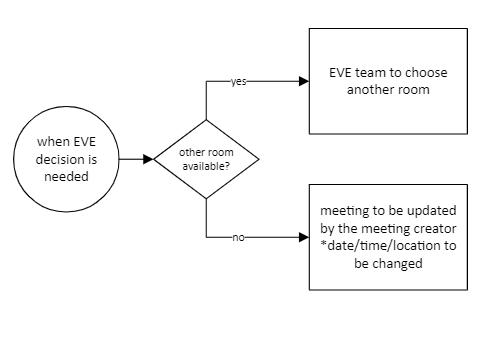
PENDING = when the user is choosing an available, but not recommended room, and it press the Publish button. The meeting will not be published until the EVE team will review the room request. If the EVE team approve the room request, the status of the room becomes Booked. In case EVE team denies the room request, the room status becomes Available.
Room recommendations matrix
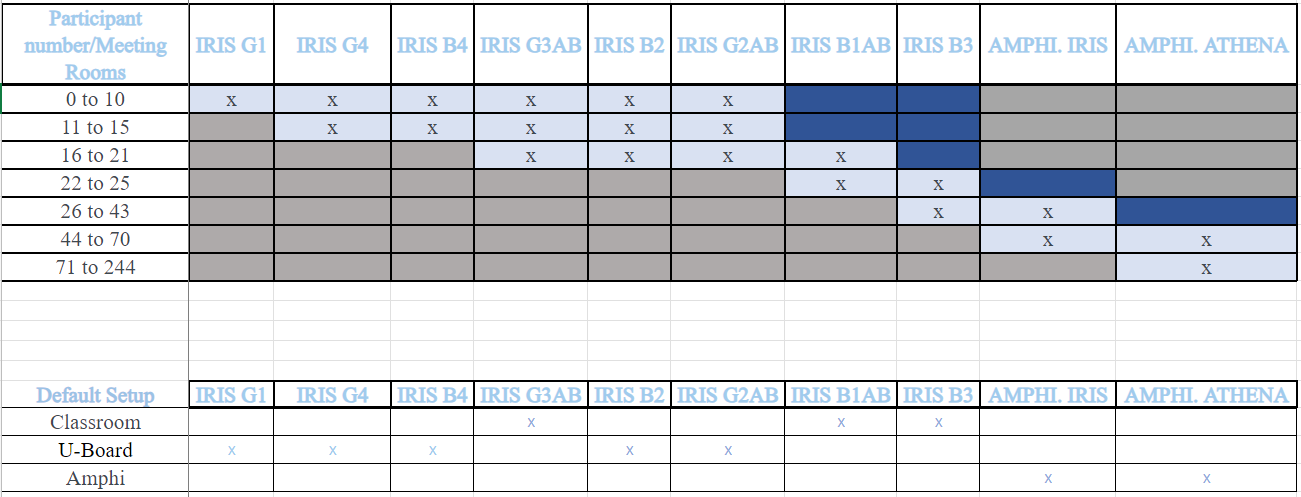
When the meeting is organized on ETSI Premises, the system is recommending a list of meeting rooms, depending on availability and room capacity. Below is the matrix that indicates which meeting room could be displayed as "Available & Recommended" depending on its capacity (marked in this table with "x" and light blue background) and which meeting rooms will be displayed as "Available" (marked in this table with dark blue background).
For more details, please see the legend below:
Create a meeting
For starting the creation of a new meeting, there are multiple options:
- go to https://portal.etsi.org/meetings-management/#/
- if you the user is already on the meetings management administration page (https://portal.etsi.org/meetings-management/#/list), by clicking on "Create meeting" button:
- from the ETSI Portal -> Meeting calendar, by clicking on "New meeting"
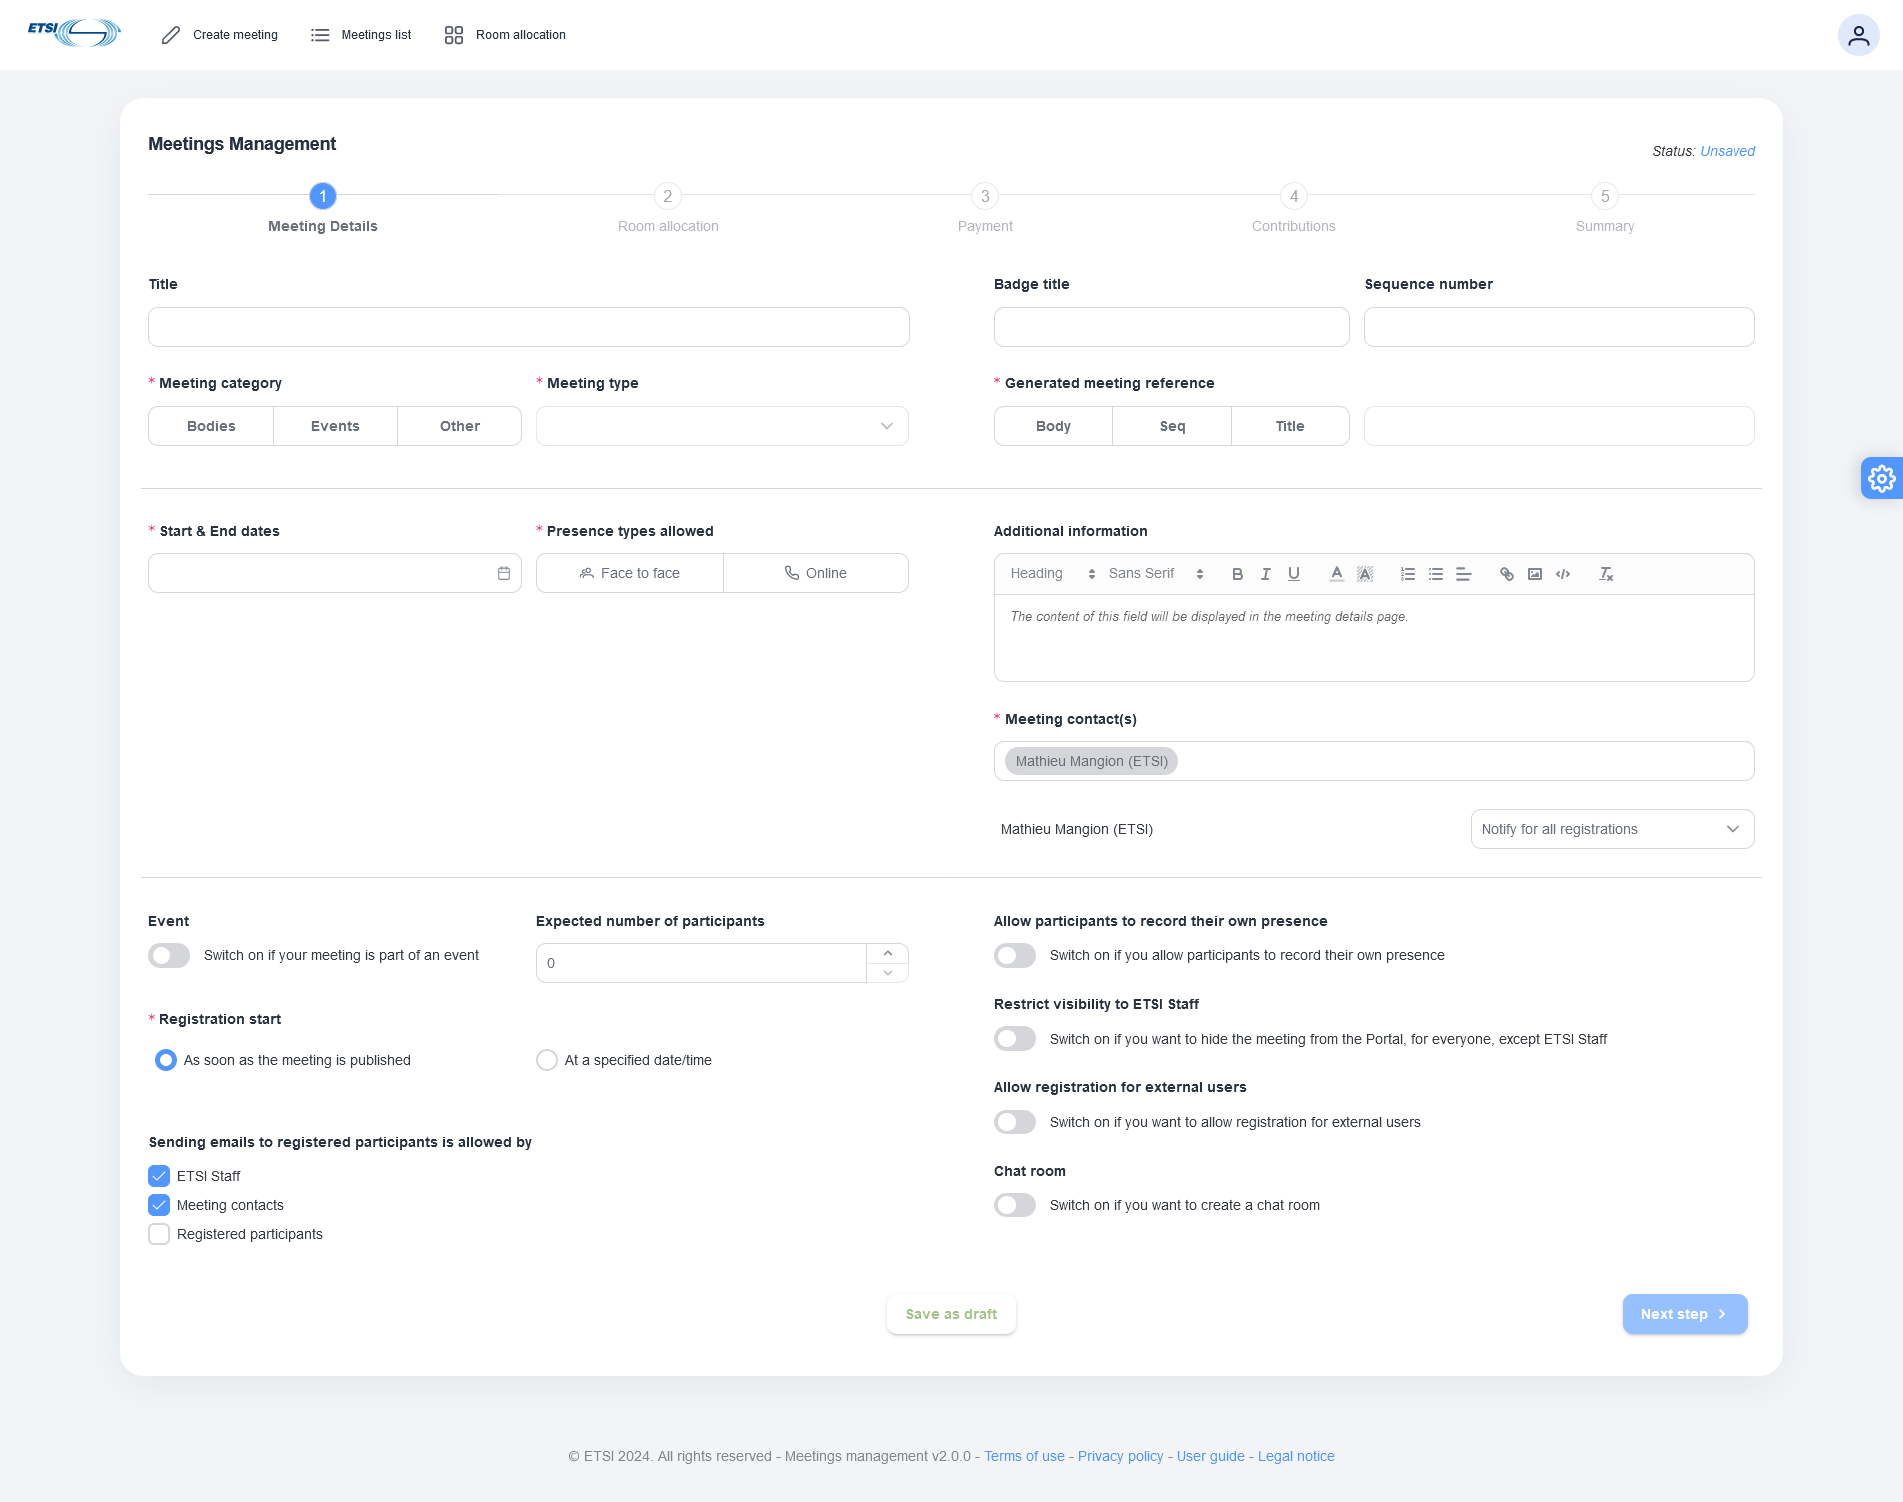
After clicking on 'Create meeting' button on the top-left corner, the user is redirected to the 1st step of meeting creation’s form:
Meeting details
On Meeting Details page, the user must fill in the mandatory fields (marked with *):
- Meeting Category
- Meeting type
- Start & End dates
- Presence types allowed
- Generated Meeting reference
- Meeting contacts
- Registration start
All the fields and drop-down options not marked with a * are considered optional.
(Some mandatory fields might be prefilled, but the user can still edit them).
Once all the mandatory fields are filled in (and some optional, depending on the user‘s needs), the user has 2 options to continue at the bottom of the Meeting details screen:
- either click on the ‘Save as draft’ button – this will save your meeting as a draft;
- Or click the button ‘Next step’ to go to the next step
Useful tip:
Hover over your mouse on an input field, little tooltip appears, providing you with essential info or guidance:
Below is a short demo video covering the 1st step of Meeting creation:
Room allocation
"Room allocation" is the 2nd step of the meeting creation process. The user can proceed to the room allocation after completing the ‘Meeting Details’ step and only if the meeting location is "ETSI Premises".
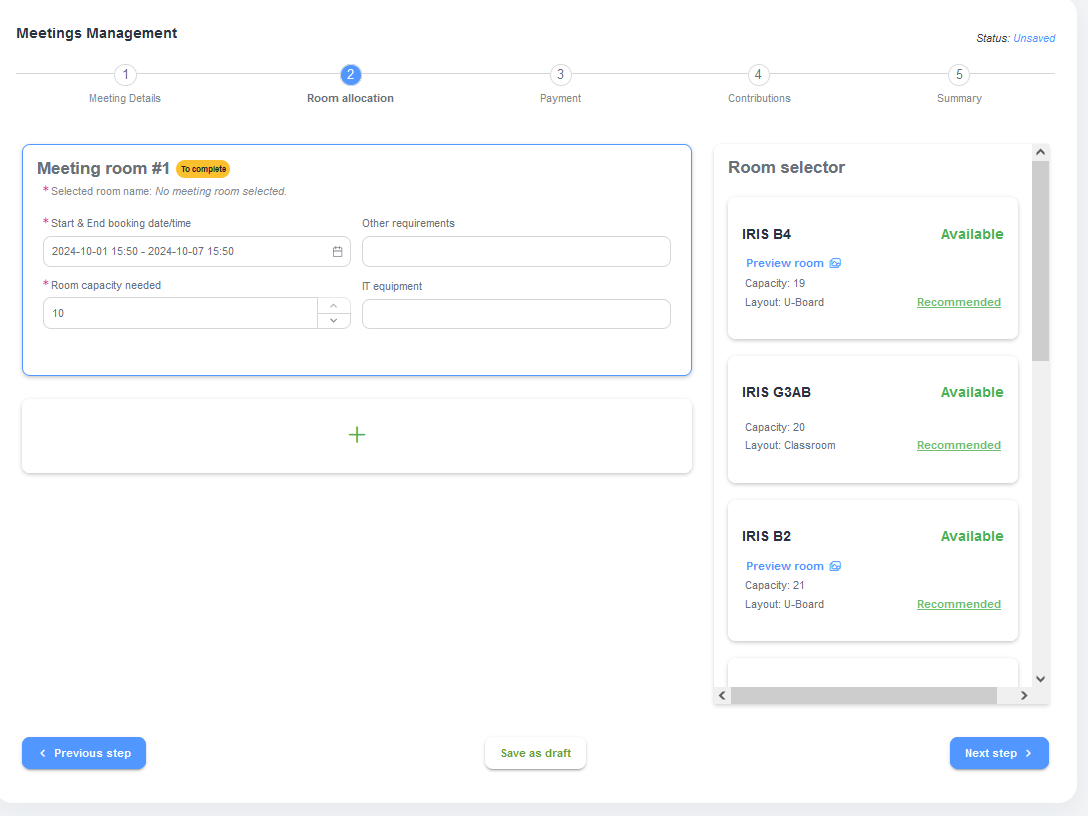
Once landed on step 2, the user will see the following screen:
The user needs to fill in all the necessary fields marked * about the desired meeting room:
- Start & End booking date/time and Room capacity needed are prefilled from the previous step; the user can edit the information upon the needs;
- The user can request here special IT equipment they need for the meeting or any other requirements (like whiteboards, post-its, etc):
- There is an option to add more rooms to the meeting – pressing the green plus button below meeting room #N. When pressed, Meeting Room #N appears and "Start & End booking date/time" and "Room capacity needed" are mandatory to fill in.
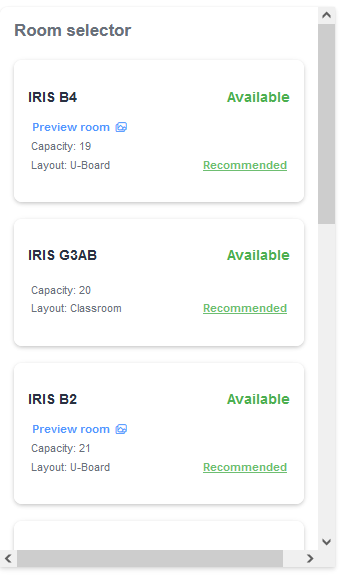
On the right side of the screen, there is a Room selector that offers the possibility to choose the room for the meeting. The best suitable options will be marked as ‘Available and ‘Recommended’:
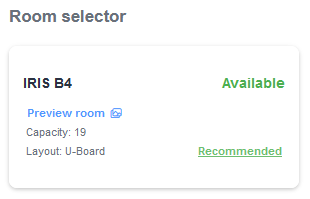
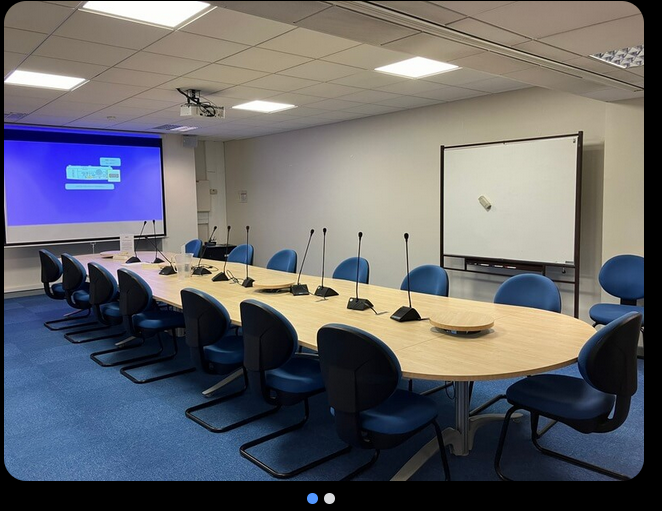
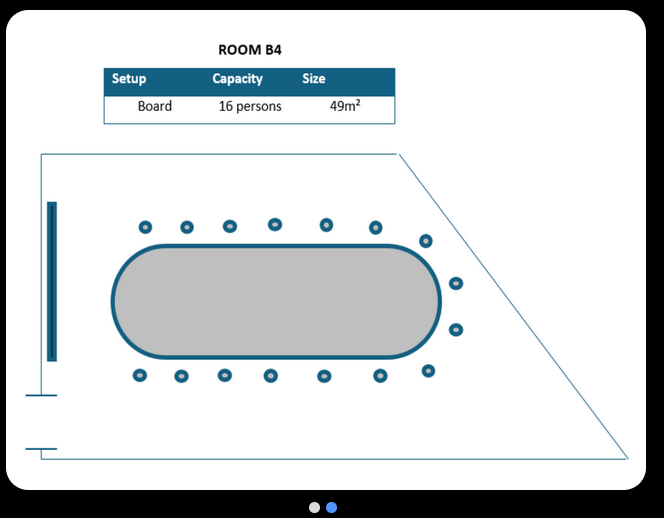
To preview the room, the user must click on the blue text ‘Preview room’ under the room name in the room selector, that will lead them to the pictures of the room:
The user must select the desired room by clicking on it on the room selector:
- The Room becomes highlighted
- Meeting Room #N label changes from ‘To complete’ to ‘Completed’
The user can proceed to the next step, go back to the previous step or save the meeting as a draft.
- If the meeting being created is NOT taking place at ETSI premises, at the 2nd step ‘Room Allocation’ , the user will see the following message on the screen:
From this screen, the user is able to go back to ‘previous step’, continue with meeting creation choosing ‘next step’ button or opt for ‘save meeting as a draft’.
Payment settings
(!!!Payment feature is deactivated for now)
The meeting creator can activate the payment settings and select if the fees will be applied only to non-members or to all participants.
Also, depending on the Presence type allowed (Face to Face and/or Online), it is possible to choose / enter the applicable fees.
Contribution settings
Contributions is the 4th step of meeting creation process and it will be activated only if Meeting category=Bodies.
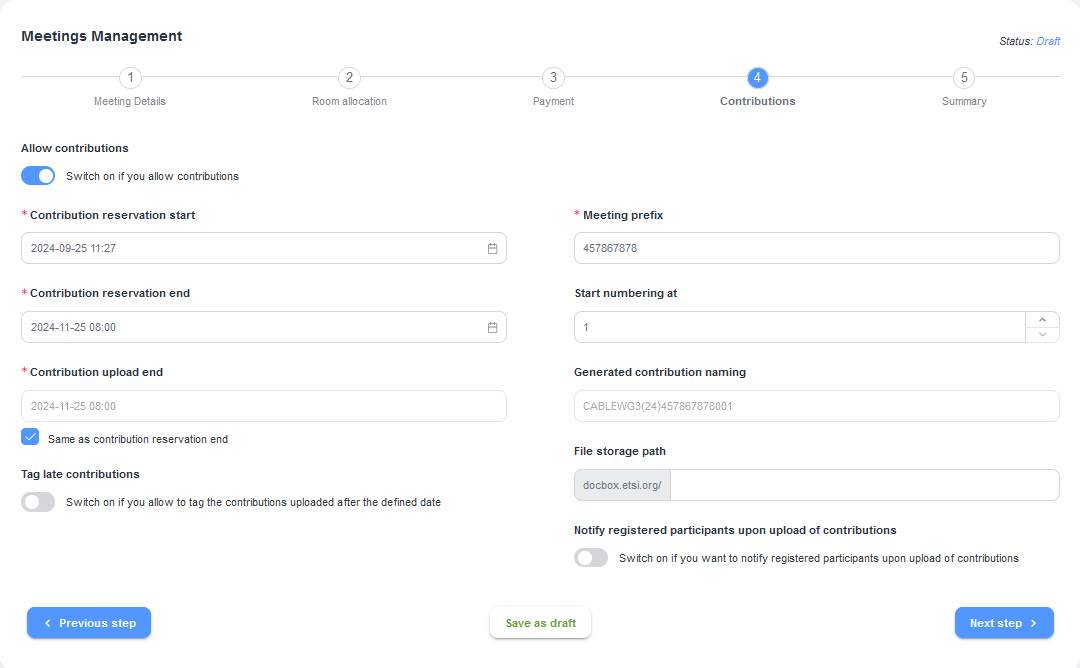
Once on the Contributions screen, the user may opt for allowing contributions to a meeting simply by switching ‘Switch on if you allow contributions’ on:
Once the switch is on, the user must fill/check/edit the mandatory (marked with *) Contribution allocation fields:
- Contribution reservation start;
- Contribution reservation end;
- Contribution upload end;
- Meeting prefix.
Once all mandatory Contribution settings are defined, the user can continue to the next step, go back to the previous step or save the meeting as a draft.
Summary
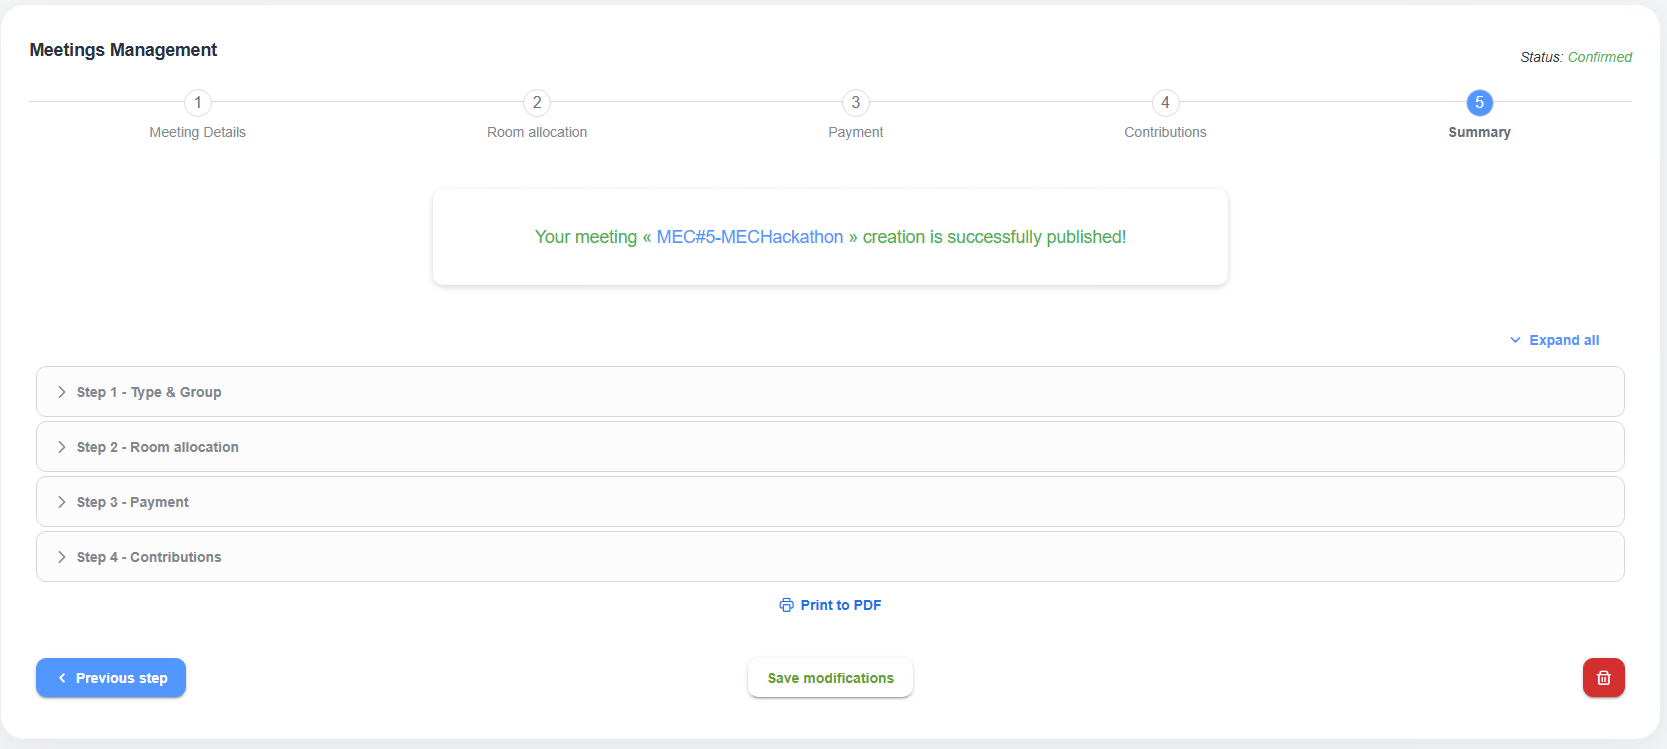
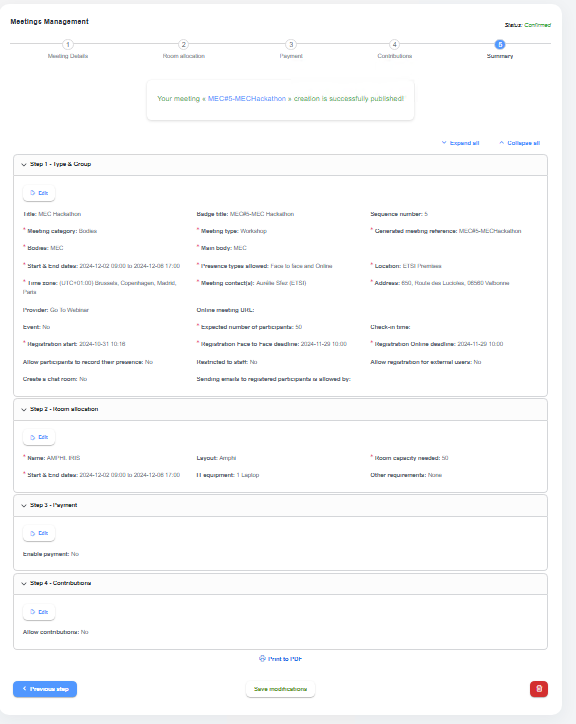
The last step of meeting creation process is the Display of the meeting's summary:
- All the meeting details (all the field labels and values chosen) are summarized inside a collapsible/expandable section, divided into groups (which correspond to the previous steps:
- A complementary print-to-PDF option “Print to PDF” appears below the meeting details section:
- At the bottom of the Summary screen, there are several action buttons. The user can go back to the previous step, save the meeting as a draft (allowing the user to save the changes in the database, but without making the meeting public, the meeting is saved in status "DRAFT"), publish or delete the meeting:
View meeting list
The user can view he meeting list by clicking the action button "Meeting list" on the top-left corner of the page.
Once this action is done, the list of meetings is displayed.
Several filters are available for a more precise search results, as well as the search window if the user knows details like meeting reference, title, body etc. Also, the user can use the sorting options for each of the columns or it can filter the meetings he/she created.
Update/Edit meeting
If the user has the permissions to update meetings, he/she can do so in several ways:
- by accessing the meeting update page via “...”>”Update Meeting” buttons from the Portal’s meeting calendar;
- from the meeting’s details page via the Portal and select the option “Update Meeting”;
- using the Meetings list and press the Edit button.
Then the user is redirected to a Meeting Detail’s screen where they can start editing the desired information. Once the modifications are done, at the bottom of the page at each step of modification, there is save modifications button.
Upon clicking on it, the meeting is updated, and a confirmation pop-up message is displayed in the top right corner of the screen.
The video below is presenting the Update/Edit process:
Clone meeting
To clone a meeting, the user needs to identify a source meeting from a meeting list and click on the button ‘clone’.
A confirmation pop-up will be prompted on the screen, asking to confirm or cancel the action.
If the user clicks on ‘Yes,’ he/she is redirected to the Meeting Details screen, where the information from the source meeting was cloned, except the Start and End Date/Time.
To avoid duplications, it is mandatory to select new Start and end dates. Then, the user might modify other input fields, depending on their needs.
The user can continue modifying/verifying Meeting information by following the steps in Meeting Creation. At any step, the user can save the meeting as a draft or publish it (if all mandatory details are filled in).
An explanatory video is presented below:
Cancel meeting
To cancel a meeting, the user needs to identify the meeting from a meeting list and click on the ‘cancel’ button ![]() :
:
A confirmation pop-up will be prompted on the screen, asking to confirm or cancel the action:
If the user clicks on ‘Yes’, the meeting is cancelled:
A cancelled meeting will still be displayed on the Meeting calendar via the ETSI Portal (and/or 3GPP Portal if the meeting body is 3GPP) with a red label.
If the meeting location is on ETSI Premises and a room booking has been made, the cancellation action will automatically release any reservation or cancel any request.
Delete meeting
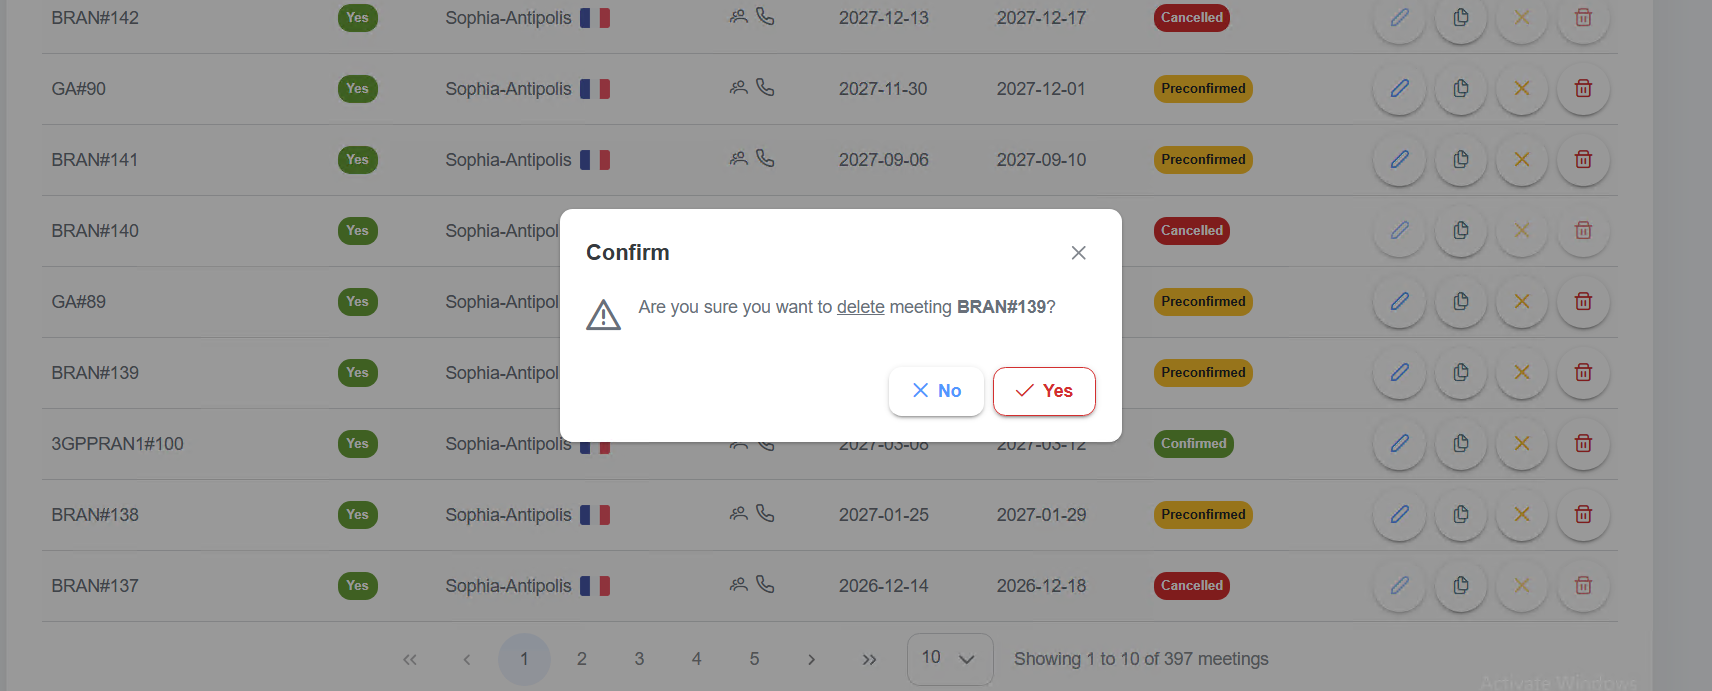
To delete a meeting, the authorized user needs to identify the meeting from a meeting list and click on the ‘delete’ button  :
:
A confirmation pop-up will be prompted on the screen, asking to confirm or cancel the action:
If the user clicks on ‘Yes’, the meeting is deleted, and a confirmation pop-up message is displayed on the top right corner of the screen.
A deleted meeting will no longer be displayed on the Meeting calendar via the ETSI Portal (and/or 3GPP Portal if the meeting body is 3GPP).
If the meeting location is on ETSI Premises and a room booking has been made, the deletion action will automatically release any reservation or cancel any request.
View Room allocation (for all users)
Any meeting creator has the possibility to access the Room allocation screen and see the full list of meeting rooms (+ capacities) and the reservations that are already done.
By default, the weekly view on the current date is displayed. The user can:
- change the weekly view by choosing the day view or the monthly view;
- navigate in the past or the future using the left/right arrows and press the "Today" button to see the current date;
- filter by meeting room status (see Room statuses for more details).
The user can click on one of the meeting room reservations to view more details about the reservation. The "View meeting link" will also land on the meeting page.
For more details about the process flow, please watch this video:
Email notifications
| Notification topic | Send | Details |
| Meeting created (saved as draft) | TO: meeting creator | One-time notification about successful meeting saved as draft. It will be send only for the first "Save as draft" action. |
| Meeting published | TO: meeting creator
CC: meetings@etsi.org (if ETSI Premises) |
One-time notification about successful meeting publication |
| Answer to your room requested for meeting | TO: meeting creator
CC: meetings@etsi.org |
When meeting room booking has been approved. |
| Change to your room requested for meeting | TO: meeting creator
CC: meetings@etsi.org |
When meeting room booking has been updated. |
| ETSI rooms pre-booking reminder | TO: meeting creator
CC: meetings@etsi.org |
Several reminders when meeting status = “Draft” and has at least one ETSI room request in status “prebooked”. |
| Maximum room capacity reached | TO: meeting creator
CC: meetings@etsi.org |
When the meeting room allocated to the meeting has almost reached the maximum capacity. |
| Meeting updates | TO: meeting creator
CC: meetings@etsi.org (if ETSI Premises) |
Updates taken into account: start & end dates, time, location, presence type, allocated meeting room. |
| Meeting canceled | TO: meeting creator
CC: meetings@etsi.org (if ETSI Premises) |
When a meeting is canceled. If ETSI Premises any room that was prebooked or booked will be now automatically released. |
| Notification topic | Send | Details |
| Non-recommended room requested for meeting | TO: meetings@etsi.org
CC: meeting creator |
When the selected room is not marked as “Recommended” and the user clicks "Save as draft" or “Publish meeting”. |
| List of local meetings without room request | TO: meetings@etsi.org | List of local meetings without room request, with start date less than 1 month. Notification to be sent each Monday. |
| Notification to Meeting support for Other requirements | TO: meetings@etsi.org
CC: meeting creator |
Once the field "Other requirements" from the "Room allocation" screen is filled in and the meeting is published, a notification will be sent to the Meeting support team and cc'd to the meeting creator. |
| Meeting update @registered participant | TO: registered participant | Updates taken into account: start & end dates, time, location, presence type. |
| Meeting canceled @registered participant | TO: registered participant | When a meeting is canceled. |
| Notification to IT for IT equipment | TO: helpdesk@etsi.org
CC: meeting creator |
Once the field "IT equipment" from the "Room allocation" screen is filled in and the meeting is published, a notification will be sent to the Helpdesk team and cc'd to the meeting creator. |
