Action List: Difference between revisions
No edit summary |
mNo edit summary |
||
| (13 intermediate revisions by 3 users not shown) | |||
| Line 1: | Line 1: | ||
==Scope of the Action List | ==Scope of the Action List Application== | ||
This application allows ETSI | This application allows ETSI committees to use the portal for the follow-up of their action items and the maintenance of their action list. | ||
:* It gives high visibility to the core action list of TBs by placing them on their portal page rather than in hidden annexes of meeting reports. | |||
:* It allows dynamic feedback and update of actions. | |||
With this application, the '''action list is alive''': at any time logged '''users provide feedback''' by adding remarks to existing action items, while '''officials create and update the status of action items'''. | |||
The application also produces html and CSV reports to be copied/pasted in meeting minutes as snapshots. | |||
With the Action Lists application, delegates will no longer arrive at a meeting and discover that they have an action item assigned to them since the last meeting that they have forgotten about... ;-) | |||
==Search and list Action Items (AI)== | ==Search and list Action Items (AI)== | ||
| Line 102: | Line 111: | ||
'''Actors''': TB/WG/TG Chairman, Vice-Chairman and Secretary; TB support staff | '''Actors''': TB/WG/TG Chairman, Vice-Chairman and Secretary; TB support staff | ||
<html> | |||
<iframe width="420" height="315" src="http://www.youtube.com/embed/J1QD6-6QNPw" frameborder="0" allowfullscreen></iframe> | |||
</html> | |||
In order to be able to create an AI you first need to be logged in to the portal. Click on the "create new" link in the portlet or in the Action List application itself. | In order to be able to create an AI you first need to be logged in to the portal. Click on the "create new" link in the portlet or in the Action List application itself. | ||
| Line 136: | Line 150: | ||
When the action items fields are filled, click on the button ‘’SAVE’’. The system displays a creation wrap up pop-up of the created AI if you have created this AI from the Action List portlet. If you have created the AI from the Action List application itself, then the system refreshes the list of Action Items including the one you've just created. | When the action items fields are filled, click on the button ‘’SAVE’’. The system displays a creation wrap up pop-up of the created AI if you have created this AI from the Action List portlet. If you have created the AI from the Action List application itself, then the system refreshes the list of Action Items including the one you've just created. | ||
==Update the details of one Action Item== | ==Update the details of one Action Item== | ||
| Line 163: | Line 176: | ||
==Change the status of one Action Items== | ==Change the status of one Action Items== | ||
Edit the details of an action item by either clicking on the AI reference from the portlet or select the AI in the list in the AL application. Click on the | Edit the details of an action item by either clicking on the AI reference from the portlet or select the AI in the list in the AL application. Click on the "UPDATE" Button and select the new status you wish to apply to the selected AI and click on the "SAVE" button: | ||
[[File:Change_status_one_AI.png|500px]] | |||
==Add a note to an Action Item== | |||
You first need to highlight the action item you intend to comment in the Action list or to open it from the portlet. The system displays the action details the screen: | |||
[[File:Add_note.png|550px]] | |||
Enter text in the blank note field and click on the "ADD NOTE" Button. | |||
==Update the details of multiple Action Items at once== | ==Update the details of multiple Action Items at once== | ||
| Line 196: | Line 222: | ||
click on the "Change status" button and select the status you wish to apply to the selected Action Items. The system refreshes with the selected status. | click on the "Change status" button and select the status you wish to apply to the selected Action Items. The system refreshes with the selected status. | ||
==Add a note to multiple Action Items== | |||
This is the same process as explained under part "Add a note to an Action item" except that the note will be appended in all selected Action Items. | |||
==Export to CSV== | ==Export to CSV== | ||
When a list of actions is displayed in the Action List Main Screen, actions can be selected and exported to a CSV file. | When a list of actions is displayed in the Action List Main Screen, actions can be selected and exported to a CSV file. | ||
Latest revision as of 09:32, 21 November 2012
Scope of the Action List Application
This application allows ETSI committees to use the portal for the follow-up of their action items and the maintenance of their action list.
- It gives high visibility to the core action list of TBs by placing them on their portal page rather than in hidden annexes of meeting reports.
- It allows dynamic feedback and update of actions.
With this application, the action list is alive: at any time logged users provide feedback by adding remarks to existing action items, while officials create and update the status of action items.
The application also produces html and CSV reports to be copied/pasted in meeting minutes as snapshots.
With the Action Lists application, delegates will no longer arrive at a meeting and discover that they have an action item assigned to them since the last meeting that they have forgotten about... ;-)
Search and list Action Items (AI)
Search for action items
This panel allows a user to perform a search on action items.
The following fields are available for filtering action items:
- Free text search: free text field that searches through the summary, description, contact and origin fields of action items. A mouse over “Search for” will display a tooltip saying “Search text in summary, description, contact and origin fields”
- Community: Autocomplete Dropdown containing all active Technical bodies and Working Groups.
- Include sub groups: checkbox which includes active sub-groups of the selected community. By default, this checkbox is unchecked. However, when coming from the portlet, it should reflect what was displayed in the portlet
- Active Action Items: Checkbox that, if checked, includes in the search action having status “In process” or “Needs action”. By default, this checkbox is checked. A mouse over “Active” will display a tooltip saying “IN-PROCESS or NEEDS-ACTION items”
- Closed Action Items: Checkbox that, if checked, includes in the search action having status “Completed” or “Cancelled”. By default, this checkbox is unchecked. A mouse over “closed” will display a tooltip saying “COMPLETED or CANCELLED items”
- Since: Date field (Free text entry or calendar choice) that restricts the search to “Closed action items” that have reached the “Completed” or “Cancelled” status on or after the selected date. Default value is today minus 90 days.
The following actions are possible from this panel:
- Export to CSV
- Generate link: generates a link to the current page/query with selected view
- Subscribe to RSS: Provides a link to RSS feed for currently displayed query results or favourites.
- Hide/Show filter options
- Search: Refreshes the list with results of the search and leaves the filter options panel open.
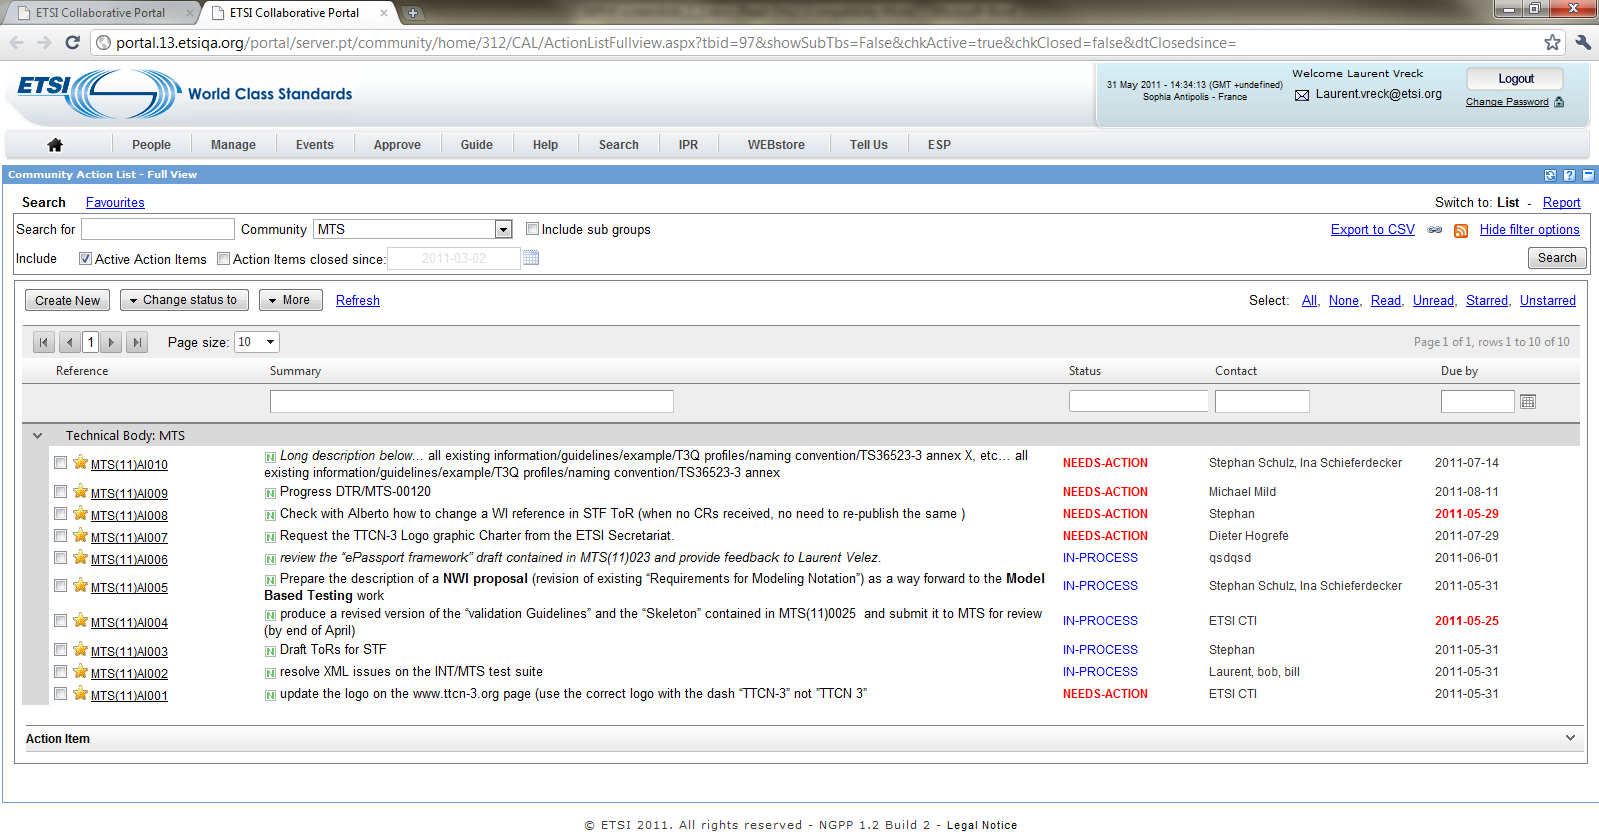
List view
This screen is the detailed list of action items. It presents the results of the query in a list view with the following columns:
- Selected or not (cannot be sorted, cannot be filtered)
- Favourite (cannot be sorted; cannot be filtered)
- Reference (can be sorted; cannot be filtered). Can be clicked to display Action details below the list.
- Summary (can be sorted; can be filtered by text). This column also includes a “New” Icon if the action was created less than 1 month ago.
- Status (can be sorted; can be filtered by choice in a list)
- Contact (can be sorted; can be filtered by text)
- Due by date (can be sorted; can be filtered by date entry and will display all actions which have a due date on or before selected value)
The list is always be grouped by Technical body. The following formatting is used in the list:
- Unread action items: whole line displayed as bold
- Read action items: whole line displayed as regular
- Late action items: Due by date displayed in Red
- Status column
- “NEEDS-ACTION” in red
- “COMPLETED” in green
- “IN-PROCESS” in blue
- “CANCELLED” in grey
The following actions can be performed to select/unselect one or more of visible action items (if the list is filtered, it does not affect hidden items) in the list:
- “All”, selects all visible action items
- “None”, unselects all visible action items
- “Read”, selects all visible action items that have already been read
- “Unread”, selects all visible action items that are marked as unread
- “Starred”, selects all visible items that are in user's favourites
- “Unstarred”, selects all visible items that are not in user's favourites
The following actions can be performed on selected actions in the list:
- Change status to...
- “CANCELLED”
- “COMPLETED”
- “IN-PROCESS”
- “NEEDS-ACTION”
- More... button
- “Edit selected actions”
- “Mark as read”, visible only if at least one of the selected action items is unread
- “Mark as unread”, visible only if at least one of the selected action items is read
- “Add to favourites”, visible only if at least one of the selected action items is not in user’s favourites
- “Remove from favourites”, visible only if at least one of the selected action items is in user’s favourites
- The following general actions can be performed:
- “New action”
- “Refresh”, re-executes the query and refreshes the list view
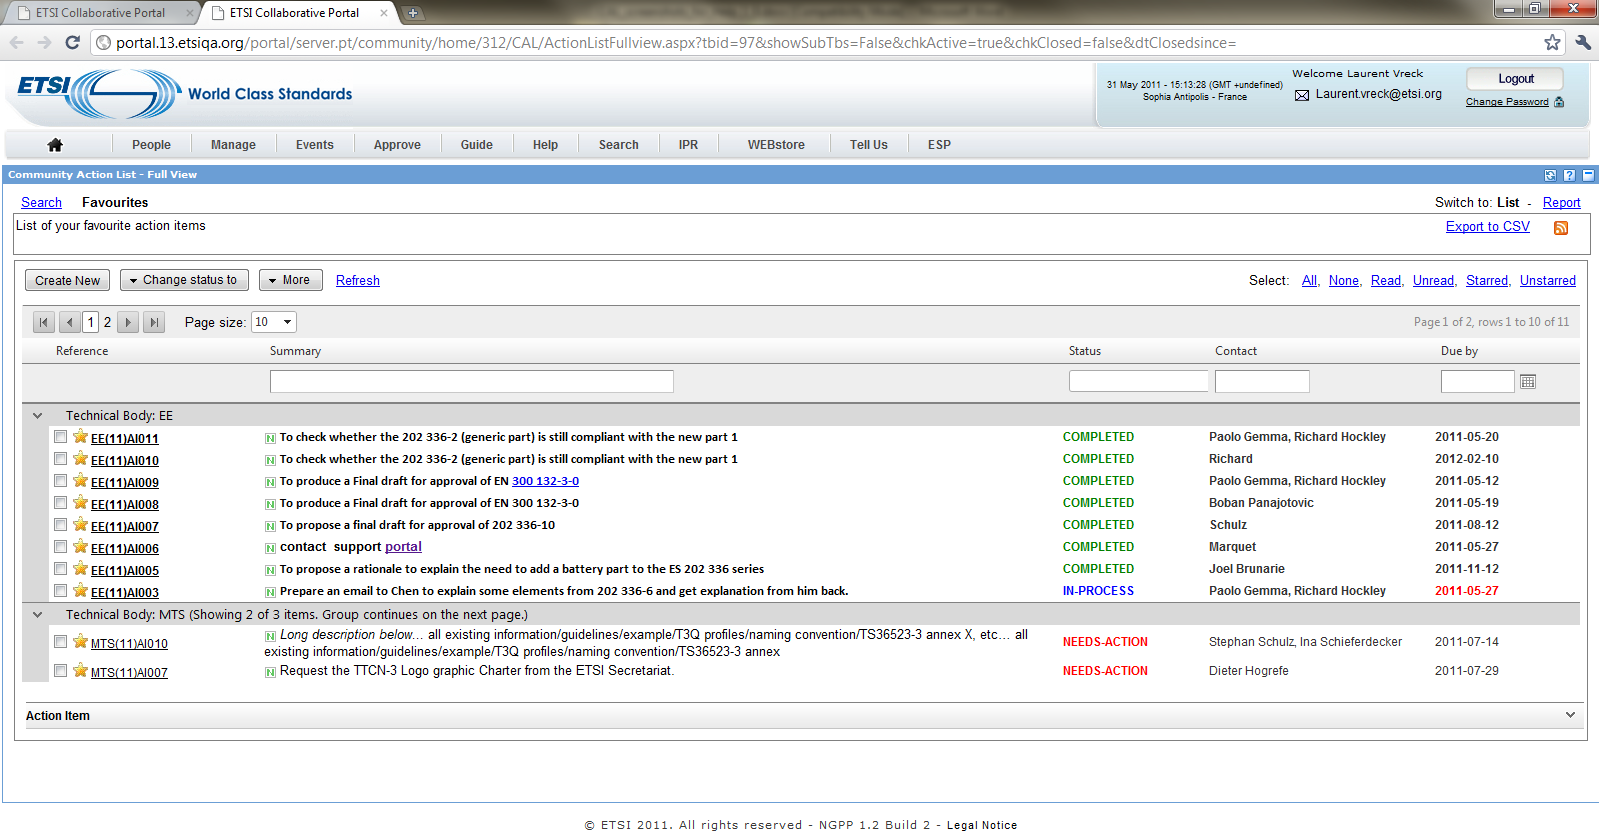
Favourites view
Any user owns a special list of favourite action items, that can be displayed by clicking on the "Favourites" link at the top left of the main screen.
This list can include actions items from several communities and will be displayed independently of their status.
Any action can be added/removed from user's favourite items by:
- select it in the action list and select "Add to favourites" or "Remove from favourites" in the 'More' dropdown menu
- clicking on the 'star' icon
The following actions are possible from this view:
- Export to CSV
- Subscribe to RSS: Provides a link to RSS feed for favourite action items.
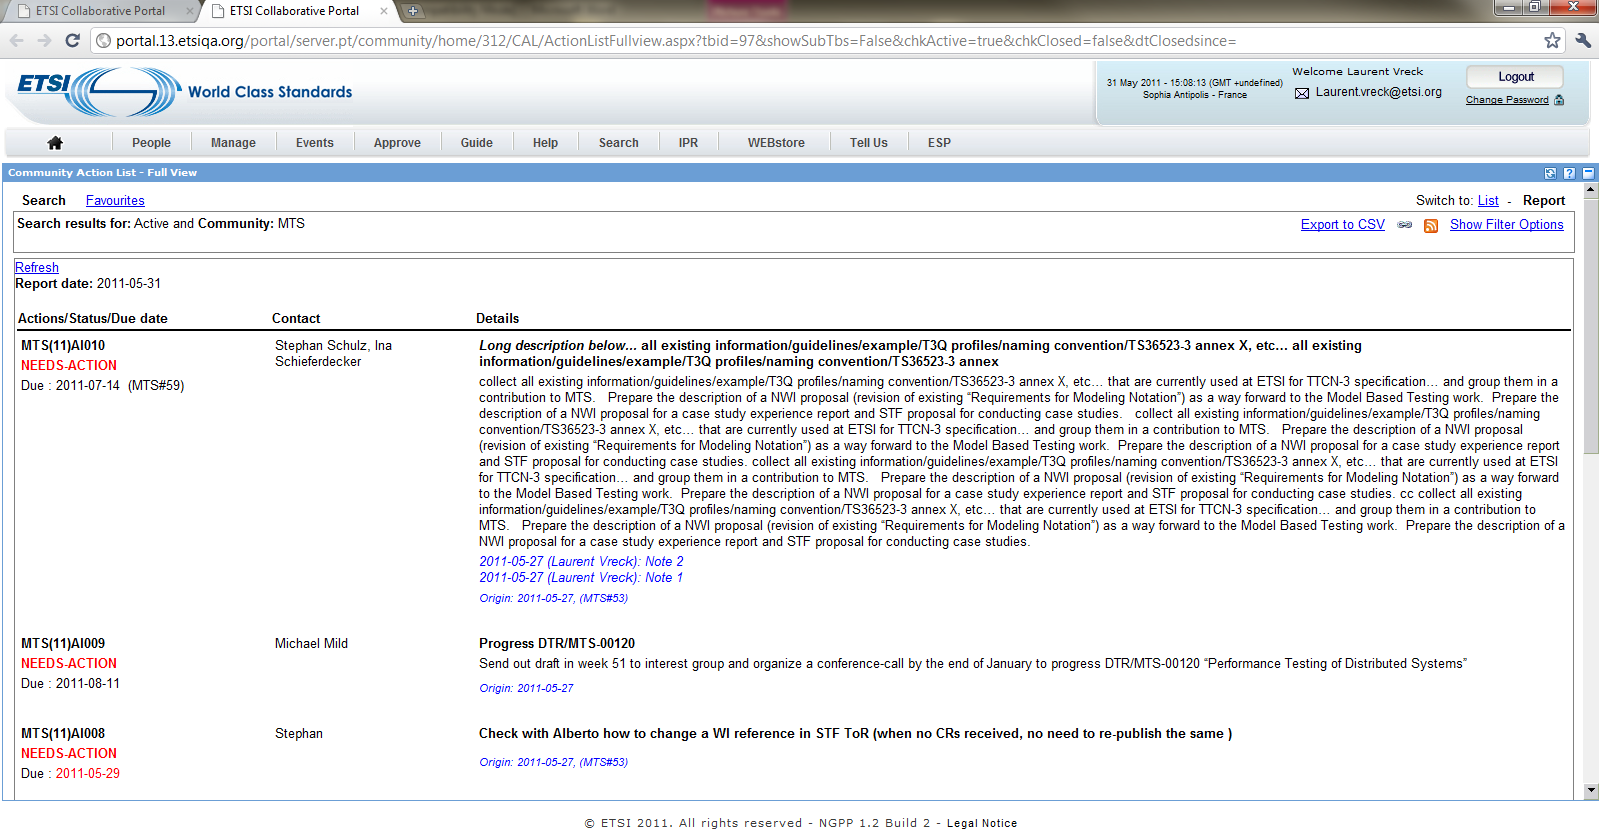
Report view
Any list of actions can be displayed in an HTML report view instead of the usual list of actions. The format of this HTML report is the following:
- 1st column
- <ActionReference>
- <Status>(same colour as in the list view)
- Due: <DueByDate> (<DueByText>)(in red if due date is today or in the past)
- 2nd column
- <Contact>
- 3rd column
- <Summary>
- <Description>(except if empty)
- <Note>(except if empty)
- Origin: <CreatedDate> , (<Origin>)
Create a New Action Item (AI)
Actors: TB/WG/TG Chairman, Vice-Chairman and Secretary; TB support staff
In order to be able to create an AI you first need to be logged in to the portal. Click on the "create new" link in the portlet or in the Action List application itself.
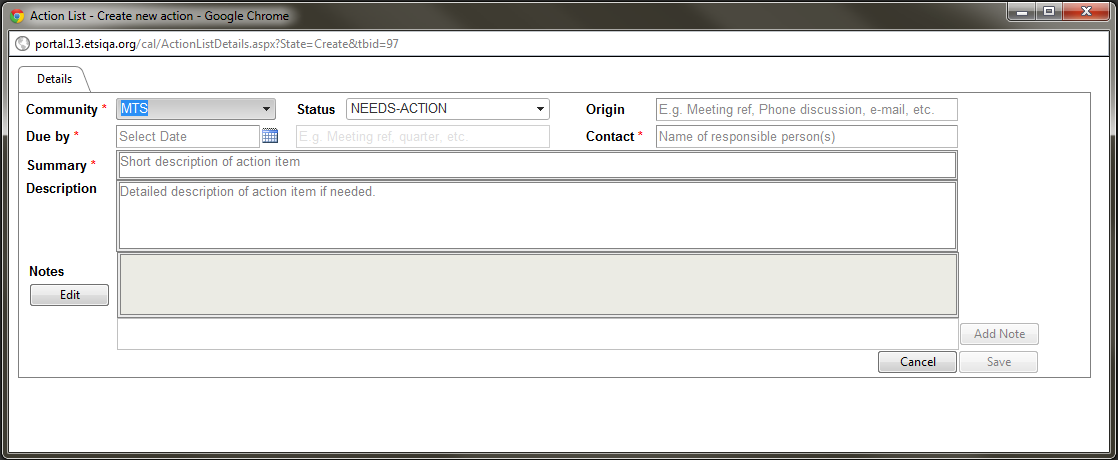
The following creation screen is displayed:
The system displays an empty form which you are asked to fill in. Some of the attributes are mandatory:
- Community: This field is mandatory and automatically shows your TB/WG and all the subgroups which belong to the parent TB. i.e. If you create an AI for TB ERM Then the system will give you the possibility to change the community to any sub-group which belong to ERM.
- Due By: This field is mandatory. This is the date when the AI is expected to be completed. Click on the calendar icon and navigate in the calendar to select the date. You have the possibility to add text in addition should you wish to add for instance the reference of the next meeting i.e. ERM#45
- Contact: This field is mandatory. Enter the name of the responsible person(s) for this AI
- Summary: This field is mandatory. Short description of the AI. You can add to this summary web links and/or email adresses
- Status: When creating an Action Item, the system put the status 'NEEDS ACTION' by default. But you can change this status to any of the other available statuses for an action:
- IN-PROCESS
- COMPLETED
- CANCELLED
- Origin: This text field can be a meeting reference (i.e. ERM#45), a phone discussion, email discussion, remote consensus...
- Description: Detailled description of the AI if needed. You can add to this description web links and/or email adresses
- Notes: This field is by default disabled, should you wish to add a note at the creation of the AI, click on the 'EDIT' button and fill in some text in the 'Notes' field.
When the action items fields are filled, click on the button ‘’SAVE’’. The system displays a creation wrap up pop-up of the created AI if you have created this AI from the Action List portlet. If you have created the AI from the Action List application itself, then the system refreshes the list of Action Items including the one you've just created.
Update the details of one Action Item
Actors: TB/WG/TG Chairman, Vice-Chairman and Secretary; TB support staff
You can update the details of an AI if the status of this action is either "NEEDS-ACTION" or "IN-PROCESS".
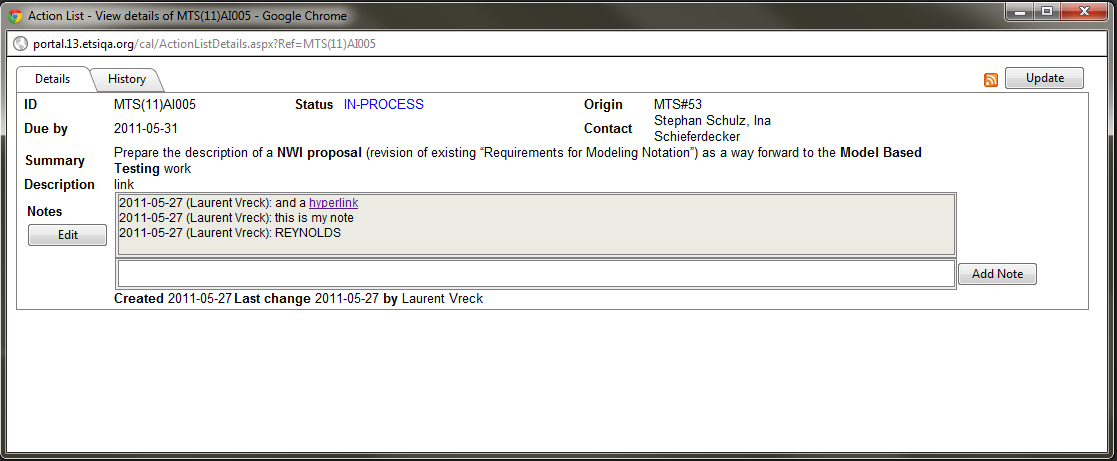
The detailled view of an AI can be accessed by clicking on the AI reference in the portlet and the system displays the following window:
Or by selecting the AI you wish to update in the list of Action Items.
Click on the "UPDATE" button to enable all the Action item properties and update the AI information. Ensure that you don’t leave a mandatory field blank
- Note: If the AI's status you want to update is either "COMPLETED" or "CANCELLED", then change the status of the AI to "NEEDS-ACTION" or "IN-PROCESS" to be able to update the AI properties.
Change the status of one Action Items
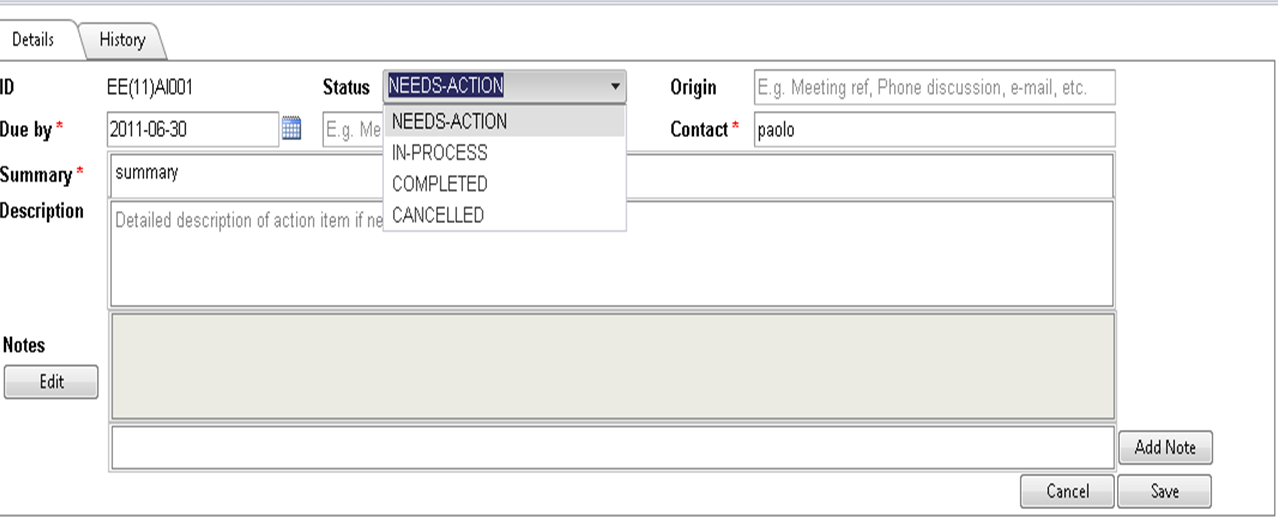
Edit the details of an action item by either clicking on the AI reference from the portlet or select the AI in the list in the AL application. Click on the "UPDATE" Button and select the new status you wish to apply to the selected AI and click on the "SAVE" button:
Add a note to an Action Item
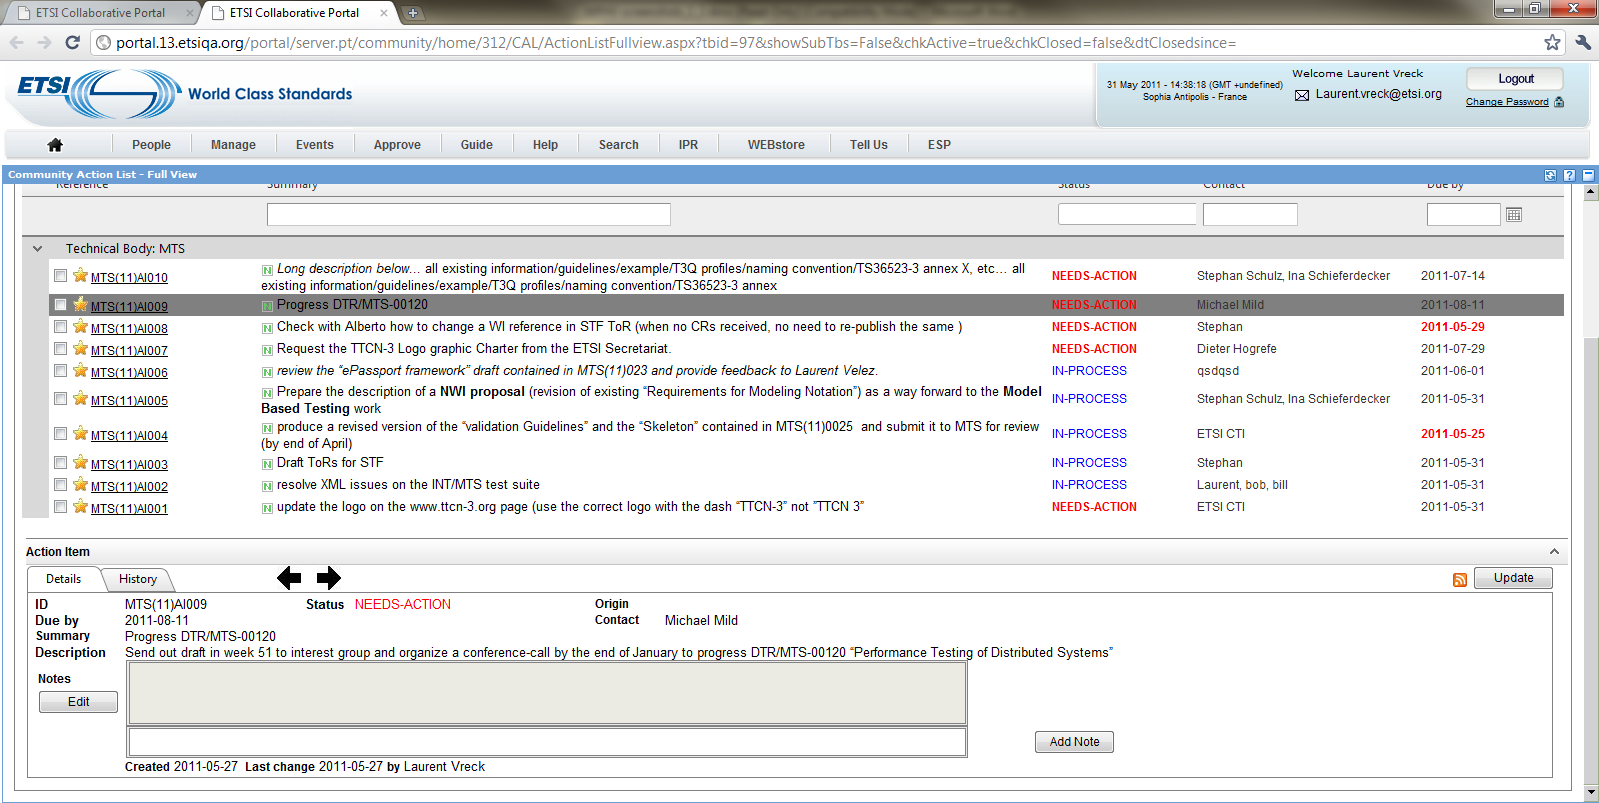
You first need to highlight the action item you intend to comment in the Action list or to open it from the portlet. The system displays the action details the screen:
Enter text in the blank note field and click on the "ADD NOTE" Button.
Update the details of multiple Action Items at once
You can update the details of several action items at once only from the Action List application.
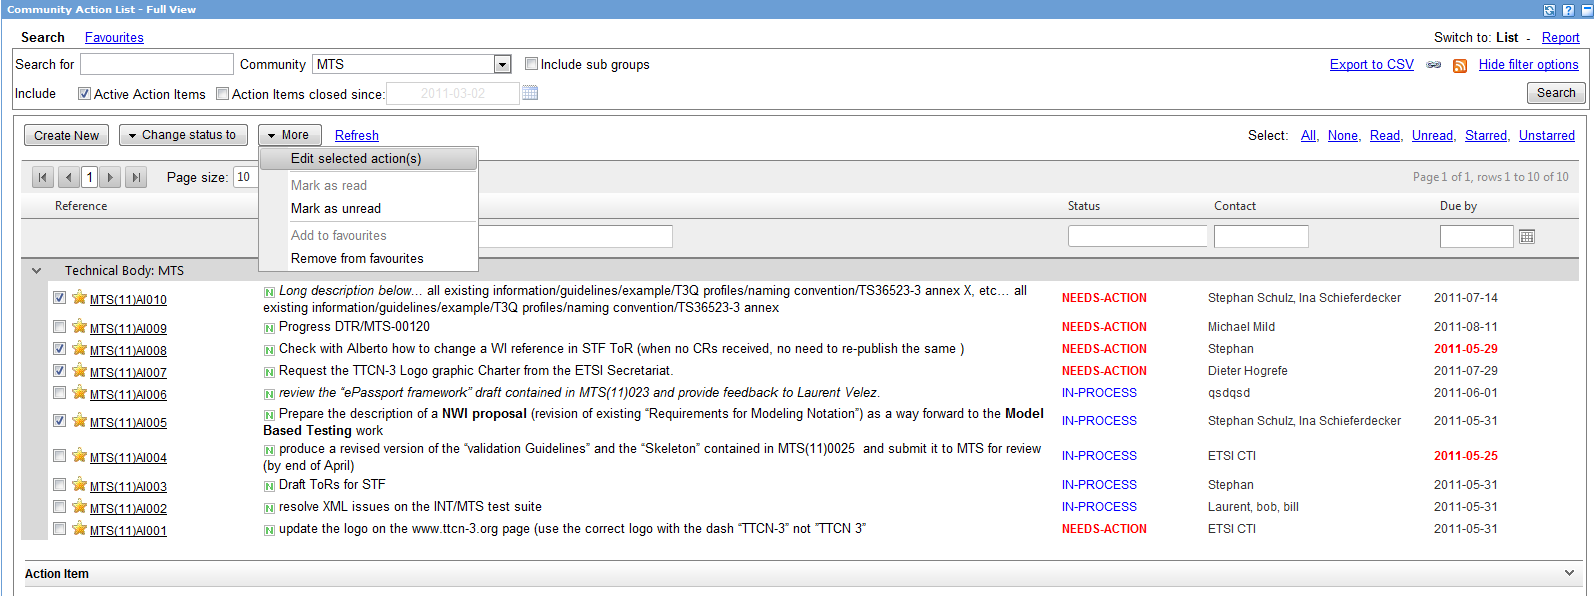
The list of Action items for a community is displayed. Tick several actions in statuses "NEEDS-ACTION" or "IN-PROCESS":
click on the "More" button and select the action (Edit selected actions). the system opens the following pop-up window.
Update the fields you wish to change for all selected AIs.
- If you add a note, then the new text will be appended to the existing content of the note fields of all selected actions.
- If you edit the Note field, then the system will overwrite the existing notes of all selected actions with the new note.
Note: The summary and the description cannot be modified in this configuration.
WARNING: Upon modification of a field the system will overwrite the corresponding field of all selected actions with the new content of the updated field.
When the update of the selected is finished, click on the SAVE button. The system refreshes the list with the changed fields.
Change the status of several Action Items at once
You can change the status of multiple Action Items at once only from the Action List application.
The list of Action items for a community is displayed. Tick several actions in statuses "NEEDS-ACTION" or "IN-PROCESS":
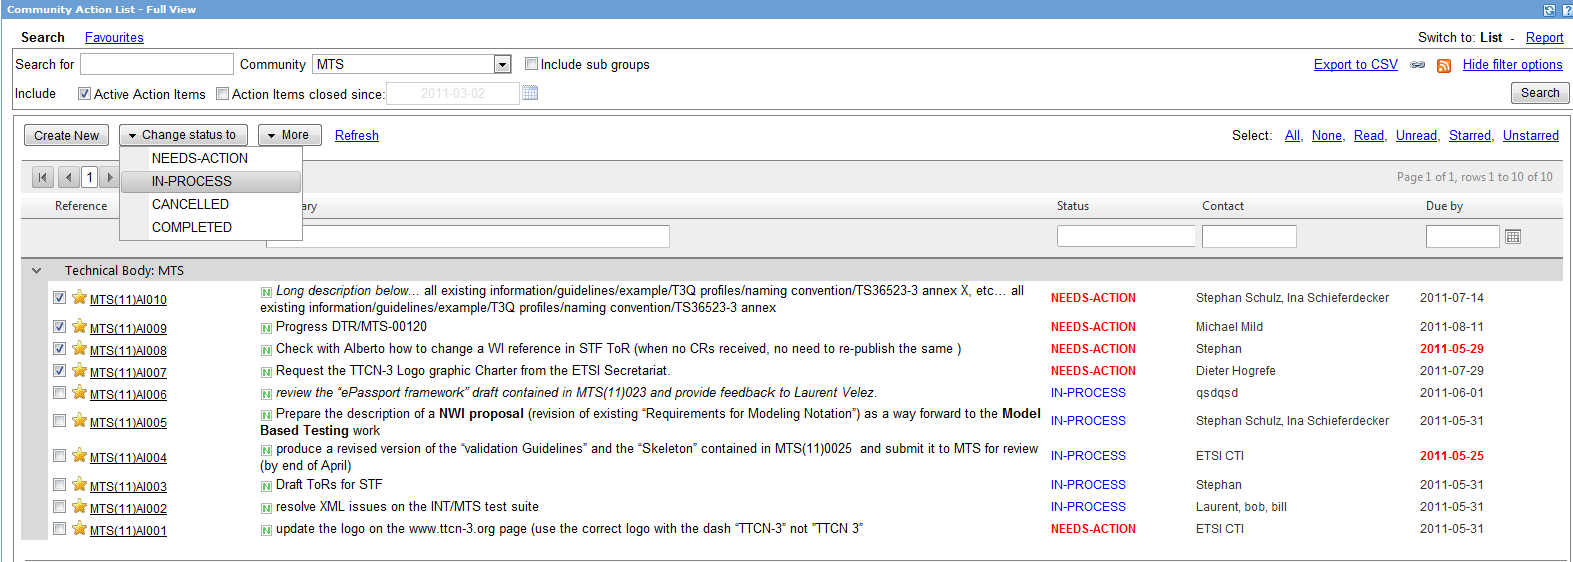
click on the "Change status" button and select the status you wish to apply to the selected Action Items. The system refreshes with the selected status.
Add a note to multiple Action Items
This is the same process as explained under part "Add a note to an Action item" except that the note will be appended in all selected Action Items.
Export to CSV
When a list of actions is displayed in the Action List Main Screen, actions can be selected and exported to a CSV file.
Upon clicking on the "Export to CSV" link, the system generates and "pushes" the exported file to the user.
For each exported Action Item, the system includes the following attributes in the export file:
- ActionReference
- Status
- Contact
- Summary
- DueByDate
- DueByText
- Description
- Note
- CreationDate
- Origin
- ActionItem URL.
